
Installation Sheet

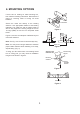
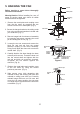
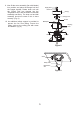
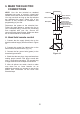
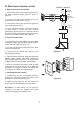
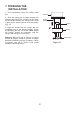
Table Of Contents

4
Before touching a screw driver thoroughly
read these instructions.
Warning/Caution: Before installing fan, turn off
power at service panel and check all visible
screws and bolts for tightness.
1. Remove the metal plate and coupling cover
from the fan motor by removing the two
screws from the rim of metal plate. (Fig. 5)
2. Secure the hanger bracket to the ceiling outlet
box using screws and washers included with
your outlet box. (Fig. 6)
4. Remove hanger ball from down rod assembly
by loosening set screws, removing the cross
pin and sliding ball off rod. (Fig. 7)
5. Loosen the two set screws and remove the
hitch Pin and lock pin from the central
shaft/top coupling of the motor assembly.
Doing so will allow the down rod to enter the
central shaft. (Fig. 8)
6. Carefully feed the fan wires through the down
rod and pull them taut. Thread the down rod
into the central shaft and tighten with the
lock pin and hitch pin previously removed,
re-tighten the set screws against the
downrod. (Fig. 8)
7. Replace the metal plate and coupling cover
to the fan motor by using the screws
previously removed. (Fig. 8)
8. Slide canopy cover (with decorative side
oriented to floor) and canopy (with wide end
oriented to ceiling) onto down rod. Carefully
reinstall hanger ball onto rod. Be sure that
cross pin is in correct position, the set screw
on hanger ball is tight and that the wires are
not twisted. (Fig. 8)
5. HANGING THE FAN
Figure 5
Screws
Coupling
cover
Metal plate
Collar
Fan motor
Ceiling
hanger
bracket
Mounting screws
(supplied with
electrical box)
Hook
Electrical
box
Figure 6
Figure 7
120V Wires
Washers
Downrod
Cross pin
Hanger
ball
Set screw