
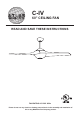
Installation Guide


8
Figure 16
Figure 17
9. ATTACHING THE
MOUNTING PLATE
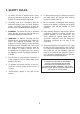
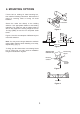
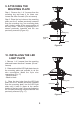
Step 1. Remove the 1 of 3 screws from the
mounting ring and keep it for future use.
Loosen the other 2 screws. (Do not remove)
Step 2. Place the key holes on the mounting
plate over the 2 screws previously loosened
from the mounting ring, turn mounting plate
until it locks in place at the narrow section of
the key holes. Secure by tightening the 2
screws previously loosened and the one
previously removed. (Figure 16)
Screws
Mounting ring
Mounting
plate
10. INSTALLING THE LED
LIGHT PLATE
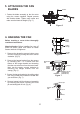
1. Remove 1 of 3 screws from the mounting
plate and loosen the other 2 screws. (Do not
remove)
2. Raise and hold the LED light plate close to
the mounting plate and proceed to do the
wire connections. Make the 2-pin wire
connections: (Fig. 17)
- White to white
- Black to black
3. Place the key holes from the LED light
plate over the 2 screws previously loosened
from the mounting plate, turn the LED light
plate until it locks in place at the narrow
section of the key holes. Secure by tightening
the 2 screws previously loosened and the one
previously removed. (Fig. 17)
LED Light plate
Mounting plate
Connectors
Screws