Maxell Portable Wireless Hard Drive User manual 1
Contents Product Overview..……………………………………………………………………………………………….….4 Identifying the Parts……………………………………………………………………………………………..…..5 Specifications ……………………………………………………………………………………………….…….…6 What’s in the Box…………………………………………………………………………………………….………8 Getting Started………………………………………………………………………………………………….……9 LED status lights…………………………………………………………………………..…………………………9 Air-Stream App for Maxell Portable Wireless Hard Drive……………………..…………..………………….
viii. ix. x. xi. xii. Restart Firmware Upgrade Shutdown Factory Default Language Air-Stream Wi-Fi Setting for Android ………………………………………………………………………..…..33 Air-Stream Manual ……………………………………………………………………………………………......34 VIII. Browse Files IX. Upload Files X. Download Files XI. Move Files & Folders XII. Copy Files XIII. File folder Variation i. Rename ii. New Directory iii. Delete XIV. Settings i. Username & Password ii. Device Name iii. Security iv. Internet Access v. Power Saving vi. Date & Time vii.
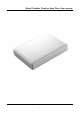
Product Overview Mobile Wireless Storage The Maxell Portable Wireless Hard Drive allows access to your personal videos, music, photos, data wirelessly and streaming it to your mobile devices such as iPad®/Tablet, Smartphones and more. By using its internal hard drive storage, there is no need to worry about running out of space on your mobile devices. At the same time, the Maxell Portable Wireless Hard Drive has a built in rechargeable battery.
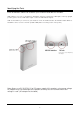
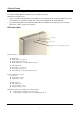
Identifying the Parts Power On/ Off Button: Switches On and Off the power of Maxell Portable Wireless Hard Drive. LED Indicators: You can see the Wireless Hard Drive status by looking at the LED Lights on the top (upright position), please refer to “LED status Lights” section for LED indicator signals. USB 3.0 Port: When you connect to your Notebook or PC via USB 3,0 Cable, the Maxell Portable Wireless Hard Drive can be used as a 2.
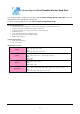
Specifications General Interface IEEE 802.11b/g/n USB 3.0 Micro-B Data Transfer Rate Wi-Fi up to 150Mbps USB 3.0 up to 5Gbps Main Chip Ralink RT5350 2.4G / WPA and WPA2 VIA Labs VL701 USB 3.0 / SATA II HDD Capacity 2.5" hard disk up to 1.5TB (SATA I or SATA II) HDD Format FAT32 / NTFS LEDs Power LED : White + Blue Battery LED : Green + Red Bridge LED : Orange System Requirement Wi-Fi iPad®, iPhone®, iPod touch® - iOS 5.0 and above Android tablets and smartphones - Android 2.
Battery Li-Polymer 2800mAh Temperature Operating: 0 ~ 40°C Storage: -10 °C ~ 60°C Humidity Operating: 65±20% RH non-condensing Storage: 65±20% RH non-condensing Package Contents USB 3.
What’s in the Box 1 Maxell Portable Wireless Hard Drive x 1 2 Quick Guide X 1 3 USB 3.
Getting Started Prepare the HDD for your first use The Maxell Portable Wireless Hard Drive is pre-formatted as FAT32. Windows 8/7/Vista/XP users: Connect your Maxell Portable Wireless Hard Drive to your computer via the USB cable attached, press the on/off switch, your computer should be able to detect and install this product automatically.
Air-Stream App for Maxell Portable Wireless Hard Drive The Air-Stream App is designed for and works with the Maxell Portable Wireless Hard Drive. You can download from iTunes App Store® or Google Play. For how to install the App, please refer to How to obtain the App(IOS/Android) Air-Stream App Features: Allows tablets and smartphones stream all the media files, documents wirelessly. Supports 5 devices streaming video at the same time. Supports 5 devices accessing documents, music and photos.
How to obtain the App(IOS/Android) Android devices: Search “Air-Stream” in Google play market: IOS devices: Search “Air-Stream” in App store® or iTunes® website: 11
Air-Stream for IOS Connecting the device: Step 1: After installing the Air-Stream App, power on the device. Search for the wifi connection named “Max-Stream_xxx” (xxx is the last 4 digit of the MAC address of your device.) Tap MAX-Stream_XXX on the Wi-Fi Manager, and then enter password 12345678. Step 2: After successful connected to Maxell Portable Wireless Hard Drive, launch the Air-Stream App by tapping the icon.
I. Browse Files Browse all the files, including documents, music, photos, and videos, on the remote device (Portable Wireless Hard Drive), or the local files on the local side (your Smartphone/Tablet/device). To browse MP3 files as an example. All files> Music > *.mp3 Step 1. Tap All Files Step 2. Tap music folder to browse all MP3 files. Step 3. Tap a file to play music. Back: Tap the icon Main menu: Tap the icon on the grey bar to go back the previous layer.
II. Upload files Upload files from the local files to Maxell Portable Wireless Hard Drive. Upload files from Local Files to the remote device. The App will upload files to the target folder according to filename extensions, including documents, music, photos, and videos. Other kinds of files will go to the Others file folder. Example on how to upload music files. Step 1. Tap Local Files. Step 2. Tap Music ( ) Step 3. Select music files and tap upload , or tap to select all music files. Step 4.
III. Download files Download files from the Maxell Portable Wireless Hard Drive to local storage. Download files from the Maxell Portable Wireless Hard Drive, including documents, music, photos, and videos, to Local Files, and the App will download files to your target folder according to filename extensions. For files not defined as music, such as photos, videos, or documents – these will go to the Others folder. There are two ways to download music files. 1. All Files >Music > mp3 songs Step 1.
IV. Move files/folders You can move a file or a folder within the app, below are the steps on moving file/folders 1. Move a file: Move a file from a files folder to a target folder: For example: to move a music file: All Files > Music Step 1. Tap All Files and then tap Music Step 2. Tap the blue icon on the right of a music file. Step 3. Select Move Step 4. Go to target folder. Ex. /Music Step 5. tap Move on the bottom bar. / Others Or tap X to cancel.
2. Move a folder Move a file folder to another location. For example: To move a file folder named 01. favourite (Please see New Directory on how to add a new folder) All Files > 01.favorite All Files > Music > 01. Favorite Step 1. Tap All Files Step 2. Tap the blue icon Step 3. Select Move. Step 4. Tap Music folder Step 5. Tap Move on the bottom bar. Or tap X to cancel. on the right to the folder.
V. Copy files Copy files and paste to the target file folder. For example, copy a music file from folder to folder. All Files > Music > *.mp3 Others > Step 1. Go to All Files > Music. Step 2. Tap the blue icon Step 3. Select Copy. Step 4. Go to target folder. Ex. / Music Others Step 5. Tap Paste. on the right of a music file. Or tap X to cancel. You can use the same way to copy other files such as documents, photos, videos, and other kinds of files.
VI. i. File Folder Variation Rename Example. Rename Rihanna-You Da One(mp3) to be 01.Rihanna-You Da One(mp3). All Files > music Step 1. Tap the blue icon next to the file you want to rename. ex. Rihanna-You Da One(mp3) Step 2. Select Rename. Step 3. Modify file name 01. Rihanna-You Da One(mp3) and tap OK. Or to tap Cancel to cancel this operation. You can use the same way to copy other files such as documents, photos, videos, and other kinds of files.
ii. New Directory Add a new file folder. There are two ways to add new file folders. In folder view page: Step 1. Tap the blue icon next to a file folder (Document/ Music / Photos/ Videos). Step 2. Tap New Directory. Step 3. Enter a name for the new folder. Step 4. Tap OK. Or tap Cancel to cancel this operation.
iii. Delete Files/Folders Delete files or file folders. For example, delete all files in a folder Step 1. Tap the blue icon next to the file folder that you want to delete. Step 2. Select Delete Step 3. Tap Yes to confirm. Or tap No to cancel. You can apply the same procedure when deleting a file. If you delete the default folders, like “Documents”, “Others”, “Photos”, “Videos”, or “Music”, it will be rebuilt once the device restarts.
VII. i. Settings Username and Password Enter the username and password Setting page allows users to change the setting on your Maxell Portable Wireless Hard Drive Enter username and password 1. Once you tap Settings, it will pop up a login box, asking you to enter the username (admin) and your password (admin). 2. Then tap Login. ii. Device Name (SSID) Note: The device name is equal to the SSID of the wifi connection of this Maxell Portable Wireless Hard Drive. Step 1. Tap Device Name. Step 2.
iii. Security Setting Set up security password and security status. Default password is 12345678. You can set your own password. Security: Enable means to enter password (Default: 12345678) when login the device. Disable means to disable password requirement when connect the device.
iv. Internet Access (Internet Bridge) This device has an internet bridging function which enables users to connect to the Internet through their Smartphone/Tablet/device (using the Air-Stream App). Disable means the device doesn’t open Internet access, and it only provides Wi-Fi connection with the Notebook/Tablet or the Smartphone. Enable means the device provides Internet access, which lets users connect to the internet. Step 1. Tap Enable to turn on Bridge mode.
V. Power Saving Set up idle time (5 min/ 10 min/ 30min) to avoid power consuming. The device will shut down after idle time. None means that the device will not operate the power saving function. Select idle time and tap Apply to confirm; otherwise Cancel the action.
Vi. Date & Time Date & Time will show up after file uploading or file downloading. There are two ways to set this up: 1. Select Time Zone from the drop-down list and key in the date and time separately. 2. Tap Copy from PC to get information from Notebook or smartphone directly. 3. Tap Apply to confirm. Or tap Cancel to leave.
Vii. Admin Password Change password through the login Settings page. Enter the new password and confirm the new password. Tap Apply to set up new admin password, or Cancel and leave.
Viii Restart Restart the device. Tap Apply to restart, or tap Cancel to leave.
iX. Firmware Upgrade Upgrade the firmware when there is a new update available. You can upgrade the Portable Wireless Hard Drive by uploading new firmware. 1. Download the firmware file to a computer. 2. Connect with the Portable Wireless Hard Drive using that computer. 3. Tap Choose file to search for the upgrade firmware in the USB drive. 4. Tap Upload after the firmware file is chosen. Or tap Cancel to leave. Do not shut down power during upload.
X. Shutdown Tap Apply to shut down the device, or tap Cancel to leave.
Xi. Factory Default Tap Apply to reset settings to default value. The Maxell Portable Wireless Hard Drive will restart.
Xii. Language Select a language for the app interface. Tap Apply to confirm, or tap Cancel to leave. REMARK: Please charge the Maxell Portable Wireless Hard Drive fully after each use, sudden power outage during operation can result in damage/or loss of your data.
Air-Stream Manual for Android
VIII. Browse files Browse all files, including documents, music, photos, and videos, on the remote device, or the local files on the local side. To browse MP3 files as an example. All files> Music > *.mp3 Step 1. Tap All Files Step 2. Tap music folder to browse all MP3 files. Step 3. Tap a file to play music. Back: Tap the icon Main menu: Tap icon on on the gray bar to go back the former layer. the upper left corner to return to main menu.
IX. Upload files Upload files from the local files to remote device. Upload files from Local Files to the remote device. App will upload files to target folder according to filename extensions, including documents, music, photos, and videos. Other kinds of files will go to Others file folder. Example on how to upload music files. Step 1. Tap Local Files. Step 2. Tap Music Step 3. Select music files and tap upload , or tap to select all music files. Step 4. Tap Upload on the gray bar at the bottom.
X. Download files Download files from the remote device to local files. User can open the files by their installed apps in their Android device. There are 2 ways to download files. For example: 1. All Files >Music > *.mp3 Step 1. Tap All Files >Music Step 2. Tap the blue icon on the right side of a music file Step 3. Select Download, or tap Step 4. Tap Download on the gray bar at the bottom. Or tap X to cancel. to select all music files.
2. Music > *.mp3 Step 1. Tap Music Step 2. Select music files and tap , or tap to select all music files. Step 3. Tap Download on the gray bar at the bottom. Or tap X to cancel the action. You can use the same way to download other files such as documents, photos, videos, and other kinds of files.
XI. Move files & folders Move a file Move a file from a files folder to a target folder: To move a music file as an example: All Files > Music Step 1. Tap All Files and then tap Music Step 2. Tap the blue icon on the right of a music file. Step 3. Select Move Step 4. Go to target folder. Ex. /Music Step 5. tap Move on the bottom bar. / Others Or tap X to cancel. You can use the same way to move other files such as documents, photos, videos, and other kinds of files.
Move a file folder Move a file folder to a target file folder. To move a file folder named 01. favorite as an example: (Please see introduction of New Directory to add a new folder) All Files > 01.favorite All Files > Music > 01. favorite Step 1. Tap All Files Step 2. Tap the blue icon on the right to the folder. Step 3. Select Move. Step 4. Tap Music folder Step 5. Tap Move on the bottom bar. Or tap X to cancel.
XII. Copy files. Copy files and paste to the target file folder. Copy a music file as an example. All Files > Music > *.mp3 Others > Step 1. Go to All Files > Music. Step 2. Tap the blue icon on the right of a music file. Step 3. Select Copy. Step 4. Go to target folder. Ex. / Music > Others / Step 5. Tap Paste. Or tap X to cancel.
XIII. File Folder Variation i. Rename Rename for file folders or files. Example. Rename Don’t contain yourself.mp3 to be 01.Don’t contain yourself.mp3. All Files > music/ Step 1. Tap the blue icon next to the file you want to rename. ex. Don’t contain yourself.mp3 Step 2. Select Rename. Step 4. Modify file name 01.Don’t contain yourself.mp3 and tap OK. Or to tap Cancel to cancel.
ii. New Directory Add a new file folder. There are two ways to add new file folders. 1. All Files > Step 1. Tap the blue icon next to a file folder (Document/ Music / Photos/ Videos). Step 2. Tap New Directory. Step 3. Enter a name for the new folder. Step 4. Tap OK. or tap Cancel to cancel.
2 .All Files > Step 1. Tap the gray icon on the upper right. Step 2. Tap New Directory. Step 3. Enter a new name for the new folder. Step 4. Tap OK. Or tap Cancel to give up.
iii. Delete Files Delete files or file folders. Delete file folders. Ex. All Files/ Step 1. Tap the blue icon next to the file folder that you want to delete. Step 2. Select Delete. Step 3. Tap Yes to confirm. Or tap No to cancel. If you delete the default folder, like Documents, Others, Photos, Videos, or Music, it will be rebuilt once the device restarts.
1. Delete files. Ex. All Files>Music/ Step 1. Tap the blue icon next to the file you want to delete. Step 2. Select Delete Step 3. Tap Yes to confirm. Or tap No to cancel.
XIV. Settings i. Enter Username & Password Once you tap Settings, it will pop up a login box, asking you to enter the username (admin) and your password (admin). Then tap Login.
ii. Device Name. You can rename the device. Step 1. Tap Device Name. Step 2. Enter new device name and tap Apply.
iii. Security a. b. i. ii. Set up security password and security status. Default password is 12345678. Security Status: Enable means to enter password (12345678) when login the device. Disable means to skip password when login the device.
iv. Internet Access Disable means the device doesn’t open Internet access, and it only provides Wi-Fi connection with the Notebook or the smartphone. Enable means the device provides Internet access, which lets users connect to the internet. Step 1. Tap Enable to turn on Bridge mode. The device will search available internet accesses. Step 2. Tap certain internet access and tap Apply. Step 3. Provide internet password, and then tap Connect. Step 4. The device will request to restart. Step 5.
v. Power Saving Set up idle time (5 min/ 10 min/ 30min) to avoid power consuming because of idling for too long. The device will shut down after idle time. None means not to operate power saving function. Select idle time and tap Apply to confirm; otherwise Cancel the action. vi. Date & Time Date & Time will show up after file uploading or file downloading. There are two ways to set up: 1. Select Time Zone from the drop-down list and key in the date and time separately. 2.
vii. Admin Password Change password when login Settings page. Enter the new password and confirm the new password. Tap Apply to set up new admin password, or Cancel and leave.
viii. Restart Restart the device. Tap Apply to restart, or tap Cancel to leave.
ix. Firmware Upgrade. Upgrade firmware when there is a new update available. 1. Choose firmware file from computer and 2. Switch the device to Reader mode and insert the USB drive. 3. Tap Choose file to search for the upgrade firmware in the USB drive. 4. Tap Upload after a file is chosen. Or tap Cancel to leave. Please do not shut down power during upload.
x. Shutdown Tap Apply to shut down the device, or tap Cancel to leave.
xi. Factory Default Tap Apply to reset settings to default value. Then device will restart .
xii. Language Select a language for the device. Tap Apply to confirm, or tap Cancel to leave.
Troubleshooting To keep the warranty valid, never try to repair the system yourself. If you encounter problems when using this unit, check the following points before requesting for service. Warranty void if case is opened. Symptom No LED lights come on Likely Cause Battery is empty after the on/off button is pressed What to do • Charge with USB AC adapter or computer via USB cable. Green charging light will light up during charging.
before you turn on the Maxell Portable Wireless Hard Drive. Important Safety Instructions Warning! Do not use in a rainy or snowy place, by the waterside or in the bathroom. It may cause fire or electric shock. Caution! Do not keep in an excessively hot place such as radiators, heaters, stoves, or other apparatus (including amplifiers) that produce heat. The surface of the device or parts may get damaged, and may also cause fire.