
Installation Sheet

Installation Instructions Screw Collar Canopy
IMPORTANT SAFETY INFORMATION
WARNING Before starting the installation, disco nnect the
power by turning off the circuit breake r or removi ng the fuse
at the fuse box. Turn i ng the power off usi ng the lighting switch
is not sufficient to prevent electrical shock.
Proper wiring is essential for the safe operation of this
fixture. All electrical connections must be in accordance
with local codes, ordinances or the National Electrical
Code. If you are unfamiliar with methods of installing
electrical wiring, secure the services of a qualified licensed
electricia n.
Fixture must be grounded to avoid potential electrical
shocks.
This fixture is designed for use in 120 volt, 60hz, fused
circuits.
Some metal parts in this fixture may have shape edges.
Handle with care to prevent
cuts and abrasions from
ex posed edges.
CAUTION: Read instructions carefully before you st art. Turn
off power at f use or circuit breaker box.
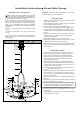
MOUNTING STRAP
1.
2.
3.
4.
5.
6.
7.
8.
9.
10.
11.
12.
13.
14.
15.
16.
17.
Attached mounting s trap (1) to outlet box (2) (not provided)
with unfinished screws (3)
Screw threaded pipe (4) into mounting strap (1). Use hex nut
(5) to lock threaded pipe into place.
Connect screw collar loop (6) to threaded pipe (4).
Pass canopy (7) over screw collar loop (6). Approximately
one-half of the screw c ollar loop exterior thread s
hould be
exposed. Adjust loop and thread pipe as required. Remove
canopy.
Using two pairs of pliers, open one end of the chain (8) and
connect it to the loop at the top of the fixture. Be sure to
close chain link completely.
Slip threaded ring (9) then canopy (7) onto chain.
Repeat step 5 adjusting chain to de sired length, and conne ct
(with fixture attached) to screw collar loop (6).
Weave electrical wire and ground wire up chain (8) through
center hole of screw loop (6) through threaded pipe (4) and
into outlet box (2).
Attach ground wi re from outlet box and grou
nd wire from
fixture to the mounting strap (1) by wrapping wire around
green screw (10) and tighten firmly. DO NOT attach the
grounding wires to any current carrying wire. If there is no
ground wires in your outlet box, consult and electrician
regarding proper grounding.
Place ribbed wire from the fixture (the wire with a raised
ridge) evenly a gainst the white wire from the outlet box. Fit a
wire connector over the two wires and screw the connector
clockwise until you feel a firmn ess.
Connect smooth wire from th e fixture to the black wire from
the out
let box in the same manner
Try gently to pull the connector (11) off the wires to check for
a firm connection. I you can pull the connector off, repeat
step 10 above, a nd check again. Be sure no bare wires show
outside wirer connector.
After the wires are connected, tuck them carefully inside the
outlet box.
Raise canopy (7) against the ceili ng and secure by threading
the ring (1) ont o screw color loop (6).
Install bulbs. DO NOT exceed maximum wattage as shown
on label attached to the fixture. DO NOT attempt to remove
the wattage label. It will dam
age the finish. Using higher
wattage bulbs will void the warranty of the fixture.
Restore power at f use or circuit breaker box. Fixture is ready
for operation.
To avoid shad ow on glass, make sure to place wattage label
on nside glass facing arm side.
CONNECTING THE WIRE S
10
9
11
12
13
14
3
5
1
4
2
7
7
7
6
8
11
12
13
14