
Instruction Manual

INC.
30 Samuel Barnet B
oulevard
New
Bedford, Massachusetts 02745
(508) 995-2200 www.maximum-inc.com
HARBORMASTER
Installation / Operation Instructions
INSTALLATION
Please follow this procedure before setting your tide clock. Use of our wall mounted panels or mantle mounts is
recommended but not necessary. Our panels are pre-drilled so that centering the instrument is not a concern.
Simply screw the two supplied right angle hangers into the two centrally located pilot holes on either side of the large
hole in the panel. These hangers should be screwed in so that there is approximately a ½” of clearance left between
the hanger and the panel.
On the back of your tide clock you will find 2 holes that will line up with the hangers. Align the holes and hangers and
push the clock against the panel. The clocks three rubber feet (not the rim of the brass case) will now be resting on
the panel. While still applying pressure against the rubber feet simply slide the clock down so that it seats on the 2
hangers. If this feels too tight simply back the hangers off one turn. If it feels too loose simply tighten the hangers one
turn.
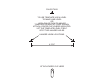
If you are not using one of our panels you can use the supplied template to spot the hanger holes on your mounting
surface. Using a #50 or 1/16” drill bit bore the two hanger holes into your mounting surface. The installation
instructions above will now apply as if you were using one of our panels. Do not remove decorative screws around the
instrument for mounting. Mounting with screws while protective rubber bumpers are in place will cause premature
failure.
TIDE SETTING
Insert a standard AA 1.5 volt battery in the battery compartment (+ side first) observing proper polarity. Look at the
face and check that the round disc with the small hand at the center of the clock is rotating. This is the “going
indicator” and its sole purpose is for you to verify that the clock is operating. You are now ready to set the
Harbormaster. It is first necessary to determine the exact time of the high or low tide you wish to set the clock to.
This information is most easily found in a current tide table, either printed or on-line. When reading a tide table,
remember to allow for the difference (if any) between your exact location and that of the reference location. Once
you have determined when high or low tide is, simply set the clock accordingly at that time using the thumbwheel on
the clock mechanism just above the battery.
HOW A TIDE CLOCK WORKS
It has been known for centuries that up and down the east coast, tides occur approximately 50 minutes later each day
than they did the day before. The primary reason for this daily lag can be traced to the moon. It takes the earth 24
hours to make one complete rotation in relation to the sun. This rotation is called a “solar day”. It takes the moon 24
hours and 50 minutes to make one complete rotation around the earth. This rotation is called a “lunar day”. It is the
moon’s close proximity to us and the relatively strong gravitational effect it has on the earth that causes the tides to
follow the moon’s lunar schedule of 24 hours and 50 minutes per cycle.