
User's Manual

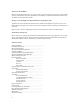
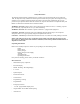

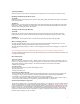
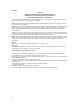


Table Of Contents
5
Antenna Installation
Fasten the antenna to the radio by turning the antenna clockwise into the receptacle on top of the radio.
Installing and Removing the Battery Pack
To Install:
Position the guides of the battery in line with the radio battery guide rails and slide the battery into position
until a click is heard.
To Remove:
Holding radio in one hand, push and hold battery latch button located in the upper right hand corner of the
battery pack , held as if looking at the back of the unit. Hold radio firmly and slide battery in downward
direction while pushing the battery latch button.
Attaching and Removing the Belt Clip
To Install:
Install belt clip onto the belt clip holder located on the upper left hand corner of the radio, held as if
looking at the back of the unit. Locate slot location in belt clip and push belt clip until a click is heard.
To Remove:
Push and hold release button located at top of belt clip and slide clip off the belt clip holder.
Battery Charging and Care
To ensure peak performance from your radio, the battery pack must be fully charged. Proper care and
charging will allow maximum performance and life of your battery pack.
The ACC-400 Desktop Charger provides 1.5 hours charging and normal "slow" charging to one radio and
one battery.
See accompanying instructions included with this charger for more information. (Remove this line)
To receive maximum performance from your radio and battery pack, periodically completely discharge and
recharge the battery pack.
SP-510 Operations
Power On-Volume
Turn the radio on by rotating the on/off - volume control clockwise until you hear a click and the self test
"alert" tone. When the power is on, beep sound would occur five-times to show that the radio power is on.
Time length of the beep sound is 50msec. An interval between the beep sound is also 50msec.
A Single tone of 1200Hz
User Alert Tones
The User Alert tone will be sound for the following reasons.
Keypad button press
Side option button press
Tones Alerts for Received Calls
Up to 4 different alert sequences shall be programmed to inform the User of the call type a ground call,
Or emergency call etc. Tone length, tone gap and repeatability will be individually programmable.
The numbers 1,2,3 and 4, shall be used to represent low tones to high tones.
One to three of the four tones shall be selectable via the software and allocated as Alert1, Alert2, Alert3,
Alert4. These Alerts shall then be assigned to a particular DECODE, e.g. Group call
Channel Select/Channel Group Select
The SP-510 is capable of up to 13 programmed groups with up to 16 channels per group for a total channel
capacity of 208 channels. To change channels press and release the or buttons to change channels (remove).
A press and hold will scroll through your programmed channels. Channel numbers will appear in the LCD
located at top of unit. If your radio has been programmed for Channel Group Scan you must enter the scan
mode by pressing the scan button which is the first button located beneath the PTT button. The Channel
Group to be scanned will be shown in the display. In order to change the Channel Group press the or ▼
buttons to select desired group to be scanned.