USER’S MANUAL Digital Satellite Receiver HTS 2100S+ E109000257A
Contents 1. Introduction 1.1 Overview 1.2 Main Features 2 2. Safety/Precautions 2.1 Safety 2.2 Precautions 3 3. Points to Check before Use 3.1 Accessories 5 4. Controls/Functions 4.1 Front Panel 4.2 Rear Panel 4.3 Remote controller 6 5. How to Connect 10 6. Operation 6.1 Getting Started 6.2 System Setting 6.3 Channels 6.4 Electronic Program Guide 6.5 Games 6.6 System Information 6.7 Common Interface 11 7. Troubleshooting 37 8.
Introduction Safety/Precautions 1.1 Overview 2.1 Safety This satellite receiver is designed for the reception of free-to-air and encrypted channels. Depending on your location, enjoy the rich choice of up to 5,000 different channels broadcasting a large range of programs: culture, sports, cinema, news, events, etc. This receiver is assembled with highly qualified electronic parts. Be sure to read this user's manual before starting the operation of the unit.
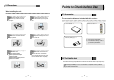
2.2 Precautions Points to Check before Use When installing the unit 3.1 Accessories Install the unit horizontally. An uneven installation may cause the unit to be damaged. Do not put heavy items such as a TV set on the unit. That may damage the unit. The accessories below are included with this receiver: Remote control : 1 User's manual : 1 er's Us Do not leave the unit where the water drops or splashes. Do not put water holding items such as vases on the unit.
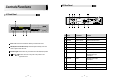
Controls/Functions 4.2 Rear Panel 4.1 Front Panel 1 3 5 2 4 6 7 10 2 1 3 4 No. Name 5 1 Power : Switches the receiver between ‘Standby’ and ‘Power ON’ modes. 2 Standby/Power on Indications Lamp : Flashes red light in ‘Standby’ mode and shows no light in ‘Power ON’ mode. 3 Indication Light : Flashes when a key on the Remote Control Unit (RCU) is pressed. 4 - 5 CH.
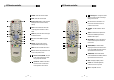
4.3 Remote controller 4.3 Remote controller 1 POWER : To turn the receiver On/Off. 14 - 15 Left & Right : To change the volume level in non-menu mode and modify a setting in menu mode. 2 MUTE : To turn the sound On/Off. 1 3 Numeric Keys (0-9) : To enter numerical 2 16 OK : To show the Channel List in non- settings (such as channel numbers) directly. menu mode and select an item or confirm in menu mode. 3 4 INFO : To show information about the 6 4 current program. Press twice to show detail.
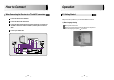
How to Connect Operation When Connecting the Receiver to a TV with RF connectors 6.1 Getting Started 1 Connect the TV antenna to TV ANT IN 2 Connect the RF-IN of the TV to RF-OUT 3 Connect the Video and Audio of the TV to Video and Audio: connect the red and white connectors to Audio R and Audio L, and the yellow connector to Video After your receiver is powered on, proceed with installation as follows : 1) Menu Language Setting Turn on your TV and receiver.
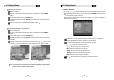
6.1 Getting Started 6.1 Getting Started ( When the DiSEqC Motor parameter is set as 1.2) 2) Antenna Setup Press the MENU button to display the main menu. - Move : You can move the dish to the West/East. Use - Limit : If you want to set limits, press CH / CH and VOL / VOL to move in the menu. Press on ‘Dish Setting’. The following window will appear. If you have a motorized dish, press on ‘Motorized Setting’. < Figure 6-3> Note : Enter a 4-Digit password if need arise.
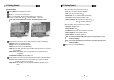
6.1 Getting Started 6.1 Getting Started 3) Satellite Scan Blind Search Through this function, the receiver searches for all the available channels and saves them in memory. Select the satellite you want to search by pressing To select more than one satellite, press the RED button when the selection bar is positioned on the satellite. Press on the names of the satellites that you want to scan under 'Satellite List'. Press the EXIT button to close the 'Satellite List'.
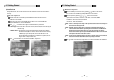
6.1 Getting Started 6.1 Getting Started 4) Channel Selection Manual Scan You can use Select a transponder. / CH CH to navigate between channels until you find the channel you want. To change a transponder’s information (Frequency, Symbol Rate), use the NUMERIC buttons. If you know the channel number, you can enter it with the NUMERIC buttons and wait 2 seconds until the channel is changed. To add a new transponder, press the GREEN button.
6.1 Getting Started 6.1 Getting Started 5) Other Functions of the Remote Control Teletext(YELLOW) The Teletext service is a text data service sometimes available from the Service Provider. Volume Control While watching a program, press VOL or VOL to control the volume. You can press the MUTE button to remove the sound of the program: the mute icon will be displayed. Press the MUTE button again to turn the sound back on. PAUSE You can press this key to pause the video.
6.2 System Setting 6.2 System Setting 1) Time Settings 2) A/V Output Settings This submenu allows you to set your local time, wake up time, wake up channel and sleep time. - GMT Usage : Set this ON for the local time to be determined by adjusting the time difference with the GMT (Greenwich Meantime) according to your location. - Current Date : If GMT Usage is OFF, you can modify the date by pressing .
6.2 System Setting 6.2 System Setting 3) OSD Settings 4) Security Settings This submenu allows you to set the menu language, OSD transparency and Information and Volume timeouts. This submenu allows you to set password options and to lock or unlock access to menus (Note: PIN code and password are the same). - Menu Language : Select the desired language for the menu. - Receiver Lock : Set ON to require entering a PIN code at powering on.
6.2 System Setting 6.2 System Setting 5) Database Reset 6) Calculator This submenu allows you to restore the factory set values (useful when encountering problems after changing settings). This submenu allows you to use a calculator on the screen. - Delete Radio Channels : Erase all radio channels in the database. - You can switch between Hex (Hexadecimal) and Dec (Decimal) basis for arithmetic with the RED button of the remote control unit.
6.3 Channels 6.3 Channels 1) Set Favorites This submenu allows you to set up favorite groups of channels. You can select TV or Radio channels in an alternative way by pressing the TV/RADIO button. The receiver supports 8 favorite groups. Press on ‘Set Favorites’. The list of groups will be displayed. Press / and to choose a group. The following menu will be displayed. If you want to change the name of a favorite group, press the RED button.
6.3 Channels 6.3 Channels 4) Lock Channels 5) Skip Channels This submenu allows you to lock channels to control access to them. Once a channel is locked, you will be asked to enter a password whenever you try to watch it. You can select TV or Radio channels in an alternative way by pressing the TV/RADIO button. You can choose a channel list group by pressing the GROUP button. If you set ‘Lock Channel Confirm’ (refer to <6.
6.3 Channels 6.4 Electronic Program Guide 6) Delete Channels 1) EPG This submenu allows you to delete channels. You can select TV or Radio channels in an alternative way by pressing the TV/RADIO button. You can choose a channel list group by pressing the GROUP button. Note : Be careful! If you delete a channel, you will not be able to access it again until you rescan. Press on ‘Delete Channels’. The following menu will be displayed.
6.4 Electronic Program Guide 6.5 Games 2) Timer 1) Tetris This sub menu allows you to set the on/off time of your receiver. This submenu allows you to set on/off times of your receiver. To display the timer menu, press the RED button while in the guide menu. Press on ‘Tetris’. The following menu will be displayed. You can choose a skill level using VOL / VOL . Press menu.
6.5 Games 6.6 System Information Press the EXIT button to quit the game. You can check the current information about your receiver such as receiver model name, S/W (software) version, H/W (hardware) version, manufacturing date, etc. Note : This information is useful to download new software and/or repair the receiver. 3) Snake Press on ‘Snake’. The following menu will be displayed. You can choose a skill level using / VOL .
6.7 Common Interface Troubleshooting There may be various reasons for the abnormal operation of the unit. Therefore, if the unit does not work properly, check it according to the procedures shown in the table below: Problem Possible causes The LED light on the front The AC power cord is disconnected. panel does not light. No Picture or sound. 2) The Status of the CAM You can access detailed information about the CAM using the Menu to select ‘CI’ and pressing .
Specifications System capabilities Fully DVB compliant LNB/Tuner input Demodulator Power supply Video decoder max 20W Connector IEC 169-24, female Supply voltage 90V ~ 250V Frequency range 950MHz ~ 2150MHz Supply frequency 50Hz ~ 60Hz Signal level -65dBm ~ -25dBm LNB supply 14/18V, max 400mA LNB switch control 22KHz DiSEqC Ver 1.0/1.1/1.