OPERATION MANUAL Complete Instructions for Installation and Operation MaxPower Corporation 230 Yuma Street Denver, CO 80223 800-576-3966 www.coolcube10.com 05/05 P/N: 5-TC600-2510 Move it. Hang it. Rack it. Stack it.
Technical Specifications TABLE OF CONTENTS Definition of Terms …………………………………………………………………………. Features ……………………………………………………………………………………... Inventory ……………………………………………………………………………………. Application ………………………………………………………………………………….. Portable ………………………………………………………………………… Hanging ………………………………………………………………………… Rack-Mount ……………………………………………………………………. Stacking ……..…………………………………………………………………. Installation …………………………………………………………………………………... General Precautions …………………………………………………………….
Troubleshooting Features Self-Diagnostic Codes CoolCube 10 Features Self-Diagnostic Codes will be displayed on the Control Pad’s ROOM TEMP LED display under the following conditions: Code Condition FL When the drain tank switch shuts off the unit (FULL TANK LED illuminates). FS When the evaporator thermistor disengages the compressor.
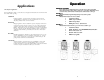
Operation Applications REMOTE CONTROL Choosing the Application Before installing the CoolCube, you must first choose the application that best fits the environment in which the CoolCube will be operating. The CoolCube 10 comes standard with a remote control. The remote control operates all the features that are standard on the CoolCube’s control pad. To operate the CoolCube with the remote control, the remote control must have a unobstructed view of the CoolCube’s control pad.
Operation Installation Emptying the Drain Tank General Precautions: During the COOL mode, condensate will accumulate in the drain tank. When the drain tank becomes full, the “FULL TANK” LED will illuminate along with an “FL” error code in the ROOM TEMP LED display. The unit will automatically shut off. 1. 2. 3. 4. 5. If you want to empty the drain tank, while the unit is in operation, press the POWER button to turn the unit off. Pull the drain tank from the bottom of the unit.
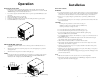
Operation Installation Portable Applications: Operating Modes The CoolCube operates in 3 modes; FAN ONLY, DEHUMIDIFICATION, AND COOL. When in FAN ONLY MODE the unit circulates the surrounding air. When in the DEHUMIDIFICATION mode the unit will focus on removing moisture from the room.
Operation Installation 12 Control Panel Portable Applications: 13 3 TIMER 4 SLEEP 8 Attaching Accessories – (See Detailed Accessory Instructions) TIMER 11 AUTO 14 • Attach the Portable Accessories (casters/feet) to the base panel of the CoolCube 10 unit. See Figure 1 & 2 • • Attach the Handles to the top panel of the CoolCube 10 unit. See Figure 1 & 2 (Optional) Attach the Cold Air Distribution Accessory (duct/diffuser/flange) to the front panel.
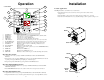
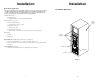
Installation Installation Hanging Applications – Permanently Connected: Stacking Applications: As the environment dictates, the CoolCube 10 unit may be hung above the floor in an industrial setting or in a drop ceiling in an office setting. The CoolCube 10 can be hung from a building’s structural beam by using a 5/16” threaded rod on the unit’s (4) corners, with 14 gage uni-strut under the CoolCube, or with 14 gage uni-strut bolted to the top of the CoolCube.
Installation Installation Stacking Applications: Hanging Applications – Permanently Connected: Two or three CoolCube 10 units are required when redundancy is critical, cooling large areas, or high heat loads. The CoolCube 10 units can be stacked on top of each other to produce a capacity of 20,000 or 30,000 BTU/hr, while maintaining a small footprint area. To facilitate the stacking of the CoolCube units, accessories are required.
Installation Rack-Mount Applications Installation Rack-Mount Applications The CoolCube 10 unit is ideal for cooling small computer rooms and server closets. The CoolCube 10 can easily be installed inside a standard 19-Inch computer rack. To facilitate the installation of the CoolCube 10 unit inside the rack, a 19-Inch Rack Kit accessory is required.