
User's Manual

CDH Communications
Using the 9Xtream Demo Kit
Introduction:
Use this demo kit to experience the power and sensitivity of
the CDH 9Xtream radio. This radio transmits data at 19200
bits per second in the license-free 900MHz ISM band. See how
simple it is to communicate with the radio using asynchronous
serial communications by following the instructions below.
Contents:
2 9Xtream Frequency Hopping 900MHz 19200bps
radios
2 Demo Boards
2 Battery clips with 9-volt battery
2 DB-9 connecting cables
2 DB-25 to DB-9 converters
1 3.5" floppy disk containing file RAT.TXT
Requirements:
2 computers with an available comm port and Windows 95/98
or NT.
Instructions:
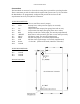
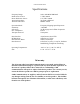
1. Assemble and Connect Demo Boards to computers.
a. Connect the radios to the Demo Boards by fitting the 4
and 11-pin connectors into their respective female
headers.
b. Attach the male sides of one of the DB-9 Connecting
Cables to the female DB-9 jacks on the Demo Boards.
c. Attach the female side of a DB-9 connecting cable to an
available comm port on the back of Computer 1.
Connect Radio 2 to Computer 2 in the same fashion.
d. Plug Battery clips into the Demo Boards. The green
LEDs on the Demo Boards will illuminate to show the
boards are powered.
e. Refer to figure 1 for completed assembly.
2. Run and configure HyperTrm.exe on both computers
a. Open the folder on the Start Menu found under
Programs -> Accessories -> Communications ->
HyperTerminal.
b. Double-click on the application HyperTrm.exe and
choose a name and an icon for the new connection in
the Connection Description dialogue box.
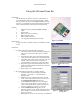
c. In the Connect To dialogue box on each computer,
select Connect using: Direct to Com1 or Direct to
Com2 to correspond with the comm port used on the
respective computers (see figure 2) . Click OK.
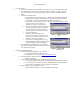
d. In the COM Properties dialogue box, set the
following: Bits per second: 19200; Data bits: 8; Parity:
None; Stop Bits: 1 and Flow Control: Hardware (See
figure 3). Click OK.
e. Both computers are now set up and ready to communicate.
Figure 1– Demo Kit
Figure 2 –Connect To Dialogue
Box
Figure 3 – COM Properties
Dialogue Box