XT-7871 USER'S MANUAL Features • • • • • • • • • • Part #MAN124 Rev. 1.0 0.
Table of Contents Section 1 Section 2 Section 3 Section 4 Appendix A Appendix B Appendix C Appendix D Appendix E General Information ................................................... 2 Installation .................................................................. 2 Monitor Controls and LEDs ........................................ 3 Troubleshooting ......................................................... 6 Specifications .............................................................
Section 1 - General Information Congratulations on purchasing a MaxTech 17-inch high resolution color monitor. The monitor uses one of the finest CRTs available in the industry. The 0.28 mm dot pitch non-glare tube provides a crisp and vivid color display. The monitor complies with the MPR-II standard to reduce electro-magnetic emissions. Advanced electronics and digital controls make it the perfect monitor for applications ranging from home computing to business presentations.
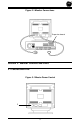
Figure 2-1 Monitor Connections Expansion boards COM1 COM2 LPT1 VIDEO Section 3 - Monitor Controls and LEDs 3.
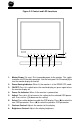
Figure 3-2 Control and LED Locations 2 3 8 7 6 5 4 1. Master Power (On rear): Push to provide power to the monitor. This switch should be left ON for daily operation. Use the front panel On/Off control (3) to turn the monitor display on and off. 2. Power Saving Indicator: When lit, the monitor is in the DPMS OFF mode. 3. ON/OFF: Press this switch to turn the monitor display on, press again to turn the monitor display off. 4. Power On Indicator: When lit the monitor is powered on 5.
3.2 On-Screen Display 1280 X 1024 H: 64KHz A V: 60Hz B C D E F G H I The On-Screen Display (OSD) is enabled by pressing either button of control pair 6 (see Figure 3-2). Control pair 5 (+ and -) buttons are used to increase or decrease the value of selected parameter. A. Horizontal-Size: Adjusts the display width. The (+) button increases the width. The (-) button decreases the width. B. Horizontal-Position: Adjusts the horizontal position. The (+) button moves the display to the right.
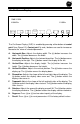
Section 4 - Troubleshooting No picture, no LEDs lit. • Check that the AC cord is plugged into an outlet and the monitor. • Turn on the Master Power switch. No picture, power LED is lit. • Monitor is in DPMS STANDBY/SUSPEND mode. Press a key or move the mouse. • Check that video cable is connected completely. • Adjust brightness and contrast controls. • Check connector for bent pins. No picture, power saving indicator (2) on. • Monitor is in DPMS OFF mode. Press a key or move the mouse. • Monitor is off.
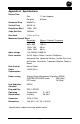
Appendix A - Specifications Picture Tube Size Dot pitch 17-inch diagonal 0.28mm Horizontal Freq 30-66KHz Vertical Freq. 50-120 Hz Resolution (Max.) 1280 x 1024 Video Dot Rate 100 MHz Data Area 11.8 in. x 8.7 in.
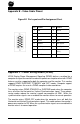
Appendix B - Video Cable Pinout Figure B-1 Pin Layout and Pin Assignment Chart PIN 11 6 1 10 15 5 SIGNAL PIN SIGNAL 1 Red 9 No Pin 2 Green 10 Ground 3 Blue 11 Ground 4 No Pin 12 SDA 5 Ground 13 Hor. Synch. 6 Red Return 14 Vert. Synch 7 Green Return 15 Data Clock (SCL) 8 Blue Return Appendix C - Power Saving Modes (DPMS) VESA Display Power Management Signaling (DPMS) defines a method for a computer to signal the monitor to reduce its power consumption when idle.
Appendix D - Three Year Warranty MAXTECH warrants to the original buyer of this product against defects in material and workmanship for three years from the date of purchase. Except as specified below, this warranty covers all defects in material or workmanship in this product. The following are not covered by the warranty: 1. Any product which is not distributed in North America by MAXTECH or which is not purchased in North America from an authorized MAXTECH Dealer. 2.
All warranty services must be performed by Authorized Service Centers. There are no user serviceable parts inside the unit. Do not remove any components or attempt to service the unit by any unauthorized service center. This warranty is voided if the product has been abused, misused, modified, or repaired by an unauthorized service center.
the receiver is connected • Consult the dealer or an experienced radio / TV technician for help Notice: Shielded cables, if any, must be used in order to comply with the emission limits. Any change or modification not expressly approved by the Grantee of the equipment authorization could void the user’s authority to operate the equipment.