Maxtor BlackArmor Contents Getting Started . . . . . . . . . . . . . . . . . . . . . . . . . . . . . . . . . . . . . . . . . . . . . . . . . . . . . . .1 Preparing the BlackArmor Drive for Use . . . . . . . . . . . . . . . . . . . . . . . . . . . .1 Configuring the BlackArmor Drive . . . . . . . . . . . . . . . . . . . . . . . . . . . .1 Installing the Maxtor Manager Software . . . . . . . . . . . . . . . . . . . . . . . .4 Using the Maxtor System Tray Icon . . . . . . . . . . . . . . . . . . . . . . . . .
Maxtor BlackArmor Editing Sync Settings . . . . . . . . . . . . . . . . . . . . . . . . . . . . . . . . . . . . . . . . . .57 Checking Sync Status . . . . . . . . . . . . . . . . . . . . . . . . . . . . . . . . . . . . . . . . . .61 Deleting Sync Settings . . . . . . . . . . . . . . . . . . . . . . . . . . . . . . . . . . . .63 Using Automatic Sync . . . . . . . . . . . . . . . . . . . . . . . . . . . . . . . . . . . . . . . . . .65 Using Automatic Overwrite . . . . . . . . . . . . . . . . . . . . . . . .
Maxtor Black Armor Getting Started This User Guide is written for both Windows XP and Windows Vista users. The images reflect the Windows XP environment, but all information is relevant for the Windows Vista environment as well.
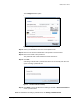
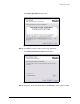
Maxtor Black Armor The Configure window opens: T Figure 1: Configure Step 2: Select your BlackArmor drive from the dropdown menu. Step 3: Enter the 25-character identification code printed on the drive label. Step 4: Enter and confirm a drive password. The password must contain between 6 and 32 characters. Step 5: Click Set.
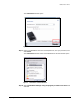
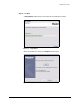
Maxtor Black Armor The Unlock Drive window opens: Figure 3: Unlock Drive Step 7: Select your BlackArmor drive from the dropdown list, enter your password, and click Unlock. The Unlock Drive window closes and the BlackArmor autostart window opens: Figure 4: BlackArmor Autostart Window Step 8: Select Install Maxtor Manager using the program provided on the device and click OK.
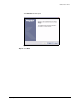
Maxtor Black Armor The Maxtor Manager installation window opens: Figure 5: Maxtor Manager Installation Window You’re ready to install the Maxtor Manager software. Installing the Maxtor Manager Software To install the Maxtor Manager software, Step 1: In the Maxtor Manager installation window, click Install Maxtor Manager.
Maxtor Black Armor The Welcome window opens: Figure 7: Welcome Step 2: Click Next.
Maxtor Black Armor The License Agreement window opens: Figure 8: License Agreement Step 3: Click Yes to accept the terms of the License Agreement. The Choose Destination Location window opens: Figure 9: Select a Destination Step 4: Accept the default destination folder or click Browse to select a different folder.
Maxtor Black Armor Step 5: Click Next.
Maxtor Black Armor Step 6: Decide whether to register now and click Next. The InstallShield Wizard Complete window opens: Figure 12: InstallShield Wizard Complete Step 7: Click Finish to restart your computer and complete the installation.
Maxtor Black Armor Step 8: Double-click the Maxtor Manager icon to open the BlackArmor application: Figure 13: My Drives Using the Maxtor System Tray Icon You can use the Maxtor Manager system tray icon to check the status of your BlackArmor drive and to access the drive features. Step 1: To check the status of your drive, roll your mouse over the system tray icon: Figure 1: System Tray Icons The information popup confirms the drive’s status and identifies the drive letter.
Maxtor Black Armor The color of the system tray icon conveys this information: Figure 14: System Tray Icon Information Note: When a backup or sync has failed, the red icon continues to display until the next successful backup or sync. Step 2: To display the Maxtor Manager menu, click the system tray icon: Figure 2: System Tray Menu Step 3: Select the feature you want to access or select Exit to close the menu (the BlackArmor application remains open).
Maxtor Black Armor Figure 15: Using the Maxtor System Tray Icon Restore Maxtor System Tray Icon 11
Maxtor Black Armor Managing Your Drives The My Drives window provides a central point from which to manage your Maxtor BlackArmor™ drives: Figure 3: My Drives The icons across the top of the Maxtor Manager window allow you to access your drive features. In the My Drives window, Step 1: Select a drive. Step 2: Click an option from the icons across the top of the Maxtor Manager window. Note: External drives are automatically detected and listed in the My Drives window.
Maxtor Black Armor Adjusting the Power Setting You can choose how long your drive should remain inactive before it goes into power-saving mode. To adjust the power setting, Step 1: In the My Drives window, click Settings. The Settings window opens: Figure 16: Settings Step 2: Click Adjust Power Setting.
Maxtor Black Armor The Adjust Power Setting window opens: Figure 17: Adjust Power Setting Step 3: Select an interval from the dropdown menu or click Default to return to the default power setting. Step 4: Click Apply to save the power setting.
Maxtor Black Armor The Adjust Power Setting window confirms that the power setting for your drive has been changed: Figure 18: Power Setting Confirmation Step 5: Click OK to return to the My Drives window. Testing Your Drive Test your drive to check the health of your BlackArmor drive. The diagnostic utility performs its tests without affecting the data on your drive. To test your drive, Step 1: In the My Drives window, click Settings.
Maxtor Black Armor The Settings window opens: Figure 19: Settings Step 2: Click Test My Drive.
Maxtor Black Armor The Test My Drive window opens: Figure 20: Test Drive Step 3: Click Test.
Maxtor Black Armor A progress bar indicates the progress of the test. When the test is complete, the results are displayed: Figure 21: Drive Test Complete The drive pictured above is functioning normally.
Maxtor Black Armor Figure 22: Drive Test - Bad Drive Step 4: Click OK and contact Seagate Support for further assistance. Updating Your Software The Software Update feature automatically informs you when an update is available for your software. However, you can manually check to see if an update is available or you can turn off the Software Update feature. To check for software updates, Step 1: In the My Drives window, click Settings.
Maxtor Black Armor The Settings window opens: Figure 23: Settings Step 2: Click Check for Software Update.
Maxtor Black Armor The Software Update window opens: Figure 24: Software Update Check for update automatically is selected by default. Step 3: To turn off Software Update, unselect Check for updates automatically. Step 4: To check for updates now, click Check Now.
Maxtor Black Armor If your software is up to date, a Software Update window informs you of that: Figure 26: Software Up to Date Step 6: Click OK to return to the Settings window.
Maxtor Black Armor Backing Up & Restoring Folders The Maxtor Manager Backup feature allows you to • • • • Schedule the backup of selected folders Edit backup settings Launch an immediate file backup Restore backed up files After the initial backup, the Maxtor Manager software backs up changed files in backed up folders on a schedule you set or right away when you click Back Up Now in the Backup window.
Maxtor Black Armor To use Simple Backup, Step 1: Click the Backup icon in the Maxtor Manager window. The Backup window opens: Figure 27: Backup Step 2: In the Backup window, click Simple Backup.
Maxtor Black Armor Step 3: Enter a name for your Backup Plan and click OK. The Backup window now allows you to edit your backup settings and restore backed up files and describes your Backup Plan and the details of your last backup. Figure 29: Simple Backup Details Creating a Custom Backup To select specific folders for backup and set up a backup destination and schedule, Step 1: Click the Backup icon in the Maxtor Manager window.
Maxtor Black Armor The Backup window opens: Figure 30: Backup Step 2: In the Backup window, click Custom Backup.
Maxtor Black Armor The Backup Folder Selection window opens: Figure 31: Backup Folder Selection Step 3: Name your Backup Plan, select the folders to be backed up, and click Next.
Maxtor Black Armor The Backup File Types window opens: Figure 32: Creating a Backup Plan File Types: All Types 28
Maxtor Black Armor Step 4: Select the types of files you want to back up: • All File Types • Photos, Music, Videos, Documents Back up any or all of these types of files: Figure 33: File Types: Photo, Music, Video, Documents • Custom Select specific file types to include or exclude for backup: — To back up only a few of the available file types, 1.Select Include these file types. 2.Select each file type you do want to back up and click Add to move it to the Include list.
Maxtor Black Armor Figure 34: File Types: Custom Step 5: Click Next.
Maxtor Black Armor The Backup Schedule window opens: Figure 35: Backup Schedule Step 6: Select the days and time you want to back up your folders and click Finish.
Maxtor Black Armor The Backup window now offers the options of editing your backup settings and restoring backed up files and describes your Backup Plan.
Maxtor Black Armor The Backup window opens: Figure 37: Backup Step 2: In the Backup window, click Edit Backup Settings.
Maxtor Black Armor The Backup Folder Selection window displays your current Backup Plan name and folder selection: Figure 38: Backup Folder Selection Step 3: Edit the Backup Plan name and/or the folder selection and click Next.
Maxtor Black Armor The Backup File Types window displays your file types selection: Figure 39: File Types Step 4: Edit the types of files to be backed up and click Next.
Maxtor Black Armor The Backup Schedule window displays your current schedule: Figure 40: Backup Schedule Step 5: Edit the days and/or time you want to back up your folders and click Finish.
Maxtor Black Armor The Backup window now displays your edited Backup Plan. Figure 41: Backup Deleting a Backup Plan You can delete the Backup Plan for any BlackArmor drive on which you’ve created one, even if the drive is not connected to your computer. To delete a Backup Plan, Step 1: Click the Backup icon in the Maxtor Manager window.
Maxtor Black Armor The Backup window opens: Figure 42: Backup Step 2: In the Backup window, click Delete Backup Plan.
Maxtor Black Armor The Delete Backup Plan window opens: Figure 43: Delete Backup Plan Listed is the Backup Plan for each BlackArmor drive connected to your computer. Step 3: Select the Backup Plan you want to delete and click Delete. The Backup Plan is deleted. Note: Your backed up files are NOT deleted. Using Scheduled Backup Use Scheduled Backup to back up changes in backed up folders on the days and time you set. The Scheduled Backup On/Off switch enables or disables the Backup schedule.
Maxtor Black Armor Turning Off Scheduled Backup To turn off Scheduled Backup, • In the Backup window, click the Scheduled Backup Off button. Figure 44: Scheduled Backup Off Backing Up Manually You can back up files manually whenever you like, whether Scheduled Backup is on or off. To launch a backup manually, • Click Back Up Now in the lower right corner of the Backup window.
Maxtor Black Armor A Backup Progress window informs you of the progress of the manual backup and lets you know when the backup is complete: Figure 45: Manual Backup Complete Viewing the Backup Log The Backup Log is a text-based report of your backup history.
Maxtor Black Armor To view the Backup Log, Step 1: Click View Log in the Backup window: Figure 46: Backup — OR — Click the BlackArmor icon in your System Tray to display the BlackArmor popup menu: Managing Backup Settings 42
Maxtor Black Armor Step 2: Click View Log to open a text file showing the history of your system backups: Figure 47: Backup Log Restoring Files When you back up the files stored in selected folders, the Maxtor Manager saves ten (10) previous, or historical, versions of each revised file stored on your BlackArmor drive. You can restore a saved historical version of a backed up file based on the date it was last modified or you can restore the most recent version of a backed up file.
Maxtor Black Armor The Backup window opens: Figure 48: Backup Listed beneath Restore Files are the date and time of your most recent backup. Step 2: In the Backup window, click Restore Files.
Maxtor Black Armor Figure 49: Restore a Backup Restoring an Historical Version Step 1: Click Restore historical version of backed up file to restore a previous version of a file.
Maxtor Black Armor The Restore Historical Version window opens: Figure 50: Restore Historical Version Step 2: Select a file and file version to be restored and click Restore. The selected file version is restored to the location noted in the Restore Historical Version window. Restoring the Most Recent Version Step 1: Click Restore most recent version to restore the latest version of a file.
Maxtor Black Armor Windows Explorer displays the contents of the Maxtor Backup folder: Figure 51: Maxtor Backup in Windows Explorer Step 2: Browse to the desired file and drag it to the location at which you want it restored. Step 3: Close Windows Explorer.
Maxtor Black Armor Synchronizing Folders Sync is designed to synchronize files in one or more folders between two or more computers. You can sync selected folders from one computer to your BlackArmor drive and then connect the drive to another computer to complete the sync. Note: Files cannot be synchronized between computers running XP and those running Vista.
Maxtor Black Armor The Sync window opens: Figure 52: Sync Step 2: Click Simple Sync. The Simple Sync Confirmation window opens: Figure 53: Confirm Simple Sync Step 3: Click OK to close the confirmation window. Your XP My Documents or Vista Personal Folder folder is now synchronized with your drive. Connect the drive to other computers to complete the sync.
Maxtor Black Armor Using Custom Sync Custom Sync allows you to select specific folders and file types for synchronization and to choose sync and encryption settings. To configure Custom Sync, Step 1: Click the Sync icon in the Maxtor Manager window. The Sync window opens: Figure 54: Sync Step 2: Click Custom Sync.
Maxtor Black Armor The Folder Selection window opens: Figure 55: Folder Selection Step 3: Select the folders to be synchronized. You can select as many folders as you like, but they must all reside on the same drive (partition). Step 4: Click Next.
Maxtor Black Armor The File Types window opens: Figure 56: Using Custom Sync Sync All File Types 52
Maxtor Black Armor Step 5: Select the types of files you want to sync: • All File Types • Photos, Music, Videos, Documents — You can choose to sync any or all of these: Figure 57: Using Custom Sync Sync File Types: Photo, Music, Video, Documents 53
Maxtor Black Armor • Custom Select specific file types to include or exclude for sync: — To sync only a few of the available file types, 1.Select Include these file types. 2.Select each file type you do want to sync and click Add to move it to the Include window. — To sync most of the available file types, 1.Select Exclude these file types. 2.Select each file type you don’t want to sync and click Add to move it to the Exclude window.
Maxtor Black Armor The Sync Rules window opens: Figure 59: Sync Rules Step 7: Select your Sync rules: • Sync Rules: — Sync automatically each time a file changes — Sync manually using the Sync Now button in the Sync window • Copy & Replace Rules — Always overwrite older file versions with newer versions — Ask before overwriting a file Step 8: After you’ve set your Sync rules, click Finish to return to the Sync window.
Maxtor Black Armor To complete the Sync, Step 1: Safely remove the BlackArmor drive from your computer. Step 2: Connect the BlackArmor drive to another computer.
Maxtor Black Armor (b) If you’ve synchronized your XP My Documents (or Vista Personal Folder), the Sync “My Documents” (or Sync “Personal Folder”) window opens: Figure 61: Sync My Documents or Personal Folder (c) If you’ve synchronized both XP My Documents (or Vista Personal Folder) and other folders, both windows open. Step 3: In each window, select the location at which to store the synchronized folders on this computer and click OK.
Maxtor Black Armor The Sync window opens: Figure 62: Sync Step 2: Click Edit Sync Settings.
Maxtor Black Armor The Folder Selection window displays your current folder settings: Figure 63: Edit Sync Folder Selection Step 3: Add and/or remove folders from Sync and click Next. Note: Folders removed from Sync are deleted from your BlackArmor drive.
Maxtor Black Armor The File Types window displays your current file type settings: Figure 64: Edit Sync File Types Step 4: Make the desired changes and click Next. Note: If you sync a type of file and then remove that file type from your sync selections, all files of that type previously synchronized will be removed from your drive during the next sync.
Maxtor Black Armor The Sync Rules window displays your current settings: Figure 65: Edit Sync Rules Step 5: Make the desired changes and click Finish to return to the Sync window. Checking Sync Status To check the status of a Sync, Step 1: Click the Sync icon in the Maxtor Manager window.
Maxtor Black Armor The Sync window opens: Figure 66: Sync Step 2: Click Check Sync Status.
Maxtor Black Armor The Sync Status window opens: Figure 67: Sync Status Listed are the names of the computers on which Sync was set up, the date of the last Sync, and the Automatic Sync setting (On or Off). Step 3: Click OK to return to the Sync window. Deleting Sync Settings To delete all your Sync settings and create a new set, Step 1: Click the Sync icon in the Maxtor Manager window.
Maxtor Black Armor The Sync window opens: Figure 68: Sync Step 2: Click Delete Sync Settings.
Maxtor Black Armor Step 3: Click Delete. The original Sync window opens: Figure 70: Sync Step 4: To create new Sync settings, select Simple Sync or Custom Sync. Using Automatic Sync The Automatic Sync feature continuously tracks file changes in synchronized folders and automatically synchronizes revised versions. Your BlackArmor drive must be connected during Automatic Sync. By default, Automatic Sync is turned on.
Maxtor Black Armor To turn off Automatic Sync, Step 1: Click the Sync icon in the Maxtor Manager window. The Sync window opens: Figure 71: Automatic Sync Step 2: In the Sync window, click the Automatic Sync Off button. Step 3: To sync manually when Automatic Sync is off, • Click Sync Now in the lower right corner of the Sync window.
Maxtor Black Armor A Sync Progress window informs you of the progress of the sync. Figure 72: Sync Progress Step 4: When the sync is complete, click OK to close the window. Using Automatic Overwrite The Automatic Overwrite feature instructs Maxtor Manager to replace old file versions with new versions each time a sync occurs.Your BlackArmor drive must be connected to use Automatic Overwrite. • When Automatic Overwrite is on, older file versions are always replaced with newer versions.
Maxtor Black Armor To turn off Automatic Overwrite, Step 1: Click the Sync icon in the Maxtor Manager window. The Sync window opens: Figure 73: Automatic Overwrite Step 2: In the Sync window, click the Automatic Overwrite Off button. Step 3: To sync manually and make individual decisions about which files to add, overwrite, or delete, • Click Sync Now in the lower right corner of the Sync window.
Maxtor Black Armor The Sync Preview window opens: Figure 74: Sync Preview Listed are the files scheduled to be overwritten. Step 4: If you do NOT want to overwrite an older file version with a newly-synchronized version, add a file, or delete a file, uncheck the file in the On column. Step 5: Click Sync Now to sync your files according to the settings you’ve made in the Sync Preview window. A Sync Progress window informs you of the progress of the sync.
Maxtor Black Armor Using the Sync Preview Window Use the Sync Preview window to manage your synchronized files: • Add or delete files. • Decide whether to overwrite existing file versions. • Resolve conflicts over which version of a synchronized file to save. If the same file is edited on different computers at the same time, a conflict occurs over which version of the file to save.
Maxtor Black Armor Step 2: Click Sync Now to complete the sync. A Sync Progress window informs you of the progress of the sync. Figure 77: Sync Progress Step 3: When the sync is complete, click OK to close the window.
Maxtor Black Armor Managing BlackArmor™ Security BlackArmor™ security uses Government-grade AES encryption technology certified by the National Institute of Standards and Technology (NIST) to provide the strongest hardwarebased, full disk encryption available for an external storage device. Your entire drive and all the data stored on it are protected by a drive encryption key from unauthorized access.
Maxtor Black Armor The window idsplays Locked instead of a drive letter. Step 2: Click Unlock Drive. The Unlock window opens: Figure 79: Unlock Step 3: Enter your password and click Unlock.
Maxtor Black Armor The window refreshes to display the drive letter. The Unlock Drive option is now grayed out: Figure 80: Other Features Changing your Password Your password must initially be set in the BlackArmor Manager application. Once you’ve set a password, you can change it in either the Maxtor Manager application or the BlackArmor Manager application when your drive is connected to a computer on which the Maxtor Manager software is not installed.
Maxtor Black Armor The Security window opens: Figure 81: Security Step 2: Click Change Password.
Maxtor Black Armor The Change Password window opens: Figure 82: Change Password Step 3: Enter your current password, then enter and re-enter a new password. Step 4: Click Set. A message confirms that a new password has been set successfully: Figure 83: Password Set Successfully Step 5: Click Done to return to the Security window or click Set Password Hint to set a hint that will provide a reminder to your password.
Maxtor Black Armor Using the Password Hint BlackArmor not only allows you to set a hint to help you remember your password, but also protects that password hint with a security question you must answer in order to retrieve the password hint. You can delete or change your password hint any time.
Maxtor Black Armor (b) Click Set Password Hint.
Maxtor Black Armor • The Change Password window: (a) Set a new password in the Change Password window. (b) Click Set Password Hint in the Password Set window.
Maxtor Black Armor • The Other Features window: Click Set, Change, or Delete Password Hint in the Other Features window: Figure 87: Set Password Hint from the Other Features Window Setting a Password Hint To set a password hint, Step 1: Open the Set Password Hint window: Using the Password Hint 80
Maxtor Black Armor Figure 88: Set Password Hint Step 2: Select a security question from the dropdown list or create a question of your own. Step 3: Enter the answer to the security question. Step 4: Enter a hint to help you recall your password if you forget it. Step 5: Enter the 25-character identification code printed on the drive label. Step 6: Click Set.
Maxtor Black Armor Changing a Password Hint To change a password hint, Step 1: Click the Security icon in the Maxtor Manager window. The Security window opens: Figure 90: Security Step 2: Click Set, Change, or Delete Password Hint. A message informs you that a password hint has already been set and asks if you want to delete it or overwrite it with a new password hint.
Maxtor Black Armor Step 3: Click Overwrite. The Set Password Hint window opens: Figure 92: Set Password Hint Step 4: Select a security question from the dropdown list or create a question of your own. Step 5: Enter the answer to the security question. Step 6: Enter a hint to help you recall your password if you forget it. Step 7: Enter the 25-character identification code printed on the drive label. Step 8: Click Set.
Maxtor Black Armor Step 9: Click OK to return to the Security window. Deleting a Password Hint To delete a password hint, Step 1: Click the Security icon in the Maxtor Manager window. The Security window opens: Figure 94: Security Step 2: Click Set, Change, or Delete Password Hint.
Maxtor Black Armor A message informs you that a password hint has already been set and asks if you want to delete it or overwrite it with a new password hint. Figure 95: Password Hint Already Set Step 3: Click Delete. The Delete Password Hint window opens: Figure 96: Delete Password Hint Step 4: Enter the 25-character identification code printed on the drive label. Step 5: Click Delete Password Hint.
Maxtor Black Armor A message confirms that your password hint has been deleted: Figure 97: Password Hint Deleted Step 6: Click OK to return to the Security window. You can set a new password hint by following the original steps at any time. Retrieving a Password Hint If you’ve forgotten your password, you can retrieve the password hint you set to help you remember the password. To retrieve your password hint, Step 1: Click the Security icon in the Maxtor Manager window.
Maxtor Black Armor The Security window for the locked drive opens: Figure 98: Security - Drive Locked Step 2: Click Unlock Drive.
Maxtor Black Armor The Unlock window opens: Figure 99: Unlock Step 3: Click Hint.
Maxtor Black Armor The Retrieve Password Hint window opens: Figure 100: Retrieve Password Hint Step 4: Enter the answer to the security question you selected when you set the password hint and click Show Hint. The Password Hint window displays the password hint: Figure 101: Retrieve Password Hint Step 5: Click Done to return to the Unlock window and enter your password.
Maxtor Black Armor Erasing a BlackArmor Drive If you’ve forgotten your password and cannot unlock the BlackArmor drive, the only way you can continue to use it is to securely erase it using KeyErase™. KeyErase regenerates the drive encryption key, during which process all it the drive has been erased. To erase your BlackArmor drive, Step 1: Click the Security icon in the Maxtor Manager window. The locked Security window opens: Figure 102: Security - Drive Locked Step 2: Click KeyErase™.
Maxtor Black Armor The KeyErase window opens: Figure 103: KeyErase 1 Step 3: Read the warning information and click Next Step.
Maxtor Black Armor A second KeyErase window opens: Figure 104: KeyErase 2 Step 4: Verify that the security LED is flashing on the drive you want to erase. Step 5: Enter the 25-character identification code printed on the drive label. Step 6: Click Erase Drive.
Maxtor Black Armor When the drive has been erased (this takes only a few moments), the Configure BlackArmor window opens: Figure 105: Configure BlackArmor Configuring an Erased Drive After you’ve erased a BlackArmor drive, you must configure the drive and set a drive password. To configure the drive, Step 1: Enter the 25-character identification code printed on the drive label. Step 2: Enter and confirm a drive password. The password must contain between 6 and 32 characters. Step 3: Click Set.
Maxtor Black Armor A message confirms that a password has been set successfully and offers the option of setting a password hint: Figure 106: Password Set Successfully Step 4: Click Done to close the Password Set window or Set Password Hint to create a password hint. Note: For information on setting a password hint, see Setting a Password Hint. The Unlock Drive window opens: Figure 107: KeyErase 2 Step 5: Enter your password and click Unlock.
Maxtor Black Armor The Unlock window closes. After a short wait, the Format Maxtor Drive window opens: Figure 108: Format Maxtor Drive Note: It can take up to a full minute for the Fornat Maxtor Drive window to open. Step 6: Click Format to reformat your drive for use. A Format confirmation window opens. Since you’ve just erased everything on your BlackArmor drive, you don’t have to worry about erasing data. Figure 109: Format Maxtor Drive Confirmation Step 7: Click Format.
Maxtor Black Armor You’re informed of the progress of the format. Figure 110: Format Maxtor Drive Confirmation A message confirms a successful format.
Maxtor Black Armor If the formatting fails, a message informs you that a partition could not be created. Figure 112: Format Failed Step 8: Close the Partition creation failed window. You must use Administrative Tools to create a partition so you can continue to use the BlackArmor drive.
Maxtor Black Armor To use Administrative Tools to manually create a partition, Step 1: Go to Start > Run and open the Run window: Figure 113: Run Step 2: Type diskmgmt.msc and click OK.
Maxtor Black Armor The Disk Management window opens: Figure 114: Disk Management The BlackArmor drive (Disk 1 in the image above) is labeled Unallocated because it’s not properly formatted. The New Partition Wizard opens automatically. Step 3: Follow the steps in the New Partition Wizard to format your BlackArmor drive and prepare it for use again.
Maxtor Black Armor Note: For information on installing the Maxtor Manager software, see Getting Started. Step 7: Launch the Maxtor Manager application.
Maxtor Black Armor Using BlackArmor™ Manager The BlackArmor™ Manager application allows you to connect your BlackArmor drive to any computer and work with the files stored on the drive even if the Maxtor Manager software has not been installed on a computer. The BlackArmor Manager application must be used to initially configure the BlackArmor drive and set a drive password.
Maxtor Black Armor The Configure window opens: Figure 116: Configure Step 2: Select your BlackArmor drive from the dropdown menu. Step 3: Enter the 25-character identification code printed on the drive label. Step 4: Enter and confirm a drive password. Note: The password must contain between 6 and 32 characters. Step 5: Click Set.
Maxtor Black Armor Note: For information on setting a password hint, see Setting a Password Hint. The Unlock Drive window opens: Figure 118: Unlock Drive Step 7: Select your BlackArmor drive from the dropdown list, enter your password, and click Unlock. The Unlock Drive window closes and the BlackArmor autostart window opens: Figure 119: BlackArmor Autostart Window Step 8: Select Install Maxtor Manager using the program provided on the device and click OK.
Maxtor Black Armor The Maxtor Manager Install window opens: Figure 120: BlackArmor Autostart Window Step 9: Click Install Maxtor Manager and follow the instructions in the Install wizard to install the Maxtor Manager software. Note: For information about installing the Maxtor Manager software, see Getting Started. Unlocking the BlackArmor Drive Your BlackArmor drive locks automatically each time you disconnect it from a computer.
Maxtor Black Armor The Unlock Drive window opens: Figure 121: Unlock Drive Step 2: Select your BlackArmor drive from the dropdown list, enter your password, and click Unlock. The Unlock Drive window closes. The BlackArmor drive is now unlocked and the files stored on it can be accessed. During the power change that occurs when your Maxtor drive wakes up from Sleep, Hibernate, or Standby mode, the drive may occasionally lock itself.
Maxtor Black Armor Using the BlackArmor Manager Features To use the BlackArmor Manager features, you must select the Other Features option in the Unlock window BEFORE you unlock your drive. Once the drive is unlocked, the BlackArmor Manager window closes and does not reappear until you have disconnected and re-connected your drive.
Maxtor Black Armor Changing your Password Your password must initially be set in the BlackArmor Manager application. Once you’ve set a password, you can change it in either the Maxtor Manager application or the BlackArmor Manager application when your drive is connected to a computer on which the Maxtor Manager software is not installed. Note: For information on changing your password in the Maxtor Manager application, see Managing BlackArmor Security.
Maxtor Black Armor The Other Features window opens: Figure 123: Other Features Step 3: Click Change Password.
Maxtor Black Armor The Change Password window opens: Figure 124: Change Password Step 4: Enter your current password, then enter and re-enter a new password. Step 5: Click Set. A message confirms that a new password has been set successfully: Figure 125: Password Set Successfully Step 6: Click Done to return to the Other Features window or Set Password Hint to set a hint that will open a reminder to your password.
Maxtor Black Armor Using the Password Hint BlackArmor not only allows you to set a hint to help you remember your password, but also protects that password hint with a security question you must answer in order to retrieve the password hint. You can delete or change your password hint any time.
Maxtor Black Armor • The Unlock Drive window: (a) Click Hint in the Unlock Drive window. If no password hint has been set, the Password Hint Not Set window opens. (b) Click Set Password Hint.
Maxtor Black Armor • The Change Password window: (a) Set a new password in the Change Password window. (b) Click Set Password Hint in the Password Set window.
Maxtor Black Armor Setting a Password Hint To set a password hint, Step 1: Open the Set Password Hint window: Figure 131: Set Password Hint Step 2: Select a security question from the dropdown list or create a question of your own. Step 3: Enter the answer to the security question. Step 4: Enter a hint to help you recall your password if you forget it. Step 5: Enter the 25-character identification code printed on the drive label. Step 6: Click Set.
Maxtor Black Armor Changing a Password Hint To change a password hint, Step 1: Connect the drive to a computer The Unlock Drive window opens: Figure 133: Unlock Drive Step 2: Click Other Features.
Maxtor Black Armor The Other Features window opens: Figure 134: Other Features Step 3: Click Set, Change, or Delete Password Hint. A message informs you that a password hint has already been set and asks if you want to delete it or overwrite it with a new password hint. Figure 135: Password Hint Already Set Step 4: Click Overwrite.
Maxtor Black Armor The Set Password Hint window opens: Figure 136: Set Password Hint Step 5: Select a security question from the dropdown list or create a question of your own. Step 6: Enter the answer to the security question. Step 7: Enter a hint to help you recall your password if you forget it. Step 8: Enter the 25-character identification code printed on the drive label. Step 9: Click Set.
Maxtor Black Armor Deleting a Password Hint To delete a password hint, Step 1: Connect the drive to a computer The Unlock Drive window opens: Figure 138: Unlock Drive Step 2: Click Other Features.
Maxtor Black Armor The Other Features window opens: Figure 139: Other Features Step 3: Click Set, Change, or Delete Password Hint. A message informs you that a password hint has already been set and asks if you want to delete it or overwrite it with a new password hint.
Maxtor Black Armor Step 4: Click Delete. The Delete Password Hint window opens: Figure 141: Delete Password Hint Step 5: Enter the 25-character identification code printed on the drive label. Step 6: Click Delete Password Hint. A message confirms that your password hint has been deleted: Figure 142: Password Hint Deleted Step 7: Click OK to return to the Other Features window. You can set a new password hint by following the original steps.
Maxtor Black Armor To retrieve your password hint, Step 1: Connect the drive to a computer The Unlock Drive window opens: Figure 143: Unlock Drive Step 2: Click Hint.
Maxtor Black Armor The Retrieve Password Hint window opens: Figure 144: Retrieve Password Hint Step 3: Enter the answer to the security question you selected when you set the password hint and click Show Hint. The Password Hint window displays the password hint: Figure 145: Password Hint Step 4: Click Done to return to the Unlock window and enter your password.
Maxtor Black Armor Testing your Drive To test the health of your drive, Step 1: Connect the drive to a computer The Unlock Drive window opens: Figure 146: Unlock Drive Step 2: Click Other Features.
Maxtor Black Armor The Other Features window opens: Figure 147: Other Features Step 3: Click Test Drive.
Maxtor Black Armor Step 4: Click Test. A window informs you of the progress of the drive test.When the test is complete, the result is displayed: Figure 149: Drive Test Complete If the drive test is not successful, contact Seagate Technical Support for assistance.
Maxtor BlackArmor Index A Adjusting the Power Setting 13 B Backing Up & Restoring Folders 23 Creating a Backup Plan 23 Restoring Files 43 Backing Up Manually 40 C Changing a Password Hint 82, 113 Changing your Password 74, 106 Checking Sync Status 61 Completing the Sync 55 Configuring an Erased Drive 93 Configuring the BlackArmor Drive 1, 101 Creating a Backup Plan 23 Creating a Custom Backup 25 Using Simple Backup 23 Creating a Custom Backup 25 D Deleting a Backup Plan 37 Deleting a Password Hint 84, 116
Maxtor BlackArmor Installing the Maxtor Manager Software after Erasing the Drive 99 M Managing Backup Settings 32 Backing Up Manually 40 Deleting a Backup Plan 37 Editing Backup Settings 32 Using Scheduled Backup 39 Viewing the Backup Log 41 Managing BlackArmor Security 72 Managing Your Drives 12 Adjusting Power Setting 13 Testing Your Drive 15 O Opening the Set Password Hint Window 77, 109 P Partition Creation Failure 97 Preparing the BlackArmor Drive for Use 1 R Restoring an Historical Version 45 Restori
Maxtor BlackArmor Using Administrative Tools to Format an Erased BlackArmor 97 Using Automatic Overwrite 67 Using Automatic Sync 65 Using BlackArmor Manager 101 Using Custom Sync 50 Using Scheduled Backup 39 Using Simple Backup 23 Using Simple Sync 48 Using the BlackArmor Manager Features 105 Using the Password Hint 77, 109 Changing a Password Hint 82, 113 Deleting a Password Hint 84, 116 Opening the Set Password Hint Window 77, 109 Retrieving a Password Hint 86, 118 Setting a Password Hint 80, 112 Using t