ATA Hard Drive Installation Guide Copyright © 2002 Maxtor Corporation. All rights reserved. Changes are periodically made to the information herein which will be incorporated in revised editions of this publication. Maxtor may make changes or improvements to the product(s) described in this publication at any time and without notice. MaxBlast is a trademark and Maxtor is a registered trademark of Maxtor Corporation.
Contents 1 Getting Started ...................................1 Handling the Hard Drive. . . . . . . . . . . . . . . . . . . . . . . . . . . . . . . . . . . . . Operating System Requirements . . . . . . . . . . . . . . . . . . . . . . . . . . . . . . . Back Up Your Data . . . . . . . . . . . . . . . . . . . . . . . . . . . . . . . . . . . . . . . . Important Capacity Notice . . . . . . . . . . . . . . . . . . . . . . . . . . . . . . . . . . . 1 1 2 2 2 Installing the Hard Drive . . . . . . . . . . . . .
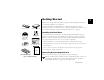
Getting Started 1 Thank you for selecting a Maxtor hard drive storage product. This installation guide will lead you through the installation of your hard drive. Maxtor ATA Hard Drive ATA Interface Cable The Maxtor Hard Drive Retail Kit includes the components shown in Figure 1.Your computer may need some or all of these parts to complete the installation.You will also need the tools shown in Figure 2 on page 2 to install the hard drive in your computer.
1 Back Up Your Data Protect your data by backing up existing hard drives before installing your new Maxtor hard drive. Important Capacity Notice System Ma nual System User Manual If you are installing this hard drive without an Ultra/ATA PCI adapter card, be sure that your computer meets the system requirements printed on the Maxtor box. Some older systems require the use of an ATA card to fully recognize higher capacity hard drives.
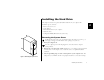
Installing the Hard Drive This chapter describes how to physically install the hard drive in your computer. The installation steps are as follows: 2 • Remove the system cover. • Set the jumpers. • Mount the hard drive in your computer. • Attach the cables. • Configure the BIOS (Windows-based systems only). Removing the System Cover For Macintosh systems, refer to the documentation that came with your system or go to www.apple.com/support for information about opening your system case. 1.
Setting the Jumpers 2 A jumper is a small plastic piece that slides over a pair of configuration pins. (See Figure 4.) The next step in the installation process is to set the jumpers on the back of your hard drive so your system can identify the hard drive. The following definitions describe the jumper settings: Master. This setting can be used if you will be using the new hard drive as a primary master boot drive or a secondary master additional storage drive.
Determining the Correct Jumper Setting The correct jumper setting for your hard drive depends on your current system configuration and how you want to use the new hard drive. The recommended jumper settings below will work on many, but not all, systems. 2 • If you are building a new system, use the cable select setting on all ATA devices to make it easier to configure your system. • If you have an existing system, check the jumper settings on your current boot drive and your CD-ROM drive.
Placing the Jumper 2 Most hard drives come preconfigured with one jumper in the cable select or master position and an extra jumper in a horizontal spare position. The extra jumper can be used as a cylinder limitation jumper (see below) if required by your system. To place the jumper Master Jumper Style A 1. Determine whether you will use the cable select, master, or slave jumper setting. Slave Cable Select 2. Remove the plastic jumper from the jumper block. 3.
Mounting the Hard Drive Before mounting the hard drive in your system, you need to determine whether you are installing the hard drive in a 3.5-inch or 5.25-inch device bay. If you are unable to locate an available device bay in your computer, please consult your system user manual. 2 3.5-inch Device Bay Installation When installing the hard drive in a 3.5-inch device bay, you do not need to use mounting brackets. Many systems have an available 3.5-inch bay located adjacent to the floppy drive.
5.25-inch Device Bay Installation When installing the hard drive in a 5.25-inch bay (such as where CD-ROM drives are typically installed), you first need to attach mounting brackets to the hard drive. 2 1. Attach the mounting brackets to the hard drive using four of the eight screws. See Figure 8 for details. 2. Tighten the screws securely. Be sure you do not over-tighten the screws as this will strip Figure 8. Mounting the Brackets on the Hard Drive the threads in the hard drive's metal housing. 3.
Attaching the Cables An Ultra ATA cable (included) no longer than 18 inches is recommended for all UDMAcapable hard drives and is required for hard drives configured as cable select. Maxtor strongly recommends using the Ultra ATA cable included in this package. 2 The provided Ultra ATA cable has a striped edge indicating pin #1 and a key notch on each connector. The power cable connector is also keyed to prevent improper connection to the hard drive.
Hard Drive Position Tips Most systems are capable of holding four ATA/IDE devices, two devices on the primary cable and two devices on the secondary cable or port. Typical configurations are as follows: New System 2 (See “Installing Hard Drive as a Boot Drive” on page 16.
Existing System 2 (See “Installing Hard Drive as an Additional Hard Drive” on page 21.) Cable Position Device Primary Master, 0: Primary Slave, 1: Secondary Master, 0: Secondary Slave, 1: Boot Drive Additional Storage Drive CD-ROM CD-ROM or DVD 2 Existing System 3 (See “Installing Hard Drive as an Additional Hard Drive” on page 21.
Configuring the System BIOS This section is for Windows-based systems only. Mac users may proceed to “Formatting the Hard Drive” on page 15. 2 Before partitioning and formatting your hard drive, you must tell the system what type of hardware you are using. This is referred to as configuring the system BIOS.Your computer system provides an initial setup utility (CMOS Setup) for this purpose.
a. Press the pause/break key after the memory count to pause the system boot. The pause/break key is usually located in the upper right corner of your keyboard (see Figure 13). Pausing the boot will give you time to locate the function key message. F11 F12 Backspace Print Scrn SysRq Insert Scroll Lock Pause Break Home Page Up Figure 13. Pause/Break Key on a Keyboard b. Press the Enter key to resume system boot. 2 3.
2 14 Installing the Hard Drive
Formatting the Hard Drive This chapter describes how to format and partition your new hard drive using the MaxBlast Plus II software on a Windows system. Do not create partitions larger than 137 GB using MaxBlast Plus unless your motherboard, BIOS, operating system, and ATA host controller properly support 48-bit Logical Block Addressing (LBA). Creating partitions larger than 137 GB on systems that do not support 48-bit LBA can result in data loss.
• Existing system with original boot drive and you want to use your new hard drive as storage only. See “Installing Hard Drive as an Additional Hard Drive” on page 21. Installing Hard Drive as a Boot Drive This section gives instructions for installing the hard drive in a new system as the boot drive or for replacing a failed boot drive in an existing system. 3 " For Windows NT 4.x, 2000, or XP installations, read “Windows NT 4.
6. Click Next to continue. Allow the MaxBlast Plus II program to partition and format the hard drive using the Standard Partitions option.Your hard drive is automatically partitioned to the largest capacity by default. The hard drive is assigned a single drive letter if installing Windows 98 or newer operating system. 7. When MaxBlast Plus II is finished formatting the hard drive, remove the system boot disk from the floppy drive and reboot the system. 8.
After the system boot disk finishes loading, you should see the A:\ prompt. Above the prompt, you should also see a line saying Drive X: = Driver MSCD001 unit 0 where X is the drive letter assigned to the CD-ROM drive. Depending on how many devices are connected to the ATA/IDE cables, the assigned CD-ROM drive letter could be E, F, G, etc. 10. Note the CD-ROM drive letter. 11. Insert your Windows CD in the CD-ROM drive. 3 12.
4. Change to the i386 directory on the CD-ROM drive. where X is the drive letter assigned to the CD-ROM drive. 5. Type WINNT /OX and press Enter. This command creates the three Windows NT 4.0 system boot disks. cd X:\i386 To create Windows 2000 startup disks 1. Boot the system with a Windows 98, SE, or ME startup disk. 2. Choose the Start Computer with CD-ROM Support option. 3 3. Insert the Windows 2000 system CD. 4. Change directories to the CD-ROM drive.
4. When MaxBlast Plus II is finished formatting the hard drive, remove the floppy disk from the floppy drive and the CD from the CD-ROM drive. 5. Insert the Windows XP CD in the CD-ROM drive and restart your system. 6. Follow the onscreen prompts to boot from the Windows XP CD and install the operating system. During the installation, you will be notified that the hard drive has an existing format.You do not need to change the format. Keep the current partition and file system and finish the installation.
7. After the system boots to the Windows desktop, double-click the My Computer icon.You should see a new drive letter and icon. 8. Double-click the new drive letter.You should see all the files copied from your boot drive to your new hard drive. If all of your files appear to have copied, you will now make the new hard drive your boot drive. 9. Shut down Windows normally and power the system off.You can now switch your new hard drive with the old original boot drive. 10.
2. Restart the system. When the MaxBlast Plus II program starts, you will be notified that an unformatted hard drive has been found. 3. When asked if you would like to format the hard drive now, click Yes. The next screen shows the devices that are connected to your ATA/IDE cables. The new hard drive is identified with Partition and Format in red lettering. 4. Click Next. The next screen looks similar to the previous one, except the information in the left hand instruction column has changed.
Getting Help This section provides troubleshooting tips and answers frequently asked questions about installing a hard drive.You can find additional information in the Maxtor Knowledge Base at www.maxtor.com/knowledgebase or contact us at www.maxtor.com.
resolve this issue. Another way to overcome the BIOS limitation is to install an Ultra ATA PCI card like the Maxtor Ultra ATA/133 PCI Adapter Card. • If the system still hangs after the installation of the capacity limitation jumper, try the user-definable option in the BIOS setup utility as follows: a. Power the system off and disconnect the ATA and power cables from the hard drive. b. Restart the system and enter the BIOS setup utility. c.
• A conflict has occurred with another device in the system.Verify the jumper settings on each device attached to the ATA cable, and try reversing the order of the devices on the cable. Try installing the devices on separate cables, setting each as a Master device. Try the new hard drive alone as the only ATA device attached to the system. Frequently Asked Questions This section contains some answers to questions frequently asked by our customers.
What do I do if my hard drive fails? First, you need to verify that the hard drive has actually failed. The Powermax diagnostic utility can determine if the hard drive is functioning properly. This utility can be created from the MaxBlast Plus II CD-ROM or downloaded from www.maxtor.com as follows: 1. Select Product Support and click Software and Utilities. 2. Click the Powermax link. 3. Download the PWRDIAG.EXE file to your hard drive. 4. Read the complete installation and test guide on the web page.
Glossary ATA Advanced Technology Attachment. ATA (also known as Integrated Drive Electronics, or IDE) is a popular internal interface standard for computer peripherals BIOS Basic Input/Output System. A low-level program that controls a computer's basic functions. Boot To start or restart your computer; loading the operating system. Boot Drive The drive from which the operating system loads to start up your computer.
Hard Drive An electromechanical device used for information storage and retrieval, incorporating one or more rotating disks on which data is recorded, stored, and read magnetically. Jumper In ATA/IDE drives, a jumper is an electrically-conductive component that you place over pairs of pins that extend from the circuit board on the hard drive jumper block to connect them electronically. For example, a jumper is one way to designate a hard drive as master or slave.
Index A attaching cables 9 B BIOS capacity barrier 25 C cable select 5 cables attaching 9 configuring system BIOS 12 creating boot disks Windows 2000 19 Windows NT 18 Windows XP 19 frequently asked questions 25 G P getting help 23 partitioning hard drive 15 Macintosh 15 positioning drives 10 Powermax diagnostic utility 26 precautions 1 PWRDIAG.EXE 26 I installing additional hard drive 21 in 3.5" device bay 7 in 5.
Maxtor Product Warranty Maxtor warranty obligations are limited to the terms set forth: Maxtor warrants to the original consumer purchaser that new Maxtor products will be free from defects in material and workmanship for 3 years from the date of original purchase. For replacement disk drives, the warranty on the replacement drive is the remainder of the warranty on the original drive or 90 days, whichever is longer.
ATA Hard Drive Installation Guide Copyright © 2002 Maxtor Corporation. All rights reserved. Changes are periodically made to the information herein which will be incorporated in revised editions of this publication. Maxtor may make changes or improvements to the product(s) described in this publication at any time and without notice. MaxBlast is a trademark and Maxtor is a registered trademark of Maxtor Corporation.