This document is a condensed version of the full Product Reference Manual. This version only includes the Maxtor Information about the Product. Information that can be found in the ANSI specification is not included in this document to reduce its over all size. Also eliminated are the Table of Contents and Glossary. This condensed version is created to allow faster downloading from Maxtor's Internet home page and MaxFax services.
Revisions Manual No. 1390 REV EC NO. SECTION DESCRIPTION DATE A 78892B All Initial release.
Before You Begin Thank you for your interest in the Maxtor DiamondMax™ 2880 AT hard disk drives. This manual provides technical information for OEM engineers and systems integrators regarding the installation and use of DiamondMax hard drives Drive repair should be performed only at an authorized repair center. For repair information, contact the Maxtor Customer Service Center at 800-2MAXTOR or 408-432-1700. Before unpacking the hard drive, please review Sections 1 through 4.
DIAMONDMAX 2880 – INTRODUCTION SECTION 1 Introduction Maxtor Corporation Maxtor Corporation has been providing high-quality computer storage products since 1982. Along the way, we’ve seen many changes in data storage needs. Not long ago, only a handful of specific users needed more than a couple hundred megabytes of storage. Today, downloading from the Internet and CD-ROMs, multimedia, networking and advanced office applications are driving storage needs even higher.
DIAMONDMAX 2880 – INTRODUCTION Conventions If there is a conflict between text and tables, the table shall be accepted as being correct. Key Words The names of abbreviations, commands, fields and acronyms used as signal names are in all uppercase type (e.g., IDENTIFY DRIVE). Fields containing only one bit are usually referred to as the “name” bit instead of the “name” field. Names of drive registers begin with a capital letter (e.g., Cylinder High register).
PRODUCT DESCRIPTION SECTION 2 Product Description Maxtor DiamondMax™ 2880 AT disk drives are 1-inch high, 3.5-inch diameter random access storage devices which incorporate an on-board ATA/Ultra DMA controller. High capacity is achieved by a balanced combination of high areal recording density and the latest data encoding and servo techniques. Maxtor's latest advancements in electronic packaging and integration methods have lowered the drive's power consumption and increased its reliability.
PRODUCT DESCRIPTION Product Features Functional / Interface Maxtor DiamondMax™ 2880 hard drives contain all necessary mechanical and electronic parts to interpret control signals and commands from an AT-compatible host computer. See Section 3 Product Specifications, for complete drive specifications. Zone Density Recording The disk capacity is increased with bit density management – common with Zone Density Recording. Each disk surface is divided into 16 circumferential zones.
PRODUCT DESCRIPTION Logical Block Addressing The Logical Block Address (LBA) mode can only be utilized in systems that support this form of translation. The cylinder, head and sector geometry of the drive, as presented to the host, differs from the actual physical geometry. The host AT computer may access a drive of set parameters: number of cylinders, heads and sectors per track, plus cylinder, head and sector addresses.
PRODUCT DESCRIPTION Cache Management Buffer Segmentation The data buffer is organized into two segments: the data buffer and the micro controller scratch pad. The data buffer is dynamically allocated for read and write data depending on the commands received. A variable number of read and write buffers may exist at the same time. Read-Ahead Mode Normally, this mode is active. Following a read request, disk read-ahead begins on the first sector and continues sequentially until the allocated buffer is full.
PRODUCT DESCRIPTION Major HDA Components Drive Mechanism A brush-less DC direct drive motor rotates the spindle at 5,400 RPM (±0.1%). The dynamically balanced motor/spindle assembly ensures minimal mechanical run-out to the disks. A dynamic brake provides a fast stop to the spindle motor upon power removal. The speed tolerance includes motor performance and motor circuit tolerances.
PRODUCT DESCRIPTION Subsystem Configuration Dual Drive Support Two drives may be accessed via a common interface cable, using the same range of I/O addresses. The drives are jumpered as device 0 or 1 (Master/Slave), and are selected by the drive select bit in the Device/Head register of the task file. All Task File registers are written in parallel to both drives.
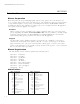
PRODUCT SPECIFICATIONS SECTION 3 Product Specifications Models and Capacities M O DEL Formatted Capacity (MB LBA Mode) 91152D 8 91008D 7 90845D 6 90840D 6 90720D 5 90648D 5 90576D 4 90510D 4 90432D 3 90288D 2 90256D 2 11,520 10,080 8,455 8,400 7,200 6,480 5,760 5,122 4,320 2,880 2,560 90576D4 90510D4 90432D3 90288D2 90256D2 4 3 2 2 8,440,992 5,627,664 5,000,000 90432D3 90288D2 90256D2 Maxtor defines one megabyte as 106 or one million bytes and one gigabyte as 109 or
PRODUCT SPECIFICATIONS Physical Dimensions PARAMETER H e ig h t Length W id t h Weight STANDARD 1.02 inch 5.77 inches 4.02 inches 1.3 pounds M E T R IC 2 5 .9 m illim e t e r s 146.6 millimeters 102.1 millimeters 0 .
PRODUCT SPECIFICATIONS Power Requirements (Average) M ODE 12V ± 8% 5V ± 5% POWER Spin-up (peak) 1600 mA 200 mA 20.2 W Seek 620 mA 330 mA 9.0 W Read/Write 215 mA 350 mA 4.3 W Idle 4.1 W 245 mA 225 mA Standby 7 mA 245 mA 1.3 W Sleep 7 mA 140 mA 0.8 W Power Mode Definitions Spin-up The drive is spinning up following initial application of power and has not yet reached full speed. Seek A random access operation by the disk drive.
PRODUCT SPECIFICATIONS Shock and Vibration PARAMETER OPERATING NON-OPERATING Mechanical Shock Random Vibration 20 Gs, 2.0 ms, no errors Per MIL-STD-810E, method 514.4, basic transportation, vertical axis PSD profile. 10 - 300 Hz at 0.004 G2/Hz 301 - 500 Hz at 0.0006 G2/Hz 200 Gs, 2.0 ms, no damage Swept Sine Vibration 5 - 20 Hz 21 - 300 Hz 10 Hz at 0.015 G2/Hz 40 Hz at 0.015 G2/Hz 500 Hz at 0.00015 G2/Hz 0.049 inches double amplitude 1.
PRODUCT SPECIFICATIONS EMC/EMI Radiated Electromagnetic Field Emissions - EMC Compliance The hard disk drive mechanism is designed as a subassembly for installation into a suitable enclosure and is therefore not subject to Subpart J of Part 15 of FCC Rules (47CFR15) or the Canadian Department of Communications Radio Interference Regulations.
INSTALLATION SECTION 4 Handling and Installation Pre-formatted Drive This Maxtor hard drive has been formatted at the factory. Do not use a low-level formatting program. Important Notice There are a number of system BIOS’s currently in use which do not support hard drives with more than 4095 cylinders (2.1 gigabytes). This section contains information describing the conditions which may identify this limitation.
INSTALLATION Unpacking and Inspection Retain any packing material for reuse. Inspect the shipping container for evidence of damage in transit. Notify the carrier immediately in case of damage to the shipping container. As they are removed, inspect drives for evidence of shipping damage or loose hardware. If a drive is damaged (and no container damage is evident), notify Maxtor immediately for drive disposition.
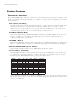
INSTALLATION Figure 4 - 2 Single Pack Shipping Container (Option A) Figure 4 - 3 Single Pack Shipping Container (Option B) Repacking If a Maxtor drive requires return, repack it using Maxtor packing materials, including the antistatic bag. Physical Installation Recommended Mounting Configuration The DiamondMax™ 2880 drive design allows greater shock tolerance than that afforded by larger, heavier drives.
INSTALLATION 1 Before You Begin IMPORTANT – PLEASE READ ! Please read this Installation Sheet completely before installing the Maxtor hard drive. It gives general information for installing a Maxtor hard drive in a typical computer system. If you don’t understand the installation steps, have a qualified computer technician install the hard drive. DO NOT use any low-level formatting software on this drive.
INSTALLATION 2 Hardware, Software and BIOS Requirements System Hardware Requirements Maxtor does not recommend installing drives greater than 8.4 GB in a 486 (50 MHz or slower), 286, 386 or older systems. These systems are not designed to support large capacity hard drives. Even if an EIDE interface card or drive management software are used the performance and reliability of the drive in older systems cannot be predicted. The minimum system recommended for drives 8.
INSTALLATION 3 Hard Drive Identification IDE stands for Integrated Drive Electronics and EIDE is Enhanced IDE. The IDE or EIDE interface is designed to support two devices – typically hard drives – on a single ribbon cable through one 40 pin connector on the mother board or interface card. Some mother boards and interface cards may have a second IDE/EIDE connector to support two additional IDE devices. The IDE/EIDE interface is identified as a primary or secondary interface.
INSTALLATION Systems Using Cable Select IMPORTANT – Most systems do not use this feature. Unless you are sure that your computer system supports Cable Select, do not set up the drive with this feature enabled. Maxtor hard drives support Cable Select. The Cable Select method of drive identification allows the system to identify Master and Slave IDE devices based upon the position (connector) the IDE device is attached to on the interface (ribbon) cable.
INSTALLATION 5 Attaching Interface and Power Cables In order for the computer to recognize that the Maxtor hard drive is in the system, the power cable and IDE interface cable must be properly connected. 1 Attach an available IDE interface connector to J1 on the Maxtor hard drive. The connector on the cable provided with the Maxtor Hard Drive Kit is keyed and will only fit in one orientation. Do not force the connector.
INSTALLATION 7 System Setup The following procedures are designed for systems using the DOS 5.0 (or higher) or Windows 95 operating systems. For other operating systems (e.g., Windows NT®, OS2®, UNIX®, LINUX and Novell NetWare®), refer to the operating system user’s manual for the BIOS setting and other installation requirements. IMPORTANT: For drives with capacities larger than 8.4 GB the full installation set for Window 95a or 95b (OSR2) or equivalent is required.
INSTALLATION Comment: When LBA is enabled, some BIOS programs (typically Award) will change the values of the cylinders and heads by dividing the cylinders by 2, 4, 8 or 16 and multiplying the heads by the same value. This operation will not change the capacity of the hard drive. If the system correctly detects the drive and does not hang during the boot process proceed to Section 9, If the system hung during the POST proceed to Section 8.
INSTALLATION 8 Hard Drive Preparation To finish the installation, the drive must be partitioned and formatted. Hard drive partitioning and formatting may be done with the operating system software or with MaxBlast installation software. Select A or B below to complete the preparation of the Maxtor hard drive. NOTE: Drive letter assignment is controlled by the operating system and not by the BIOS or MaxBlast.
INSTALLATION System Hangs During Boot If the system hangs during the boot process after installing the Maxtor hard drive – either before or after setting the system BIOS – the system many have a BIOS with a cylinder limitation. This may occur for hard drives that exceed 2.1 GB. If this happens, do the following: 1 Turn the system OFF. 2 Install the cylinder limitation jumper (J46) on the drive.