User Manual
Contents Contents ............................................................................................................................................. 1 1. Appearance and Keypad Operations .............................................................................................. 2 2. Using Memory Card as U Disk ...................................................................................................... 2 3. Wi-Fi ........................................................................
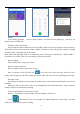
1. Appearance and Keypad Operations Keys Functions Short press this button to return home from any application or interface. Long press it to open Google search. Short press this button to manage wallpapers , widgets and home settings. Long press it to open the recent items. Press it to return to the previous interface,or to close dialog box ,options’ menu ,notification panel or the keypad. home recent back Short press this button to lock or unlock the screen.
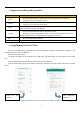
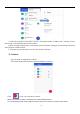
3. Wi-Fi Wi-Fi provides as far as 300feet (100M) range of wireless network access. If you use cell phone to connect Wi-Fi , you should connect to the wireless access point or 「hot spots」. Notices:The availability and coverage of Wi-Fi signal depend on the number, infrastructure and other objects penetrated by the signal. Open Wi-Fi and to connect to the wireless network 1) Enter settings. 2) Select the Wi-Fi box,to open Wi-Fi. Phone will automatically scan for available wireless networks.
Notices: in addition, mobile phone can also surf the Internet by GPRS. Our current SIM card GPRS to open after the default boot.
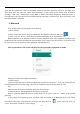
Cut the connection to the Bluetooth In the list of Bluetooth equipment, touch or tap and hold the connected hand-free headset. Press and select “OK”. 5.Gmail Create an electronic mail account Open the Gmail, You can activate or edit existing e-mail accounts as well as create a new e-mail account. Select mail, Google account setting interface appears. Then touch ‘ next step ’ > create account>enter name,last name and e-mail account.
Dialing At the dialing Keyboard ,enter the phone number,and then click the dialing key , after that, you should choose one SIM card. Telephone calls in the call log Every telephone number called and received in“SIM1、SIM2”will reserved in phone’s menu of call log. Each call to record recently will show“SIM1 or SIM2”,All numbers in the call log can be dialed by clicking the button ”dial” on the right side of the screen.
Telephone recording During the call,Click“ ”,you could record the dialog of the call.
Send MMS to certain phone number When creating message,it was defaulted as SMS,it will be turned to MMS when following operations were done. 1) You can send MMS via touch“ ”. 2) Enter the editing information interface. a. Click “type a name, phone number, or email”box to start input method, in that way you can enter characters. b. Click “type an SMS message”, click the Lower left corner ,you can add some default picture, photos, video, recording and location. c.
1)When the message is sent after the success, according to SIM1 or SIM2 sends a message of time, there will be a checkmark beside the little symbol. 2)When message sending failed,a red triangle with exclamation will appear. When editing information other functions of Menu button. 3)Hold the certain information, can carry out selective operation. 8. Contacts Open the menu of applications>contacts The default display mobile phone contact and SIM card contacts.
In contact interface, click on the Menu button a. Click Maun>Search,You can enter the contact search interface. Enter the list of Numbers or letters and part name that will be shown in search results. If no search to match the contact interface will appear “No contacts”.
b. Menu>Settings- Contacts to display You can choose all contacts, Customize view of one a SIM card of contact, the mobile phone contacts Choose from the definition, but also on a SIM card and cell phone choice whether or not to show that all the lone contacts. c. Menu >Settings-Import/export In the mobile phone can local, SIM card and SD card three parties achieve contact information of the copy each other.
d. Menu > Labels Click on the "create label" icon to the new label. In "Label name" column input label name。 1) In a label, click on the Menu button, Menu functions 2) Menu>Rename label You can rename label name 3). Menu >Delete label You can delete the label. 4). Menu >Send messaging Automatic new information, and the label added to contact the address bar recipients 5).
9. Clock 1)Open the menu of application, click , The alarm clock Settings into the interface Alarm After functions set,phone will arrives in the setting time to alert you by ringing or vibrating to achieve it’s function. Press Menu to add alarm,you can also add it from the adding interface. You could set the alarm according to your needs. Edit You can edit the current alarm,you could edit time、ringing tones、vibration、repeat form and tabs. 10.
11. Camera 11.1 Camera Prior preparation Install memory card before using the camera or video camera. All your photos or videos taken by the phone are stored in memory card. Open camera Press home, touch menu, select camera. Take pictures 1)Aim your object with the screen. 2)Touch the “shutter” button on the screen. 3)After taking,photos will save to the camera’s galley folder with the name of taking time. 4)You can view the photos by touching the preview box button.
Shared Settings of Camera and Video camera 1)Flash mode:Auto、On、off.
Camera Settings Capture mode:Normal, Panorama mode, HDR Storage path:phone,SD card Volume key function:Shutter,Volume,Zoom Quick capture by double-click vol down key when screen off:capture with back camera, capture with front camera,off Shutter sound: ON, Off Save location: ON, Off Photo settings Picture size : (back camera)(4:3)8.0megapixels, (4:3)3.1megapixels, (4:3)1.9megapixels, (16 : 9)6.0megapixels , (16 : 9)2.1megapixels , (16 : 9)0.9megapixels ; (Front camera)(4:3)5.0megapixels, (4:3)1.
12. Gallery Open gallery Press home,touch label of applications,then touch photos’ gallery. In the interface of camera,Press menu to open it,then touch to operate. Gallery interface A. in the gallery main interface, the upper right corner of the camera button, can quickly switch to the camera application B. folder tile in the gallery main interface, folder thumbnail displayed on the folder name and the number of embedded file. Files Interface a.
Share photos In long according to the selected folder or photos in picture viewer interface, choose to share. Methods include Bluetooth, mail, and information sharing. A. use email to send pictures: choose Gmail or E-mail, pictures will be automatically attached to the email. Write your information, and click send. B. using information sending pictures: select information, images will be automatically attached to the MMS. Write your information, and click send. C.
• Clip pictures a. If you want to adjust the size of the clip, please hold the edge of the cutting tools. The arrow appears clip, from the trim your fingers inside or outside the center to drag, can adjust its size. b. If you want to adjust the big hours in the clip that keep proportion, please hold down any of the four corners of the one. If you move to the clip of the picture area of the other, please hold cutting is internal, then move to drag the fingers to the position.
Enter the calendar program, click on the upper left area, it will display some menus: schedule, four kinds of mode , search menu, PC Sync, settings and help&feedback . 1) Interface display on the day and 3day of the schedule on the month use grayto highlight on the same day. 2) Week interface shows the schedule for this week (click date) recently about sliding according to weeks turn pages. 3) On the interface display and month schedule (date) recently click slide left and right can flip on a monthly basis.
original equipment-headphones, when listening, you can switch it manually mode with wired headphones. • Open FM radio to speakers or the Touch this label to open the application of FM radio. 1)Click on the " ", automatic scanning search FM channel, and channel in list interface, list all channels 2)Click "Start recording", listening to the radio to the current can be recorded. The tape recording to default file name can be arbitrary well-preserved input filename. Save to FM recording the default file.
•Wi-Fi Wi-Fi and Wi-Fi settings Touch Wi-Fi to open . Open Wi-Fi ,it can search for available networks automatically,networks without password can be used directly, others need to enter the password first. Notice:Open Wi-Fi then the flight mode,Wi-Fi will close automatically;Open flight mode then connect Wi-Fi,it can be used normally. •Bluetooth Bluetooth switch and setting up the touch Bluetooth to open , will automatically be search nearby Bluetooth open the equipment.
• • Storage a. Can view the SD card and cell phone memory usage. b. c. Can unmount SD card or erase SD card. Can choose the default memory. Battery Boot time that use and each module to use power in general • Apps management application and delete installed applications. Personal • Security & location 1) Google Play Protect: Off/Tap to turn on protection. 2) Find My Device: Find My Device help YOU locate this device remotely. It also helps you keep your DATE safe, if the device is lost.
• About phone You can check the information of software updates, status, legal information model CPU GPU, RAM, internal memory, android version, android security patch lever, baseband version, kernel version, software version, custom build version. 16. Notices for the use of phone Your phone is a product of superior design and craftsmanship and should be treated with care. The following suggestions can help you comply with the terms of repair kits, to extend the life of mobile phone.
BODY-WORN OPERATION: This device was tested for typical body-worn operations with the back/front of the phone kept 1cm from the body. To comply with FCC RF exposure requirements, a minimum separation distance of 1cm must be maintained between the user's body and the back/front of the phone, including the antenna. Third-party belt-clips, holsters and similar accessories containing metallic components shall not be used.
NOTE: The manufacturer is not responsible for any radio or TV interference caused by unauthorized modifications to this equipment. Such modifications could void the user’s authority to operate the equipment. NOTE: This equipment has been tested and found to comply with the limits for a Class B digital device, pursuant to part 15 of the FCC Rules. These limits are designed to provide reasonable protection against harmful interference in a residential installation.