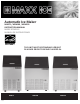
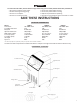
Automatic Ice Maker MIM75 / MIM100 / MIM130 INSTRUCTION MANUAL MODE D’EMPLOI MANUAL DE INSTRUCCIONES THE UNIT MUST BE STANDING UPRIGHT 24 HOURS PRIOR TO BEING PLUGGED IN.
TABLE OF CONTENTS ICE MAKER SAFETY . . . . . . . . . . . . . . . . . . . . . . . . . . . . . . . . . . . . . . . . . . . . . . . . . . . . . . . . . . . . . . . . . . . . . . . . . . . . . . . . . . . . . 1 IMPORTANT SAFEGUARDS . . . . . . . . . . . . . . . . . . . . . . . . . . . . . . . . . . . . . . . . . . . . . . . . . . . . . . . . . . . . . . . . . . . . . . . . . . . . 1-3 TECHNICAL INFORMATION . . . . . . . . . . . . . . . . . . . . . . . . . . . . . . . . . . . . . . . . . . . . . . . . . . . .
SAVE THESE INSTRUCTIONS ICE MAKER SAFETY Your safety and the safety of others are very important. We have provided many important safety messages in this manual and on your appliance. Always read and obey all safety messages. This is the Safety Alert Symbol. This symbol alerts you to potential hazards that can injure or cause death to you and others. All safety messages will follow the Safety Alert Symbol and either the words “DANGER”, “WARNING” OR “CAUTION”.
• T he ice maker should not be located next to ovens, grills or other sources of high heat. • The ice maker must be installed with all electrical,water and drain connections in accordance with state and local codes. A standard electrical supply (220-240VAC, 50Hz, 15A), properly grounded in accordance with the National Electrical Code and local codes and ordinances is required. • Do not kink or pinch the power supply cord between the ice maker and cabinet.
WARNING To reduce the risk of fire, electric shock or injury when using your ice maker, follows these basic precautions: • Plug into grounded 3-prong outlet. • Disconnect power before cleaning. • Do not remove grounding prong. • Disconnect power before servicing. • Do not use an adapter. • Replace all panels before operating. • Do not use an extension cord. • Use two or more people to move and install ice maker. SAVE THESE INSTRUCTIONS TECHNICAL INFORMATION Model: MIM75 220-240VAC~50Hz 4.4A R134a/6.
ICE MAKER INSTALLATION Unpacking WARNING Excessive Weight Hazard Use two or more people to move and install ice maker. Failure to do so can result in back or other injury. Remove Packaging Materials IMPORTANT: Do not remove any permanent instruction labels or the data label on your ice maker. Remove tape and glue from your ice maker before using. • T o remove any remaining tape or glue, rub the area briskly with your thumb.
WARNING Normal operating ambient temperature should be between 55°F (13°C) to 90°F (32°C). Normal operating water temperature should be between 41°F (5°C) and 77°F (25°C). Operation of the ice maker for extended periods outside of these normal temperature ranges may affect production capacity. The plug must be accessible after installation. • It is strongly recommended that a water filter be used. A water filter, if it is of the proper type, can remove taste and odors as well as particles.
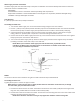
Water Supply and drain connections The water supply and drain should be ready at the point of installation. A wall outlet directly behind the ice maker will make under-counter installation easier. IMPORTANT: All installations must be in accordance with local plumbing code requirements. Professional installation is recommended. Make certain the pipes are not pinched, kinked or damaged during installation. Check for leaks after connection.
3 A ll horizontal runs of drain lines must have a fall of ¼” per foot (6.35mm per 30.5cm). An air gap will likely be required between the ice maker drain hose and the drain/waste receptacle. A stand pipe with a trap below it would be acceptable for the drain/waste receptacle. A floor drain is also acceptable. 4. P our 1 gallon of water into the ice storage bin to check for leaks at all drain connections and at the nut of the drain water hole. Tighten any connections or nuts that leak.
OPERATION Final Check List Prior To Operation 1. H ave all packing materials and tape been removed from the interior and exterior of the ice maker? 2. Did you clean the ice storage bin? 3. H ave the installation instructions been followed, including connecting the machine to water, drain and electricity? 4. Has the machine been leveled? Feet locked? 5.
20 Minutes: A complete cycle takes about 20 minutes, but it depends on temperature and operating conditions. Freeze: During the freeze cycle the compressor is pumping refrigerant, the fan motor is blowing air, and the water pump is circulating water. When the evaporator surface gets to the setting temperature, the ice maker stops the freezing cycle and begins the harvest. Harvest: During the harvest cycle the compressor is still operating, but the water pump has stopped.
CLEANING AND MAINTENANCE CAUTION If the ice maker is left unused for a long time, before the next use it must be thoroughly cleaned. Follow carefully any instructions provided for cleaning or use of sanitizing solution. Do not leave any solution inside the ice maker after cleaning. Periodic cleaning and proper maintenance will ensure efficiency, top performance, and long life. The maintenance intervals listed are based on normal conditions.
Interior Cleaning The ice storage bin should be sanitized occasionally. Clean the bin before the ice maker is used for the first time and reused after stopping for an extended period of time. It is usually convenient to sanitize the bin after the ice making system has been cleaned, and the storage bin is empty. 1. Disconnect power to the unit. 2. O pen the door and with a clean cloth, wipe down the interior with a sanitizing solution made of 1 oz (29.5ml) of household bleach or chlorine and 2 gallons (7.
1. Turn off power to the ice maker. Keep the ice maker connected to the water supply and drainpipe. 2. Open the door and scoop out all of the ice cubes. Either discard them or save them in an ice chest or cooler. 3. Remove the screws in the front cover, push forward to remove the front cover. Locate the control box. Note: Do not use too much force, as the wire leads connected to the power switch can be inadvertently disconnected. Use care in the area of the control box. Do not expose it to moisture. 4.
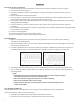
CONTROL PANEL (behind front cover) Descriptions of LEDs and buttons: 1. Red LED: Ice Full indicator light. When this LED is lit, the ice storage bin is full of ice or there is Red LED something between the two arms of the ice-full sensor in the ice Clean storage bin. The unit will stop working. When ice cubes are taken out of the ice storage bin, clearing the sensor, the red LED will keep Ice-full flashing for 3 minutes. Then the unit will restart and return to the ice Green LED making mode. Adjust 2.
MAJOR FUNCTIONS 1. Complete automatic operating procedure. 2. W hen the ice storage bin is full of ice cubes, the machine stops working automatically and starts again after the cubes are removed. 3. The different colors of the LED display indicate various work modes. 4. Ice cube size is adjustable. 5. A sensitive probe and accurate timer enhance the performance of the ice maker. 6. Manual clean mode to start or stop the ice making system cleaning. 7. Built-in compressor protection system.
Problem Possible Cause Probable Correction The body of the ice maker is electrified. The grounding line isn't in the socket. Use the socket that meets required electrical standard. The lines are creepage. Adjust, reconnect /replace lines The hardness of the water is too high. Use a water-softening device installed in front of the water inlet valve. The ice cubes are incomplete when being dumped. The sprinkler is blocked. Clean it; see "Interior Cleaning".
NOTES 16
NOTES 17
3355 Enterprise Avenue • Suite 160 • Fort Lauderdale, FL 33331 Tel: 954.202.7419 • Fax: 954.202.7337 www.MaxximumFoodService.