
Installation Guide
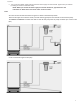
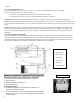
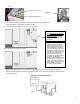
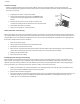
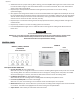
Table Of Contents
- ICE MAKER SAFETY
- IMPORTANT SAFEGUARDS
- TECHNICAL INFORMATION
- INTRODUCTION
- COMPONENT LOCATIONS
- ICE MAKER INSTALLATION
- INSTALLATION TYPES
- OPERATION
- MIM50P and MIM50P-O DRAIN SYSTEM OPERATION
- CLEANING AND MAINTENANCE
- CONTROL PANEL
- MAJOR FUNCTIONS
- TROUBLE SHOOTING
- SÉCURITÉ ET MACHINE À GLAÇONS
- MESURES DE PROTECTION IMPORTANTES
- RENSEIGNEMENTS TECHNIQUES
- INTRODUCTION
- EMPLACEMENTS DES COMPOSANTS
- INSTALLATION DE LA MACHINE À GLAÇONS
- Retirer le matériau d’emballage
- Nettoyage avant l’utilisation
- Dégagements pour l’installation
- Exigences en matière d’électricité
- Méthode recommandée de mise à la terre
- Mise de niveau de la machine à glaçons
- Inverser l’ouverture de porte pour MIM50-O et MIM50V
- Inverser l’ouverture de porte pour MIM50, MIM50P et MIM50P-O
- Alimentation en eau
- Outils requis
- Évacuation
- TYPES D’INSTALLATION
- UTILISATION
- FONCTIONNEMENT DU SYSTÈME D’ÉVACUATION MIM50P et MIM50P-O
- NETTOYAGE ET ENTRETIEN
- PANNEAU DE COMMANDE
- FONCTIONS IMPORTANTES
- DÉPANNAGE
- SEGURIDAD DE LA MÁQUINA DE HACER HIELO
- DISPOSICIONES DE SEGURIDAD IMPORTANTES
- INFORMACIÓN TÉCNICA
- INTRODUCCIÓN
- UBICACIONES DE COMPONENTES
- INSTALACIÓN DE LA MÁQUINA DE HACER HIELO
- Quitar los materiales de empaque
- Limpieza antes de usar
- Espacio de separación para la instalación
- Requisitos eléctricos
- Método recomendado de conexión a tierra
- Nivelar la máquina de hacer hielo
- Cómo cambiar el sentido en que abren las puertas de MIM50-O y MIM50V
- Cómo cambiar el sentido en que abren las puertas de MIM50, MIM50P y MIM50P-O
- Suministro de agua
- Herramientas necesarias
- Desagüe
- TIPOS DE INSTALACIÓN
- OPERACIÓN
- OPERACIÓN DEL SISTEMA DE DESAGÜE DE MIM50P Y MIM50P-O
- LIMPIEZA Y MANTENIMIENTO
- PANEL DE CONTROL
- FUNCIONES PRINCIPALES
- SOLUCIÓN DE PROBLEMAS
- Blank Page
- Blank Page

11/07/2017 PK
17
4.
Allow 30 minutes for proper cleaning. After cleaning, press the ON/OFF switch again. Use a drain hose on the
front of the water trough to drain off the waste water to a convenient container. Don’t drain off the waste
water to the inside of the cabinet.
5.
Repeat steps 3 and 4 (without Ice Machine Cleaning Solution) three times to rinse the ice making
system thoroughly.
6.
Next, prepare a sanitizing solution made of 1 ounce of household bleach and 2 gallons of hot water (95˚ to 115˚F).
Fill a spray bottle with the sanitizing solution and spray all corners and edges, making sure to cover all surfaces
with the solution. Wipe the entire bin inside and outside, covering the entire surface of the walls. Allow the
solution to be in contact for at least 3 minutes, then dry.
7.
Repeat steps 1 to 5 with the sanitizing solution of step 6 (bleach and water). Filling the water through to its
maximum level.
8.
Repeat steps 3 and 4 to rinse the ice making system one more time.
9.
Press the ON/OFF button again. The ice maker will return to the regular ice making mode. Discard the first
batch of ice.
WARNING
The ice machine cleaner contains acids.
DO NOT use or mix with any other solvent-based cleaner products. Use rubber gloves to protect hands.
Carefully read the material safety instructions on the container of the ice machine cleaner.
Discard the first batch of ice produced after cleaning.
CONTROL PANEL
MIM50V / MIM50 / MIM50P
/ MIM50P-O
Front Inside Door
MIM50-O
Front Inside Door Back
(Behind access panel)
Description Of LEDs And Buttons
1. Bin Full (Red) LED: Bin full indicator light
When this is lit, the ice storage bin is full of ice or there is something blocking the bin-full probe. The unit will
stop working. When ice cubes are removed from the ice storage bin, freeing the bin-full probe, the red LED
will remain flashing for 3 minutes, then the unit will restart and return to the ice making mode.
2. Ice Making (Green) LED: Ice making indicator light
When this is lit, the unit is working in the ice making mode controlled by a temperature sensor.
3. Ice Harvest (Yellow) LED: Ice harvest indicator light
When this is lit, the unit is working in the ice harvest mode controlled by the ice-full probe.
4. Mode button: Mainly for service. When this is pressed, the ice making mode changes to the ice harvest mode
or vice versa. The mode can be judged from the status of the green and yellow LEDs.
5. Adjust button: To be used by an authorized service technician.