
Instructions / Assembly
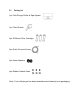
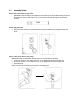


Table Of Contents
- PRECAUTIONS:
- IMPORTANT INFORMATION
- 1.1 Pre-Install Checklist & Safety Warning
- 1.2 Sanitation Warning: Safe Use of Ozone
- 1.3 Electrical Warning
- 1.4 Specs
- ASSEMBLY
- 2.1 Product Diagram
- 2.2 Packing List
- 1pc Cold Plunge Chiller & Spa System
- 1pc Filter Wrench
- 3pc 20 Micron Filter Cartridge
- 2pc Quick-Connect Hoses
- 2pc Hose Adapters
- 6pc Rubber Gasket Seals
- Note: Your cold plunge has been assembled and tested prior to packaging.
- 2.3 Assembly Details
- 2.4 Assembly Diagram
- OPERATING THE COLD PLUNGE CHILLER & SPA SYSTEM
- 3.1 Control Panel Introduction
- 3.2 Interface Overview
- 3.3 App Set Up
- Note: Tuya can only support 2.4G WIFI signal. Before connecting your phone to the chiller, please confirm that the Wi-Fi___33 used by your phone is in the 2.4G frequency band. It will not be able to connect to the chiller, if it is in the 5G frequen...
- 3.4 Settings & Preferences
- 3.5 Water Maintenance
- 3.6 Unit Maintenance
- Warranty Information
- General Conditions:

3.3 App Set Up
Note: Tuya can only support 2.4G WIFI signal. Before connecting your phone to the chiller, please confirm that the
Wi-Fi___33 used by your phone is in the 2.4G frequency band. It will not be able to connect to the chiller, if it is in the
5G frequency band.
Step 1: Add your chiller
• Turn on your chiller.
• Download the Tuya app.
• Go into the settings menu on your chiller.
• Press and hold the WIFI button for 3-5
seconds until the button begins to blink.
• Tuya should locate the chiller automatically.
• Enter your WIFI password.