
Owner's Manual


4
Highlights
a. High quality craftsmanship
b. Automatic thermostat for constant temperature
c. Timer and buzzer: buzzer sounds 5 minutes before the end of the sauna session
d. Digital sensor and thermometer
e. Infrared carbon heat emitter panels
f. Wiring diagram:
Assembly
Assembly Requirements
a. You will need a philips screwdriver, ladder, and two adults to assemble.
b. Do not plug any other appliances into the power supply of the sauna room other than the designated sauna
connections/plugs.
c. Assemble the sauna room on a completely level surface.
d. Do not spray or get water on the exterior/interior walls of the sauna room. If the floor is damp, install a floor
separator to keep the sauna high & dry.
e. Do not store flammable objects or chemical substances near the sauna.
Sauna Room Assembly:
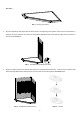
1. Structure of Infrared Sauna. See FIG-1
2. Make sure all parts are present before installing the unit. See packing list below.
A. User manual B. Floor Panel C. Back Panel D. Left Side Panel E. Right Side Panel
F. Bench Heater Panel G. Bench H. Roof Cover I. Front Panel J. Roof Panel
K. Left Back Side Panel L. Right Back Side Panel