
User's Manual

The packaging has to be kept since it contains important information.
Contents:
RC Vehicle x 1
Transmitter x 1
Transmitter Antenna x 1
4-Hour Battery Charger x 1
9.6V Rechargeable Ni-Cd Battery Pack (For Vehicle Use) x 1
9V non-rechargeable Battery (For Transmitter Use) x 1
Instruction Manual x 1
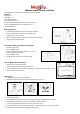
Battery Charging:
1. Connect the 9.6V Battery Pack and the Charger connectors.
2. Plug the Charger into a standard 110V electrical outlet.
3. Charging time is around 4 hours.
4.
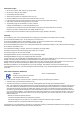
Transmitter: Battery and Antenna Installation
1. Switch the power OFF.
2. Open the Battery Cover.
3.
4. Close the Battery Cover.
5. Screw the Antenna into the Transmitter securely.
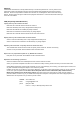
Vehicle: Battery Pack installation
1. Switch the power to the OFF position.
2.
3.
4. Close and lock the Battery cover.
How to play:
1. Fully extend the Antenna of the Transmitter.
2. Match the Transmitter with the Vehicle Channel (Channel A or B or C).
3. Switch ON the Transmitter, the red LED will light up.
4. Switch ON the Vehicle.
5. The Headlight Features (OFF, Low beam and Hi-Beam) can be controlled on the Transmitter.
6. Pull the trigger to go forward, push it to go backward and release it to stop.
7. Turn the Transmitter steering wheel to move the Vehicle left or right.
8. If the Vehicle does not run in a straight line, adjust the wheel alignment arm on the Vehicle chassis.
9. Switch OFF the Transmitter and Vehicle power after playing.
Turn the Battery Knob and lift up the Battery Cover.
Install the Battery Pack into the battery compartment and plug it into the connector correctly.
Install a 9V Battery with correct polarity (+/-) as shown
inside the battery compartment.
When charging is complete, detach the connectors and remove the
Charger from the electrical outlet.
Maisto Radio Control Vehicles