FRONT-LOADING AUTOMATIC WASHER For questions parts, about features, ol_eration/performance, accessories, or service, call: 1-800-688-9900 or visit our website at... LAVEUSE AUTOMATIQUE A CHARGEMENT FRONTAL Pour assistance, installation, ou service, 1-800-807-6777 ou visitez notre site internet www.maytag.ca www.maytag.com In Canada, or visit call: 1-800-807-6777 our website www.maytag.ca W10295008A at... composez 2_..
TABLE OFCONTENTS TABLE DESMATIERES WASH ER SAFETY ........................................................................................... 3 SI_CURITI_ DE LA LAVEUSE ......................................................................... 27 INSTALLATION REQUIREMENTS ................................................................. Tools and Parts ........................................................................................... 4 4 EXIGENCES 28 Options ..............................
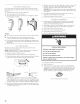
WASHER SAFETY Your safety and the safety of others are very important. We have provided many important safety messages in this manual and on your appliance. Always read and obey all safety messages. This is the safety alert symbol. This symbol alerts you to potential hazards that can kill or hurt you and others. All safety messages will follow the safety alert symbol and either the word "DANGER" or "WARNING." These words mean: You can be killed or seriously follow instructions.
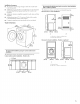
INSTALLATION Gather the required tools and parts before parts supplied are in the washer drum. Tools needed for connecting the water • Pliers (that open to 19/16" [39.5 mm]) • Flashlight Tools needed • starting installation. The Pedestal inlet hoses You have the option of purchasing pedestals of different heights separately for this washer. You may select a 10" (254 mm) or a 15.5" (394 mm) pedestal The pedestal will add to the total height of the washer.
Installation clearances • The location must be large enough to be fully opened. • Additional spacing should be considered for ease of installation and servicing. The door opens more than 90 ° , and it is not reversible. • Additional moldings. • Additional spacing of 1" (25 mm) on all sides of the washer is recommended to reduce noise transfer.
Recommended installation spacing for recessed or closet installation, with stacked washer and dryer The dimensions shown are for the recommended spacing. The washer can be installed using the standpipe drain system (floor or wall), the laundry tub drain system, or the floor drain system. Select the drain hose installation method you need. See "Tools and Parts." m m Standpipe drain system - wall or floor (views A & B) The standpipe drain requires a minimum diameter standpipe of 2" (50 mm).
• Do not have a fuse in the neutral or ground GROUNDING Plug into a grounded 3 prong outlet. WARNING: improper connection of the equipment= grounding conductor can result in a risk of electric shock. Check with a qualified electrician or serviceman if you are in doubt as to whether the appliance is properly grounded. ground prong. Do not use an adapter. Do not use an extension INSTRUCTIONS For a grounded, cord=connected washer: This washer must be grounded.
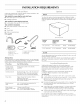
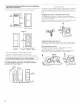
INSTALLATION _( V_ T__ INSTRUCTIONS ¸_¸_ _5_@_'__¸_ _..... Insert new flat washers (supplied) into each end of the inlet hoses. Firmly seat the washers in the couplings. Excessive Weight Hazard Use two or more people to move and install washer. A Failure to do so can result in back or other injury. IMPORTANT: within Position approximately the washer so that the rear of the washer 3 ft. (900 mm) of its final B A. Coupling B. Washer is location.
2. Slide drain hose onto washer connection. 3. Once 4. Washer drain system can be installed standpipe, floor standpipe, or laundry Connect the inlet hoses to the washer IMPORTANT: Make sure that the flat washers have been _[aced into the hose couplings. J drain hose is in place, release pliers. C. CoM water inlet H. Hot water inlet 1o Attach the hot water hose to the washer's hot (H) water inlet valve. Screw on coupling by hand until it is seated on the washer. 2.
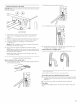
5. Drainhosemustbesecured tostopthehosefrommoving when wateris.pumped Ifthe drain hose m oves, water may end upon out. thefloor 1. Drape thepowercordoverthewasher top. 2. Movethewasher toitsfinallocation. 3. Place thedrainhose inthelaundry tuborstandpipe asshown. Seeillustrations AandB. After the washer is [eve[, and a[[ four feet are in firm contact with the f[oob use a 9/1 6" (14 mm) open-end wrench to turn the [ocknuts on the feet, tightly against the washer cabinet.
FEATURES AND BENEFITS Your new front-loading high efficiency washer, was designed to conserve resources and lower your water and energy bills. The washer is designed to determine and then provide the amount of water needed for the best performance. The time of operation may be greater for this new system than for a conventiona/washer. Electronic Controls are easy to use whether you are a Level clothes. With a low water level, you can obtain the same results.
WASHER USE heavy du_mforters white _000 power SER|ES @ B pid wash ,_ elicate start delaystart O m 2_d cancel rinse O Ill © maxe×tra_t &spin _ soak _,_ fresh spin MCT Maytag Corn mercia[ ...... clean washer 0 cycle _J p_e_ _old necoconserve I¢chr_0/ogy options and modifiers First Wash Cycle Without Laundry Before washing clothes for the first time, if not completed during the final installation step, choose the Normal cycle and run it without clothes.
You will hear the door locking, again. This is normal unlocking, 3. and locking Push in the dispenser drawer slowly and completely (to avoid a spill). If you do not press START/PAUSE within 5 minutes of choosing a cycle, the washer automatically shuts off. When the wash cycle is complete, the DONE status light illuminates, the door unlocks, and the wash load can be removed from the washer.
Done Not all Options are available Cycles and Options is pressed. with all Cycles. can be changed anytime before START/PAUSE The Done light comes on after the cycle stay on until door is opened. Controls is complete. The light will Locked To cancel a cycle Lock/Unlock 1. Press POWER/CANCEl 2. The washer removed. powers ..... down, the door unlocks, and clothes can be NOTE: If the water level or the temperature is too high, the washer will drain automatically before the door unlocks.
Cycle Estimated Time* (hr:min) Temp Spin Speed Soak 0:30 Warm/ Cold No Spin Clean Washer with AFFRESH TM 0:56 N/A High WashCycles Choose Wash Cycles by rotating the Cycle selector knob to the desired cycle. Each cycle is designed for different types of fabric and soil levels. heavy duty norma| comforters rapid wash *The cycle times vary automatica[[ty based on your water pressure, water temperature, detergent, andc[othes load.
Rapid Wash Use this cycle to wash are needed in a hurry. shortened wash time, I_arge wash loads will time. small loads of 2-3 lightly soiled garments that This cycle combines fast-speed tumbling, a and high-speed spin to shorten drying time. result in the machine increasing the wash You can customize your wash by adding options to your cycle selections. You can add or change an option after starting a cycle anytime before the selected option begins. Not all Options are available with all cycles.
Temperature Guide Spin Speed Wash Temp Suggested Fabrics HOT Whites and pastels Heavy soils Each cycle has a preset spin speed. To change the spin speed, press the SPIN SPEED button until the desired setting is illuminated. Cycle Signal WARM Bright colors Moderate COLD Colors This signal is helpful when you are removing as soon as it stops. Press Cycle Signal button Off. to light soils that bleed or fade Prewash Light soils In wash water temperatures colder than 60°F (15.
LAUNDRY TIPS Preparing clothes for washing Unloading Follow these recommendations to help you prolong the life of your garments. • Use only High Efficiency detergents. The package for this type of detergent will be marked "HE" or "High Efficiency." This wash system, along with less water; will create too much sudsingwith a regular non-HE detergent. Using regular detergent will likely result in washer errors, longer cycle times and reduced rinsing performance.
Stain Use Liquid Chlorine Color-Safe Bleach or Use suggested Cycle Power Wash Stain Use Liquid Chlorine Color-Safe Bleach Wash or Use suggested Cycle _ Power If Power Wash i,/ Warm Power Wash Wash Wash G rass Normal Cold or Warm I_ Blood Tomato Products I_ Warm Whites Mud Coffee/ Chocolate Heavy Duty Cosmetics Heavy Duty Deodorants Warm Heavy If Normal Duty Ring around the Collar Dirty Motor Oil Do not tumble dry soiled or stained items. Heat may permanently set stains.
WASHER CARE 5. Selectthe 6. Press START/PAUSE. CI.EAN WASHER with AFFRESH r'* cycle. NOTE: The basket will rotate, then the door will again, and then the cycle will continue. Cleaning the Door Seal/Bellow • 1. Open the washer door and remove the washer. any clothing or items from 2. Inspect the colored seal/bellow between the door opening and the basket for stained areas. Pull back the seal/bellow to inspect all areas under the seal/bellow and to check for foreign objects. 7.
To transport the washer: Install and store your washer where it will not freeze. Because some water may stay in the hoses, freezing can damage your washer. If storing or moving your washer during freezing weather; winterize it. Non-use or vacation care: 1. If washer will be moved during freezing weather; put in 1 qt (1 I.) of R.V.-type antifreeze in the drum. Run washer on a Rinse, Drain & Spin cycle. 2. Unplug Operate your washer only when you are at home.
TROUBLESHOOTING First try the solutions suggested here or visit our website and reference FAQs (Frequently Asked Questions) to possibly avoid the cost of a service call... In U.S.A. www.maytag.com/help In Canada www.maytag.ca Did you empty pockets? You may be hearing items that are caught under the door seal or basket. Check under the door sea[ and remove items. Error codes An error code may be shown in the Estimated Time Remaining display.
• • • Is the fabric softener dispenser clogged? Clean the fabric softener dispenser. See "Washer details. • Care" for Are the laundry products in the correct dispenser compartment? Add the correct amounts of detergent, fabric softener or liquid chlorine bleach to the correct compartments. Add powdered or liquid color-safe bleach to the Main Wash compartment. Is there water in the dispenser at the end of the cycle? A small amount of water will remain in the dispenser compartment.
Is the load balanced? Washer won't run A single or bulky item may cause imbalance. redistribute the load. Is the washer in a normal pause in the cycle? The washer pauses for about 2 minutes during certain cycles. Allow the cycle to continue. Some cycles feature periods of tumbling and soak. Is the washer Wash smaller overloaded? loads. Incorrect water temperature or Wash/Rinse Are the hot and cold water inlet See "Connect the Inlet Hoses.
• • • • Did you use enough HE detergent? Follow manufacturer's recommendations for the type of load you are washing. For best performance, use only High Efficiency detergent. Use enough HE detergent to remove soil and ho[dit in suspension. Do you have hard water? Use more detergent for washing water. • Did you use powdered detergent Consider using liquid detergent.
MAYTAG ® LAUNDRY WARRANTY LIMITED WARRANTY For one year from the date of purchase, when this major appliance is operated and maintained according to instructions attached to or furnished with the product, Maytag brand of Whirlpool Corporation or Whirlpool Canada LP (hereafter "Maytag") will pay for factory specified parts and repair labor to correct defects in materials or workmanship that existed when this major appliance was purchased. Service must be provided by a Maytag designated service company.
P P SECURITE DE LA LAVEUSE Votre s_curit_ et celle des autres est tr_s importante. Nous donnons de nombreux messages de s6curit6 importants dans ce manuel et sur votre appareil m6nager. Assurez-vous toujours lire tous les messages de s6curit6 et de vous y conformer. de Voici le symbole d'alerte de s6curit6. Ce symbole d'alerte de s6curit6 vous signale les dangers potentiels de d6ces et de blessures graves a vous eta d'autres.
EXIGENCES D'INSTALLATION Rassembler ['installation. [aveuse. Outils les outils et pi_ces n6cessaires avant de commencer I.es pi_ces fournies se trouvent dans [e tambour de [a n_cessaires au raccordement • Pince (ouverture • I.
Des robinets d'eau chaude et d'eau froide situ6s _ moins de 4 pi (1,2 m) des robinets d'admission d'eau chaude et d'eau froide, et une pression d'eau de 20-100 [b/po 2 (137,9-689,6 kPa). • Un plancher de niveau ayant une pente maximale de 1" (25 mm) sous I'ensemble de la laveuse. I.'installation de la laveuse sur des Espacement recommand6 pour une installation dans.,un encastrement ou dans un placard, avec ou sans pmedestal I.
Espacement recommand_ pour une installation dans. un encastrement ou dans un placard, avec laveuse et secheuse superpos_es I.es dimensions indiqudes sont pour I'espacement I.a laveuse peut 6tre install6e en utilisant le syst6me de rejet 1'6gout (au plancher ou mural), le syst6me de vidange de 1'6vier de buanderie, ou le syst6me de vidange au plancher. S61ectionner la m6thode d'installation du tuyau de vidange selon les besoins. Voir "Outillage et pi6ces'. recommand6.
• Ne pas installer un fusible dans le conducteur circuit de liaison _ la terre. INSTRUCTIONS Ne pas utiliser un adaptateur. Ne pas utiliser un c_ble de rallonge. AVERTISSEMENT Brancher sur une prise _ 3 alv_oles reli_e _ la terre. Ne pas enlever la broche de liaison _ la terre. Le non-respect de ces instructions peut causer un d_c_s, un incendie ou un choc _lectrique. • • A LA TERRE Pour une laveuse reli_e _ la terre et connect_e par un cordon : Cette laveuse doit _tre reli6e & la terre.
INSTRUCTIONS D'INSTALLATION Ins6rer les rondelles des tuyaux d'arriv6e plates neuves (fournies) dans chaque extr6mit6 d'eau. Ins6rer fermement les rondelles dans les raccords.
2. Faire glisser le tuyau de vidange sur le raccord de la laveuse. 3o Une fois le tuyau de vidange en place, rel&cher la prise de la pince. 4. I.e syst6me de vidange de la laveuse peut @re install6 _ I'aide d' un conduit d'6vacuation au p[ancheb un tuyau de rejet _ ['6gout au p[ancher (rigide) ou un 6vier de buanderie. Connecter les tuyaux d_alimentation _ la laveuse IMPORTANT : S'assurer que [es rondelles dans les raccords de tuyau. plates ont 6t6 plac6es ® / C. 7byau d'eau hoMe H.
4. I.e tuyau d'6vacuation doit 6tre bien install6 pour emp6cher le tuyau de bouger Iorsque I'eau est pomp6e pour la vidange. Si le tuyau d'6vacuation bouge, de I'eau peut couler sur le plancher. 1. Faire passer le cordon 2. D6placer d'alimentation par-dessus 3. Placer le tuyau de vidange dans 1'6vier de buanderie de rejet _ 1'6gout. Voir les illustrations Aet B. la laveuse _ son emplacement REMARQUES la laveuse. final. ou le tuyau • Ne pas forcer [aveuse.
CARACTERISTIQUES ET AVANTAGES Votre nouvelle laveuse haute efficacit6 _ chargement frontal a 6t6 conque pour pr6server [es ressources et diminuer vos factures d'eau et d'6nergie. I_a [aveuse est conque pour d6terminer puis fournir [a quantit6 d'eau n6cessaire _ une performance optima[e. Avec ce nouveau syst6me, [a dur6e de fonctionnement peut 6tre sup6rieure ce[[e d'une [aveuse conventionne[[e. Commandes 61ectroniques I.
UTILISATION heavy 2000 SERIES power DE LA LAVEUSE du_mforters white ..... po,,e,_ //2f/ pid wash -_-_'_\_ \ @caoco, &spin ,_,_ fresh MeT _ soak spi_ e cate m start si,k ? clean..... cycle x.
4. Mettre la laveuse en marche en appuyant sur POWER/CANCEl .... (mise sous tension/annulation) ou en tournant le s61ecteur de programme. I_e t6moin lumineux correspondant au programme s61ectionn6 s'allumera. Lors de la s61ection d'un programme de lavage, pr6r6glages de temp6rature de I'eau et vitesse d'essorage pour le programme s6lectionn6 seront allum6s. I.es pr6r6glages procurent les soins aux tissus recommand6s pour le programme s61ectionn6. Voir "Programmes". 5. S61ectionner les Options d6sir6es.
Compartirnent de I'agent de blanchiment (l_ettre C sur I'illustration du distributeur) au chlore Pour vidanger la laveuse manuellement NE PAS verser PI.US de 2/3 de tasse (160 ml_) d'agent de blanchiment au chlore liquide dans ce compartiment I.'agent de blanchiment sera automatiquement dilu6 et distribu6 au moment appropri6 au cours du premier rin_:age apr&s le programme de lavage. Ce compartiment ne peut diluer un agent de blanchiment en poudre.
Door Locked (porte verrouill_e) Pr_r_glages de programme I.a porte se verrouille et se d6verrouille automatiquement, en fonction de 1'6tat d'avancement du programme de lavage. I.orsque le t6moin lumineux d'avancement s'allume, la porte est verrouill6e. Pour d6verrouiller la porte, appuyer sur START/PAUSE (mise en marche/pause). Chaque programme comporte une dur6e pr6r6gl6e, WASH TEMP et SPIN SPEED (temp6rature de [avage, vitesse d'essorage).
My Cycle (mon programme) Cette caract6ristique tr6s pratique permet d'enregistrer [e programme ainsi que [es options et [es modificateurs [es plus uti[is6s. I[ suffit de s6[ectionner [e programme, [es options et [es modificateurs, et d'appuyer sans re[richer sur [e bouton My Cycle (mon programme) jusqu'_ ce qu'un signal sonore retentisse pour indiquer que [a s6[ection a 6t6 enregistr6e, et [e t6moin My Cycle s'a[[ume. Pour uti[iser _ nouveau cette combinaison, i[ suffit d'appuyer sur POWER/CANCEl.
Max Extract Comme avec tout nouveau produit, vous entendrez des sons auxquels vous n'6tes pas habitu6s. Vous pouvez entendre diff6rents sons [ors du verrouillage/d6verrouillage de la porte et durant le processus de lavage, rin_:age ou essorage. Enhe les changements des actions de lavage, la laveuse fera des pauses momentan6es. Vous entendrez_ 1'6claboussement de I'eau pendant les p rogrammes de lavage et de rin_:age. Ces nouveaux sons et pauses font partie du fonctionnement normal de la laveuse.
Pr_lavage Traitement anti-taches Utiliser cette option pour des charges n6cessitent un pr6traitement. d'articles dans [e compartiment tr6s sales qui • Ajouter du d6tergent du tiroir distributeur. • Cette option ajoute un temps de culbutage avant le programme principal s61ectionn6. I_a laveuse encha?ne automatiquement du programme de pr61avage au programme de lavage principal. Utiliser cette option pour des charges de v6tements tr6s sales qui n6cessitent un traitement renforc6 contre les taches.
CONSEILS DE LESSIVAGE Preparation des v6tements Suiwe les recommandations v6tements. • pour le lavage suivantes D_chargement pour prolonger la vie de vos Utiliser uniquement des d6tergents Haute efficacit6. Pour ce type de d6tergent, "H E" ou "Haute efficacit6" sera mentionn6 sur I'emballage. Ce syst&me de lavage, utilisant moins d'eau, provoquera trop de mousse avec un d6tergent ordinaire non-H E. I.
Tache Tache Utiliser un agent de Utiliser blanchiment au chlore liquide ou sans danger pour les couleurs Drogrammede navage suggere le Utiliser un agent de blanchiment au chlore liquide ou sans danger pour les couleurs le rOgramme de vage suggere Power Wash (lavage haute puissance) haute puissance) I_ Utiliser Power Was h (lavage Encre Herbe I_ Power Wash (lavage haute puissance) Warm (tilde) Cold droide) ou Normal Sang Produits base de tomate I_ Warm (tilde) Power Wash (lavage haute pu
ENTRETIEN DE LA LAVEUSE Nettoyage du joint/soufflet 2. Utilisation du nettoyant pour laveuse AFFRESH ® (recommand_e) : Ajouter une tablette de nettoyant pour laveuse AFFRESH ® dans le tambour de la laveuse. 3. Ouvrir de la porte En cas d'utilisation 1. Ouwir la porte de la laveuse et retirer tout v6tement la laveuse. ou article de 2. Examiner le joint/soufflet color6 entre I'ouverture de la porte et le panier pour d6celer des zones tach6es.
Remise en marche de la laveuse : Nettoyage du tiroir distributeur l e tiroir distributeur est amovible pour faciliter [e nettoyage. 1. D6verroui[[er d6gagement. 2. Oter [es s6parateurs ([e siphon des compartiments de I'assouplissant de tissu et de I'agent de blanchiment). 3. [e tiroir distributeur en appuyant Voir "Uti[isation du distributeur". sur [e [evier de Retirer [e tiroir. 1. Vidanger 2. 3. Reconnecter les tuyaux d'arriv6e Ouvrir les deux robinets d'eau. les canalisations d'eau.
DEPANNAGE Essayerd'abord les solutions sugg_r_es ici ou visiter notre site Internet et la FAQ (foire aux questions) pour _viter possiblement le co_t d'un appel de service. Aux E.-U., www.rnaytag.corn/help Au Canada, www.rnaytag.ca Codes d'erreur Bruit, vibrations, d6s6quilibre Un code d'erreur peut appara?tre sur I'afficheur r6siduelle estim6e. Consulter la liste ci-dessous probl6me 6ventuel et effectuer les v6rifications • de la dur6e pour identifier n6cessaires La laveuse est-elle d'aplomb? I.
Le tuyau de vidange est-il correctement install6? I.e tuyau de vidange dolt 6tre bien fix6 au conduit d'6vacuation ou _/'6vier de buanderie. Voir "lmmobi[isation du tuyau de vidange". U6vier ou le conduit d_6vacuation La porte ne se d_verrouille pas route I'eau s'est-elle 6coul6e de la laveuse durant I'essorage? S6lectionner RINSE, DRAIN & SPIN (rin_:age/vidange et essorage) pour enlever toute eau restde dans la laveuse. I.a porte de la laveuse se d6verrouillera _ la fin de la vidange.
• Le module de commande ne s'6teint pas n'accepte pas les s61ections effectu6es et Les touches tactiles du tableau de commande verrouill6es? Appuyer sur le bouton pendant d6verrouiller les commandes. 3 secondes Temp6rature de I'eau incorrecte incorrecte sont-elles pour verrouiller Les boutons tactiles ne r_pondent pas? Appuyer deux fois sur la touche tactile POWER/CANCEl_ sous tension).
• La charge est-elle _quilibr_e? Un article ou un article encombrant peut provoquer un d6s6qui[ibre _ [ui seu[. Ajouter des articles ou redistribuer charge. • Le tambour • effectu_ [a est-il vide? Avez-vous surcharg_ la laveuse? Ne pas surcharger [a laveuse. La laveuse peut 6tre bien remplie mais [e [inge ne doit pas 6tre tass6. I_a charge de [avage doit 6tre 6qui[ibr6e. De [a charpie _eut 6tre coinc6e dans [a charge s'i[ y a surcharge.
GARANTIE DES APPAREILS DE BUANDERIE MAYTAG ® GARANTIE LIMITI_E Pendant un an _ compter de la date d'achat, Iorsque ce gros appareil m6nager est utilis6 et entretenu conform6ment aux instructions jointes ou fournies avec le produit, la marque Maytag de Whirlpool Corporation ou WhMpool Canada LP (ci-apr6s d6signdes "Maytag") paiera pour les pi6ces sp6cifides par I'usine et la main-d'ceuwe pour corriger les vices de mat6riaux ou de fabrication qui existaient d6j_ Iorsque ce gros appareil me'nager a 6t6 achet
ASSISTANCE OR SERVICE Before calling for assistance or service, please check "Troubleshooting" or visit www.maytag.com/help. It may save you the cost of a service call. If you still need help, follow the instructions below. When calling, please know the purchase date and the complete If you need replacement model and serial number parts or to order of your appliance. accessories We recommend that you use only Factory Specified Parts.