SMOOTHTOP DOUBLE OVEN INDUCTION RANGE Use & Care Guide For questions about features, operation/performance, parts, accessories or service, call: 1-800-688-9900 In Canada, call: 1-800-807-6777 or visit our website at www.maytag.com or www.maytag.ca CUISINIÈRE À DOUBLE FOUR AVEC TABLE DE CUISSON À REVÊTEMENT LISSE Guide d’utilisation et d’entretien Au Canada, pour assistance, installation ou service, composez le : 1-800-807-6777 ou visitez notre site internet à www.maytag.
TABLE OF CONTENTS TABLE DES MATIÈRES RANGE SAFETY .............................................................................3 The Anti-Tip Bracket ....................................................................3 COOKTOP USE ..............................................................................5 Induction Cooking........................................................................5 Cooktop Controls.........................................................................5 Ceramic Glass ..
RANGE SAFETY Your safety and the safety of others are very important. We have provided many important safety messages in this manual and on your appliance. Always read and obey all safety messages. This is the safety alert symbol. This symbol alerts you to potential hazards that can kill or hurt you and others. All safety messages will follow the safety alert symbol and either the word “DANGER” or “WARNING.
IMPORTANT SAFETY INSTRUCTIONS WARNING: To reduce the risk of fire, electrical shock, injury to persons, or damage when using the range, follow basic precautions, including the following: ■ WARNING: TO REDUCE THE RISK OF TIPPING OF THE RANGE, THE RANGE MUST BE SECURED BY PROPERLY INSTALLED ANTI-TIP DEVICES. TO CHECK IF THE DEVICES ARE INSTALLED PROPERLY, SLIDE RANGE FORWARD, LOOK FOR ANTI-TIP BRACKET SECURELY ATTACHED TO FLOOR OR WALL, AND SLIDE RANGE BACK SO REAR RANGE FOOT IS UNDER ANTI-TIP BRACKET.
This induction cooktop generates and uses ISM frequency energy that heats cookware by using an electromagnetic field. It has been tested and complies with Part 18 of the FCC Rules for ISM equipment. This induction cooktop meets the FCC requirements to minimize interference with other devices in residential installation. This induction cooktop may cause interference with television or radio reception.
For maximum surface cooking area operation, all cooktop touchactivated electronic controls can be set to the Performance Boost function when bringing liquids to a fast and rapid boil. Select the desired surface cooking area, then press “Boost” to immediately reach the highest setting. NOTE: Where 240V installation is not available, this cooktop will automatically adjust to 208V operation. Control Lock The Control Lock avoids unintended use of the surface cooking areas.
To Turn Off: Simmer can be turned off in 3 different ways: 1. Use the power slider to set to a heat level. OR 2. Touch the surface cooking area OFF keypad. OR 3. Select a different cooking function. Melt and Hold Performance Boost Function This function allows you to increase the heat setting level above the maximum heat setting 9 for 10 minutes or less. NOTES: Performance Boost function is available on only 1 surface cooking area at a time within a zone.
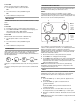
A Tones B Tones are audible signals, indicating the following: One tone ■ Valid pad press ■ Slider is moved to “0” power level ■ Slider is moved to “Boost” power level C A. ½" (1.3 cm) Maximum overhang B. Outer edge of cooktop C. Minimum pan size, if applicable Three tones ■ End of Timer cycle ■ Use flat-bottomed cookware for best heat conduction and energy efficiency. Cookware with rounded, warped, ribbed or dented bottoms could cause uneven heating and poor cooking results.
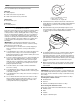
To find out whether your pans can be used with an induction cooktop, flip the pan over, hold a magnet to the bottom of the pan, and see whether it sticks. If the magnet sticks to the bottom of the pan, the pan is ferromagnetic and can be used for induction cooking. In addition, many manufacturers are now placing an “induction compatible” symbol on the bottom of their cookware, or they will note compatibility on their packaging. See the following symbol.
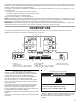
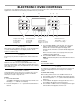
ELECTRONIC OVEN CONTROLS This manual covers different models. The range you have purchased may have some or all of the items listed. The locations and appearances of the items shown here may not match those of your model. A C B D E F N O A. Upper oven settings B. Oven display C. Cook time D. Delay start E. Power preheat F. Oven light G. Self clean H. Settings M K J I H I. Clock J. Kitchen timer K. Lower oven cancel L.
Settings The Settings function enables you to personalize audible tones and oven operation to suit your needs. After completing your adjustments, press any CANCEL or wait 30 seconds for the display to show the time of day. To change any of the following settings, press SETTINGS until the correct display text appears, and then follow the instructions in the appropriate section. See the following “Settings Quick Reference Chart.
2. Press the Temp/Time “+” keypad to select French, or press the Temp/Time “-” keypad to select Spanish. In French, press the Temp/Time “+” keypad to select Spanish, or press the Temp/Time “-” keypad to select English. In Spanish, press the Temp/Time “+” keypad to select English, or press the Temp/Time “-” keypad to select French. 3. Press any START or CANCEL to save the setting and exit.
Rack Positions - Upper Oven Cook function Rack position Bake 2 and 4 Convect bake 2 and 4 2 1 Baking FOOD RACK POSITION All foods 1 Broiling FOOD RACK POSITION Broiling 1 NOTE: For optimal performance, use the lower oven. Bakeware To cook food evenly, hot air must be able to circulate. Allow 2" (5.0 cm) of space around bakeware and oven walls. Use the following chart as a guide.
BAKEWARE/ RESULTS RECOMMENDATIONS Insulated cookie sheets or baking pans ■ Little or no bottom browning ■ Place in the bottom third of oven. ■ May need to increase baking time. Stainless steel ■ Light, golden crusts ■ May need to increase baking time. Stoneware/Baking stone ■ Crisp crusts ■ Follow manufacturer’s instructions. Ovenproof glassware, ceramic glass or ceramic ■ Brown, crisp crusts ■ May need to reduce baking temperatures slightly.
Broiling Broiling uses direct radiant heat to cook food. The lower the temperature, the slower the cooking. Thicker cuts and unevenly shaped pieces of meat, fish and poultry may cook better at lower broiling temperatures. ■ For best results, use the lower oven and a broiler pan with grid (not provided). It is designed to drain juices and help avoid spatter and smoke. 3. Press START. “Broiling” scrolls in the selected oven text area.
BROILING CHART It is necessary to preheat the upper or lower oven for 5 minutes when broiling. Times are guidelines only and may need to be adjusted for individual tastes. Turn meat halfway through cooking time. Recommended rack positions are numbered from the bottom (1) to the top (5). For diagram, see the “Positioning Racks and Bakeware” section. For best results, use the broiler pan available for ordering in the “Accessories” section. UPPER OVEN FOOD RACK POSITION Steak 1" (2.
3. Press START to begin preheating oven. “CONVECT BAKE” will scroll in the lower oven text area and “Power Preheating for single rack. Press start to preheat for multi-rack” will scroll in the lower oven text area until the set temperature is reached. NOTE: If the upper oven is in use, the lower oven will default to the standard preheat/multi-rack baking option. 4. “Insert food for one rack convect only” will scroll twice in the lower text area once the one-rack preheat temperature is reached. 5.
5. Place food in the oven. 6. Press CANCEL for the desired oven when finished. 7. Remove food from the oven. To Cancel Keep Warm™ Feature: Press CANCEL for the desired oven. Remove food from oven. Sabbath Mode The Sabbath Mode allows the range to operate in compliance with the Star-K Jewish Sabbath requirements for a Bake cycle, including Timed Bake or Delayed Bake functions. To use the Sabbath Mode on this range note the following: ■ The Sabbath Mode feature must first be enabled.
To Set a Delay Cooking Time: Before setting, make sure the clock is set to the correct time of day. See “Clock” section. 1. Press the button for any cooking function except Self-Clean or Keep Warm. Press the Temp/Time “+” or “-” pads to enter a temperature other than the one displayed, then press START. 5. Press Temp/Time “+” or “-” pads to enter the desired length of cooking time. 6. Press START. The start time is automatically calculated and displayed. The delay countdown appears on the oven display.
To Self-Clean: To Delay Start Self-Clean: 1. Close the oven door. 2. Press SELF CLEAN. “Press (+) for Upper Oven” will appear in the upper oven text area, and “Press (-) for Lower Oven” will appear in the lower oven text area 1. Press DELAY START. “Press (+) for Upper Oven” will appear in the upper text area, and “Press (-) for Lower Oven” will appear in the lower text area. 3. Press the Temp/Time “+” or “-” pads to select the desired oven.
GENERAL CLEANING IMPORTANT: Before cleaning, make sure all controls are off and the oven and cooktop are cool. Always follow label instructions on cleaning products. Soap, water and a soft cloth or sponge are suggested first unless otherwise noted. EXTERIOR PORCELAIN ENAMEL SURFACES Food spills containing acids, such as vinegar and tomato, should be cleaned as soon as the entire range is cool. These spills may affect the finish.
OVEN DOOR EXTERIOR Cleaning Method: ■ Glass cleaner and paper towels or nonabrasive plastic scrubbing pad: Apply glass cleaner to soft cloth or sponge, not directly on panel. affresh® Kitchen and Appliance Cleaner Part Number W10355010 (not included): See “Assistance or Service” section to order. ■ To avoid oven door glass breakage: ■ Do not close the oven door if the racks are not fully inserted into the oven cavity or when bakeware extends past the front edge of an oven rack.
TROUBLESHOOTING Try the solutions suggested here first in order to avoid the cost of an unnecessary service call. Nothing will operate ■ Has a household fuse blown, or has a circuit breaker tripped? Replace the fuse or reset the circuit breaker. If the problem continues, call an electrician. Cooktop will not operate ■ Is the cooktop control set correctly? Touch the display area on the control panel to select a cooking surface before selecting a function.
Is the display flashing “F” or “C” and numbers? If “F” or “C” and a number are alternately flashing on the display, refer to the following table for possible solutions. ■ Problem or Error Code Possible Cause or Error Solution Cooktop has turned off and is beeping every 10 seconds. An object, liquids or soils are putting pressure on the control panel. Thoroughly wipe or remove any object on touch keys. F42, F43 The power voltage is too low or too high. Turn off the cooktop.
ASSISTANCE OR SERVICE Before calling for assistance or service, please check “Troubleshooting.” It may save you the cost of a service call. If you still need help, follow the instructions below. When calling, please know the purchase date and the complete model and serial number of your appliance. This information will help us to better respond to your request. If you need replacement parts If you need to order replacement parts, we recommend that you use only factory specified parts.
MAYTAG® ELECTRIC RANGE LIMITED WARRANTY FIRST YEAR LIMITED WARRANTY (PARTS AND LABOR) For one year from the date of purchase, when this major appliance is installed, operated and maintained according to instructions attached to or furnished with the product, Maytag brand of Whirlpool Corporation or Whirlpool Canada, LP (hereafter “Maytag”) will pay for factory specified replacement parts and repair labor to correct defects in materials or workmanship that existed when this major appliance was purchased.
Keep this book and your sales slip together for future reference. You must provide proof of purchase or installation date for in-warranty service. Write down the following information about your major appliance to better help you obtain assistance or service if you ever need it. You will need to know your complete model number and serial number. You can find this information on the model and serial number label located on the product.
SÉCURITÉ DE LA CUISINIÈRE Votre sécurité et celle des autres est très importante. Nous donnons de nombreux messages de sécurité importants dans ce manuel et sur votre appareil ménager. Assurez-vous de toujours lire tous les messages de sécurité et de vous y conformer. Voici le symbole d’alerte de sécurité. Ce symbole d’alerte de sécurité vous signale les dangers potentiels de décès et de blessures graves à vous et à d’autres.
IMPORTANTES INSTRUCTIONS DE SÉCURITÉ AVERTISSEMENT : Pour réduire le risque d’incendie, de choc électrique, de blessures ou de dommages lors de l’utilisation de la cuisinière, il convient d’observer certaines précautions élémentaires dont les suivantes : ■ AVERTISSEMENT : POUR MINIMISER LE RISQUE DE BASCULEMENT DE LA CUISINIÈRE, ELLE DOIT ÊTRE BIEN IMMOBILISÉE PAR DES DISPOSITIFS ANTIBASCULEMENT CORRECTEMENT INSTALLÉS.
IMPORTANTES INSTRUCTIONS DE SÉCURITÉ ■ ■ ■ ■ ■ ■ Nettoyer la table de cuisson avec prudence – Si une éponge ou un chiffon mouillé est utilisé pour essuyer les renversements sur une surface de cuisson chaude, éviter les brûlures causées par la vapeur chaude. Certains nettoyants peuvent produire des émanations désagréables lorsqu’ils sont utilisés sur une surface chaude.
UTILISATION DE LA TABLE DE CUISSON Ce manuel couvre différents modèles. La cuisinière que vous avez achetée peut comporter l'ensemble des articles énumérés ou seulement certains d'entre eux. Les emplacements et aspects des articles illustrés ici peuvent ne pas correspondre à ceux de votre modèle. F G H E I D J A B C M A. Alimentation de la table de cuisson B. Mijotage C. Faire fondre et maintenir au chaud D. Affichage de la surface de cuisson avant gauche E.
Verrouillage des commandes Le verrouillage des commandes empêche l’utilisation involontaire des surfaces de cuisson. Si le verrouillage des commandes est activé lorsque l'alimentation électrique de la table de cuisson est interrompue, la table de cuisson est verrouillée et les surfaces de cuisson ne peuvent pas être allumées au moyen des commandes tactiles de la table de cuisson.
Mijotage La fonction de mijotage peut être utilisée pour toutes les surfaces de cuisson. Utilisation : Activation : 1. Vérifier qu'une surface de cuisson a été sélectionnée. 2. Appuyer sur SIMMER (mijotage). “A” apparaît sur l'affichage et le témoin lumineux situé à côté de Simmer (mijotage) s'allume. La minuterie reste visible et peut être réglée si désiré.
3. La minuterie lance le compte à rebours après quelques secondes. Pour modifier la durée, appuyer sur la touche “vers le haut” ou “vers le bas” de TIMER. ■ Afin d'éviter d'endommager la table de cuisson, ne pas laisser des objets qui pourraient fondre, comme du plastique ou du papier d'aluminium, toucher une partie quelconque de la table de cuisson. 4. Une fois le compte à rebours terminé, “00” clignote et un signal sonore retentit.
Ustensiles de cuisson IMPORTANT : Cette cuisinière est dotée d'éléments de cuisson à induction. La taille, le matériau et le positionnement du plat sont très importants pour l'obtention des meilleurs résultats. Consulter “Cuisson par induction” avant d'utiliser la table de cuisson. Seuls les ustensiles de cuisson ferromagnétiques peuvent être utilisés pour la cuisson par induction.
COMMANDES ÉLECTRONIQUES DU FOUR Ce manuel couvre différents modèles. La cuisinière que vous avez achetée peut comporter l'ensemble des articles énumérés ou seulement certains d'entre eux. Les emplacements et aspects des articles illustrés ici peuvent ne pas correspondre à ceux de votre modèle. A C B D E F N O A. Commandes du four supérieur B. Afficheur du four C. Durée de cuisson D. Mise en marche différée E. Préchauffage puissant M F. Lampe du four G. Autonettoyage H. Réglages I. Horloge J.
Réglages Les réglages permettent de personnaliser les signaux sonores audibles et le fonctionnement du four pour convenir aux besoins de l'utilisateur. Une fois les ajustements terminés, appuyer sur une touche CANCEL (annulation) ou attendre 30 secondes pour que l'heure s'affiche. Pour modifier l’un des réglages suivants, appuyer sur SETTINGS (réglages) jusqu’à ce que l’affichage correspondant apparaisse puis suivez les instructions de la section appropriée.
Alarme Rapp (Réglage du signal de rappel - Marche ou arrêt) Le signal de rappel est préréglé à l'usine sur Marche mais peut être modifié et réglé à Arrêt. 1. Appuyer sur SETTINGS (réglages) jusqu'à ce que “ALARME RAPP” (Réglage du signal de fin - Marche ou arrêt) s'affiche. 2. Appuyer sur la touche “+” de Temp/Time (température/durée) pour modifier le réglage. 3. Appuyer sur START (mise en marche) ou CANCEL (annulation) pour enregistrer le réglage et sortir.
UTILISATION DU FOUR Des odeurs et de la fumée sont normales lorsque le four est utilisé les premières fois, ou lorsqu'il est très sale. IMPORTANT : La santé de certains oiseaux est très sensible aux émanations de fumée. L’exposition aux émanations peut entraîner la mort de certains oiseaux. Toujours déplacer les oiseaux dans une autre pièce fermée et bien aérée. Les fours inférieur et supérieur disposent d’options de Power Preheat (préchauffage puissant) et préchauffage standard.
NOMBRE D'USTENSILES Pain à la levure, pains éclairs, muffins, couronnes, petits morceaux de viande et de volaille et cuisson au four sur 2 grilles 2 Biscuits, mets en sauce, muffins, gâteaux, cuisson au four sur 1 grille 3 Cuisson au four sur 2 grilles 2 et 4 1 Centre de la grille. 2 Côte à côte ou légèrement décalés. 3 ou 4 S’assurer qu’aucun ustensile de cuisson ne se trouve directement au-dessus d’un autre. Voir les illustrations pour le positionnement des gâteaux à étages.
Thermomètre à viande Il n'y a pas de thermomètre à viande fourni avec cet appareil. Suivre les instructions du fabricant pour l'utilisation du thermomètre à viande. Pour les modèles qui ne sont pas dotés de sonde thermométrique, utiliser un thermomètre à viande pour déterminer si la cuisson de la viande, de la volaille ou du poisson correspond au degré de cuisson souhaité. C'est la température interne qui indique le degré de cuisson et non l'apparence. Évents du four A B A. Évent du four supérieur B.
Cuisson au gril La cuisson au gril utilise la chaleur radiante directe pour cuire les aliments. Plus la température est basse, plus la cuisson est lente. Les morceaux épais et de forme irrégulière de viande, de poisson et de volaille cuisent mieux à des températures de cuisson au gril plus basses. ■ Pour de meilleurs résultats, utiliser le four inférieur et une lèchefrite avec une grille (non fournies). La lèchefrite est conçue pour laisser s'écouler les jus et aider à éviter les éclaboussures et la fumée.
TABLEAU DE CUISSON AU GRIL Il est nécessaire de préchauffer pendant 5 minutes le four inférieur ou supérieur lors de la cuisson au gril. Les durées de cuisson sont citées à titre indicatif seulement; on peut les régler en fonction des goûts personnels. Retourner la viande à mi-cuisson. Les positions recommandées de la grille sont indiquées de la base (1) jusqu’en haut (5). Pour le schéma, voir la section “Positionnement des grilles et ustensiles de cuisson au four”.
Réglage de la cuisson au four par convection : 1. Appuyer sur CONVECT BAKE (cuisson au four par convection) jusqu’à ce que “CUISSON CONV” s’affiche dans la zone de texte inférieure, et “325°F (163°C)” s'affiche. “Rég temp ou” défile dans la zone de texte du four inférieur, suivi de “Appuyez START”. 2. Appuyer sur les touches “+” ou “-” de Temp/Time (température/durée) jusqu'à ce que la température souhaitée s'affiche. 3. Appuyer sur START (mise en marche) pour commencer le préchauffage du four.
Caractéristique Keep Warm™ AVERTISSEMENT Risque d'empoisonnement alimentaire Ne pas laisser des aliments dans un four plus d'une heure avant ou après la cuisson. Le non-respect de cette instruction peut causer un empoisonnement alimentaire ou une maladie. IMPORTANT : Les aliments doivent être à la température de service avant de les placer dans le four chaud.
2. Si l'on doit utiliser le mode Sabbat pour les deux fours, démarrer une cuisson au four, une cuisson au four minutée ou une cuisson au four différée dans le second four. 3. Appuyer sur KITCHEN TIMER (minuterie de cuisine) pendant 5 secondes. “Cuis-sabbat” apparaît dans la zone de texte supérieure pendant 3 secondes. Pour une fonction de cuisson au four minutée, la durée s'affiche également. Réglage de la température (lorsque le mode Sabbat fonctionne sur seulement un four) : 1.
ENTRETIEN DE LA CUISINIÈRE Programme d’autonettoyage AVERTISSEMENT ■ Essuyer toute saleté décollée afin de réduire la fumée et d’éviter les dommages. À des températures élevées, les aliments réagissent avec la porcelaine. Cette réaction peut causer des taches, des attaques, des piqûres ou de légères taches blanches. Ceci n’affectera pas la performance de cuisson. Préparation de la table de cuisson : ■ Risque de brûlures Ne pas toucher le four au cours du programme d'autonettoyage.
Autonettoyage : Pour différer l’autonettoyage : 1. Fermer la porte du four. 2. Appuyer sur SELF CLEAN (autonettoyage). “Appuyer sur (+) pour le four supérieur” défile dans la zone de texte du four supérieur et “Appuyer sur (-) pour le four inférieur” défile dans la zone de texte du four inférieur. 1. Appuyer sur DELAY START (heure de mise en marche différée).
NETTOYAGE GÉNÉRAL IMPORTANT : Avant le nettoyage, s’assurer que toutes les commandes sont éteintes et que le four et la table de cuisson sont froids. Toujours suivre les instructions figurant sur les étiquettes des produits de nettoyage. Du savon, de l’eau et un chiffon doux ou une éponge sont recommandés à moins d’indication contraire.
Lampe du four TABLEAU DE COMMANDE Afin d’éviter d'endommager le tableau de commande, ne pas utiliser de nettoyants abrasifs, de tampons en laine d’acier, de chiffons de lavage rêches ou d'essuie-tout abrasifs. Pour éviter d'activer les commandes lors du nettoyage, on peut activer la caractéristique Verrouillage des commandes (sur certains modèles). Voir la section “Verrouillage des commandes”.
Dépose : Réinstallation : 1. Ouvrir la porte du four complètement. 2. Repérer les loquets de charnière de la porte du four situés aux deux coins de la porte du four. Faire pivoter les loquets de charnière vers l'avant puis vers le bas, à la position de déverrouillage. 1. Saisir la porte avec les deux mains, comme indiqué dans l'illustration suivante. Repérer les encoches situées de chaque côté de la cavité du four et insérer les charnières de la porte du four dans les encoches. 3.
DÉPANNAGE Essayer d'abord les solutions suggérées ici afin d'éviter le coût d'une intervention de dépannage inutile. ■ Sur certains modèles, le mode Sabbat est-il réglé? Rien ne fonctionne Voir la section “Mode Sabbat”. Un fusible du domicile est-il grillé ou le disjoncteur s’est-il déclenché? Remplacer le fusible ou réenclencher le disjoncteur. Si le problème persiste, appeler un électricien.
■ “F” ou “C” ainsi que des chiffres clignotent-ils sur l’affichage? Si “F” ou “C” ainsi qu’un chiffre clignotent en alternance sur l’affichage, consulter le tableau suivant pour trouver une éventuelle solution. Problème ou code d'erreur Cause ou erreur possible Solution La table de cuisson s'est éteinte et émet un signal sonore toutes les 10 secondes. Un objet, des liquides ou des saletés exercent une pression sur le tableau de commande.
ASSISTANCE OU SERVICE Avant de faire un appel pour assistance ou service, veuillez vérifier la section “Dépannage”. Cette vérification peut vous faire économiser le coût d'une visite de service. Si vous avez encore besoin d'aide, suivez les instructions ci-dessous. Lors d'un appel, veuillez connaître la date d'achat et les numéros de modèle et de série complets de votre appareil. Ces renseignements nous aideront à mieux répondre à votre demande.
GARANTIE LIMITÉE DE CUISINIÈRE ÉLECTRIQUE MAYTAG® GARANTIE LIMITÉE DURANT LA PREMIÈRE ANNÉE (PIÈCES ET MAIN-D'ŒUVRE) Pendant un an à compter de la date d'achat, lorsque ce gros appareil ménager est installé, utilisé et entretenu conformément aux instructions jointes au produit ou fournies avec, la marque Maytag de Whirlpool Corporation ou Whirlpool Canada, LP (ci-après désignées “Maytag”) paiera pour les pièces de rechange spécifiées par l'usine et pour la main-d'œuvre pour corriger les vices de matériaux o
Si vous résidez à l'extérieur des 50 États des États-Unis et du Canada, contactez votre marchand Maytag autorisé pour déterminer si une autre garantie s'applique. Si vous avez besoin d'un service de réparation, voir d’abord la section “Dépannage” du guide d'utilisation et d'entretien. Si vous êtes dans l'incapacité de résoudre le problème après avoir vérifié la section “Dépannage”, vous pourrez trouver de l’aide supplémentaire en vérifiant la section “Assistance ou service” ou en appelant Maytag.