
User's Manual


Features
24
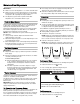
Crisper and Crisper Cover
To remove and replace the crisper(s):
1. Slide crisper(s) straight out to the stop. Lift the crisper(s) from
the slide rails and pull out the rest of the way.
2. Replace the crisper(s) by placing them on the slide rails and
pushing them back into position past the drawer stop.
To remove the crisper(s) cover:
1. Remove crisper(s).
2. Holding the glass insert firmly with one hand, press up in
center of glass insert until it rises above the plastic frame.
Gently slide the glass insert forward to remove.
3. Lift the cover frame up and remove it.
To replace crisper(s) cover:
1. Fit back of cover frame into supports on side walls of the
refrigerator and lower the front of the cover frame into place.
2. Slide rear of glass insert into cover frame and lower front into
place.
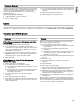
Crisper Humidity Control
You can control the amount of humidity in the moisture-sealed
crisper. Adjust the control to any setting between LOW (open)
and HIGH (closed).
LOW - Move control to the far left-hand side to allow moist air out
of the crisper for best storage of fruits and vegetables with skins.
■ Fruit: Wash, let dry and store in refrigerator in plastic bag or
crisper. Do not wash or hull berries until they are ready to use.
Sort and keep berries in original container in crisper, or store
in a loosely closed paper bag on a refrigerator shelf.
■ Vegetables with skins: Place in plastic bags or plastic
container and store in crisper.
HIGH - Move control to the far right-hand side to keep moist air in
the crisper for best storage of fresh, leafy vegetables.
■ Leafy vegetables: Wash in cold water, drain and trim or tear
off bruised and discolored areas. Place in plastic bag or
plastic container and store in crisper.
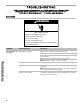
Temperature-Controlled Drawer
IMPORTANT: This control sets the temperature for only this
drawer. It does not set the temperature for, or turn off cooling to
the refrigerator or freezer compartments.
The full-width, temperature-controlled drawer can be used to
store large deli trays, fresh meat, beverages or other items that
you want to store at an optimum temperature.
Depending on your model, you will have either an Electronic
Control or a Manual Control. Use the directions specific to your
model.
NOTE: Do not place leafy vegetables in the temperature-
controlled drawer. The colder temperatures could damage leafy
produce.
Style 1 - Electronic Control
Press the button that corresponds with the items stored in the
drawer.
■ Meat (coldest)
■ Drinks (default)
■ Deli (least cold)
NOTE: If no button is pressed, the control will revert to DRINKS,
the default setting.
Style 2 - Manual Control
Slide the control to the temperature setting best suited for the
items stored in the drawer.
■ Coldest - Meat
■ Colder - Drinks
■ Cold - Deli