GUI ••• ........ii 8 .i,_::,...
Models: Welcome LAT9206 • LAT8106 * LAT8026 • LAT8016 • LAT8006 • LAT1916 ....................................................................... Welcome and congratulations on your purchase of a 2) Have proof of original date of purchase. Consumer Rated No.1 Maytag Washer! Your complete satisfaction is very important to us. Read this manual Please attach your sales receipt here. for best results. It contains instructions to acquaint you with proper operating and maintenance procedures.
Important Safety Instructions .................................... _k WARNING m To reduce the risk of fire, explosion, electric shock, property damage or injury to persons when using your appliance, follow basic precautions, including the following: 1. Read all instructions before using the appliance, been used for such a period, before using a wash- 2. ing machine or combination washer-dryer, turn on all hot water faucets and let the water flow 3. 4. 5. 6.
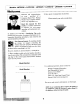
ontrols Step 0 AtAGI Select Cycle Press the control knob ance ........................................... (Features may vary according to model.) in and turn clockwise to the desired cycle. Pull the knob out to start the washer. REGULAR OFF EX HEAVY spit EASY CARE / PERMANENT PRESS LIGHT : "eo NORMAL • REGULAR • •o is used for most fabrics.
Step 0 Select Water Level Turn the WATER LEVEL knob to the setting that matches the size of the load• Select models offer infinite settings. Choose a specific setting or any point in between If more water is needed once the fill is complete, turn the knob to reset and then to the proper setting. Step 0 Select qFeatures may vary according to model.) WATER LEVEL SETTING WATER LEVEL i o**lt** ioq Super * oo,, •o. i o*. *6. 3/4 - •Full o*,_ . o.boo* t* _o.
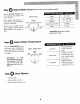
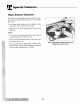
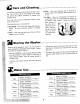
Special Fabric Softener Features .................................................. Dispenser This dispenser automatically releases liquid fabric softener at the proper time during the cycle. To use, follow these steps: 1. Pour liquid fabric softener into the dispenser using the amount recommended on the package. 2. Add warm water to the dispenser until it reaches the MAX line. NOTE: • Do not stop the washer during the first spin. This will cause the dispenser to empty too soon.
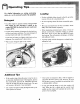
Operating Tips ....................................................... For detailed information on sorting, pretreating stains, etc., see the enclosed Laundry Tips pamphlet. Loading • Put dry, unfolded clothes loosely in the tub, up to the top row of holes for a maximum load. Detergent • Do not wrap large items like sheets around the agita- • Use either liquid or granular laundry detergent.
Care and Cleaning ............................................... Turn off the water faucets after finishing the day's washing. This will shut off the water supply to the washer and prevent the unlikely possibility of damage from Interior - hard water deposits may be removed, if needed, using a recommended cleaner labeled washer safe. escaping water. Use a soft cloth to wipe up all detergent, bleach or other spills as they occur, Lint Filter - these are self-cleaning and require no maintenance.
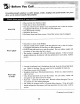
Before You Call ................................................... For problem laundry solutions (i.e. fabric damage, residue, tangling) and special laundry care procedures, see the enclosed Laundry Tips pamphlet. Check these )oints if your washer... • Plug cord into live electrical outlet. • Check fuse or reset circuit breaker. • Turn the control knob to proper cycle and pu/l knob out to start the washer. Won't Fill If equipped with buttons, be sure they are fully depressed.
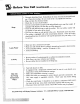
Before You Call (continued).................................. Check thes( )oints if ,our washer... • Unevenly distributed load. Redistribute the load, close the lid and pull knob out. Check for leveling. Be sure water level is acceptable for load size. • Plug cord into live electrical outlet. • Check fuse or reset circuit breaker. • Turn the control knob to proper cycle and pull knob out to start the washer. If Stops o..***., e e*.***o, equipped with buttons, be sure they are fully depressed.
' Automatic Washer Warran ty ............................. Full One Year Warranty For one (1) year from the date of original repaired or replaced free of charge.