
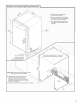
Installation guide
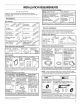

Connectdrainhosetowasteteeorwastedisposer
usingoneofthefollowingoptions:
•OptionA,Wastedisposer-noargap
-OptionB,Nowastedisposer-noairgap
,OptionC,Wastedisposer-withairgap
•OptionD,Nowastedisposer-withairgap
IMPORTANT:Thedrainhoseconnectionofthedisposerora
wasteteemustbemadebeforethedraintrapandatleast
20"(50.8cm)abovethefloorwherethedishwasherwillbe
installed.
HelpfulTip:Toreducevibrationofthehose,keepthehoseaway
fromthefloor.
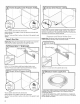
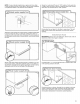
Option A, Waste Disposer - No Air Gap
Helpful Tip: Remove disposer knockout plug.
1=
Using a hammer and screwdriver,
knock plug into disposer.
2. Use needle-nose pliers to remove
plug.
3=
Attach drain hose to disposer inlet
with large drain hose clamp
(provided). Use pliers to squeeze
clamp open and move into position.
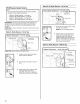
Option B, No Waste Disposer - No Air Gap
1. Fit rubber end of drain hose to waste
tee and cut if needed.
NOTE: Do not cut ribbed section.
2= Attach rubber end of drain hose to
waste tee with a large drain hose
clamp (provided). Use pliers to
squeeze clamp open and move into
position. If the drain hose was cut,
use a 1V2" to 2" (3.8 to 5 cm) screw-
type clamp (not provided).
Option C, Waste Disposer - With Air Gap
Drain trap
10