
Installation guide
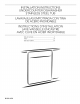

INSTALLATIONREQUIREMENTS
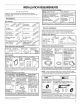
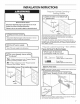
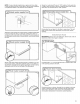
Gather the recommended tools and parts before starting
installation. Read and follow the instructions provided with any
tools listed here.
All Installations
Tools Needed:
screwdriver
5 i
5/16 and V4 _ I
nut drivers or _ ISmalllevel
hex sockets
10!! adjustable wrench ___ Torx®tT20® and, if
tha! opens to //_/j/7 J installing custom _/
(2,9 cm) front panels,
.... . Torx®T15 ®screwdrivers
Other Useful Items You May Need:
F! Shallow Bath towel
Parts Supplied:
Drain hose Drain hose #10 xl/£ ' Undercounter DoOr
clamps (2) Phillips, m0unting handle (on
(1 large/red _ head brackets (2) some
and ! small/ _ screws (2) models)_
Make sure all these parts are included in the literature package.
If parts are not included, call 1-800-422-1230. In Canada, call
1-800-807-6777.
Other Parts Needed: (not provided)
%" COmpression HouseholdWiring Twist-on
x ¾!! Hose Fitting (Metallic} Strain Relief Connectors
with rubberseal to fit %,I (2,2 cm) hole NOTE:Confirm
andg0 °elbow (required tO properly proper size for
(required to secure household connecting your
pr0perlyc0nnect wiring tothe dish- gauge of house-
household Water washer terminal box) hold wiring tothc
line to the NOTE: Use only UL 16-gauge wiring
dishwasher) Listed/CSAApproved in the dishwasher
_ part _ NOTE: Use on y
((_ }_h UL Listed/CSA
_::}i::: Approved parts,
(WhirlpoOlNumber (whirlPool PaX
w10685193) Number 4396672)_--_ _J
Col! Whirlpool Parts: 1-800-442-9991 ;for Part Number above;
orsee local electrical/plumbing supply retailer for equivalent.
I"®TORX, T15, and T20 are registered trademarks of
Acument Intellectual Properties, LLC.
O
an optional, added level of
protection if installing a
dishwasher under a wooden
(Whirlpool Part /_._-_
)tional Accessory Parts Available:
Moisture BarderTape Side P
NOTE: Moisture barrier tape is For enclosing the side of
the dishwasher when
installing it at the end of
your cabinetry.
(whirlpoOl
Part Number
Varies With
color)
Call Whid pool Parts:l-800:442-9991; for PaA Nu m ber abore:
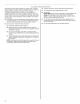
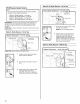
First-time Installations:
Check local codes. Check existing electrical supply. See the
"Electrical Requirements" section. It is recommended that
electrical connections be made by a licensed electrical installer.
Additional Tools Needed:
(
1/£!;3/4,
saW bits
Additional Parts Needed (not provided)
C0pPertubing(%i;' Screw-TyPe 'opd0nal:Longer }
O.D. suggested) Cla,mps Drain Hose Maximum
or Rexible Braided IVy' ' 2.... length: 12 ft (3,7 m)
Water Supp!y Line (3,81:5cm) NOTE: Must meet
Kit (Whirlpool Part (3 maximum) AHAM/IAPMO test
NumberW10278635RP). standards, fit !"
Kit includes Braided (2.5 cm)drain
Hose and %, I connection, and be
Compression x resistant t0 heat and
¾ Hose Fitting detergent.
(WhirlpO( I _.
Part
.................I 3385556) _
call Whidp0ol Parts: 1:800-442-9991, for Part Number above;
or see local plumbing supply retailer for equivalent,
NOTE: If using a flexible braided hose, replace inlet hose after
5 years to reduce the risk of hose failure. Record hose installation
or replacement dates on the hose for future reference.
For DirectW_re For Power Cord
cabinet Grommet' Power Cord Kit
For !_/2 (3:8 ore)Kit typically includes Power €ord,
hole in cabinet, meta!lic strain relief, grommet, and
twist-on Wire connectors:
Wh r p0o
Nomber302797/
NOTE: Required
for metal cabinets, (Whirlpool Part Number 4317824)
Call Whirlpool Parts: ii800'442-9991; for Part Number above;
or see local electrical supply retailer for equivalent;