
Owner's Manual


24
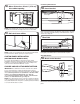
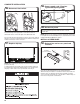
CONNECT WATER LINE TO HOUSE
SHUT-OFF VALVE
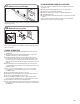
NOTE: If using a exible braided hose, replace inlet hose after 5
years to reduce the risk of hose failure. Record hose installation
or replacement dates on the hose for future reference.
44. Attach water supply line
Attach the water supply line (copper tubing or exible braided
line) to the hot water line using a connection conguration that is
in compliance with local codes and ordinances. The water supply
to the dishwasher should have a manual shut-off valve located
under the sink.
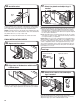
CONNECT DRAIN HOSE
45. Connect drain hose
IMPORTANT: The drain hose connection of the disposer or a
waste tee must be made before the drain trap and at least
20" (50.8 cm) above the oor where the dishwasher will be
installed.
Helpful Tip: To reduce vibration of the hose, keep the hose away
from the oor.
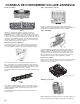
NOTE: Use the red clamp provided to connect the drain hose to
the customer connection - plumbing or garbage disposal.
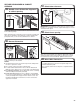
Option A: Waste disposer—no air gap
Disposer inlet
Large drain
hose clamp
Drain hose
Drain trap
Helpful Tip: Remove disposer knockout plug.
1
1. Using a hammer and screwdriver, knock
plug into disposer.
2
2. Use needle-nose pliers to remove plug.
3
3. Attach drain hose to disposer inlet with
large drain hose clamp (provided). Use
pliers to squeeze clamp open and move
into position.
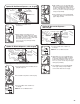
Connect drain hose to waste tee or waste disposer using
one of the following options:
■ Option A: Waste disposer – no air gap
■ Option B: No waste disposer – no air gap
■ Option C: Waste disposer – with air gap
■ Option D: No waste disposer – with air gap