
Installation guide


Option
D,
No
waste
disposer
-
with
air
gap
No
\
waste
2
disposer
_
“with
air
gap
—
Air
gap
-
Large
silver
drain
hoseclamp
—
Screw-type
clamps
a
Waste
tee:
Rubber
hose
connector
Drain
hose
Cee
eee
eee
reece
“Drain
trap
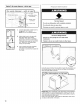
1.
Connect
black
end
of
drain
hose
to
air
gap
and
cut
if
needed.
NOTE:
Do
not
cut
ribbed
section.
Black
end
2.
Attach
drain
hose
to
air
gap
with
large
silver
drain
hose
clamp
(provided).
Use
pliers
to
squeeze
clamp
open
and
move
into
position.
lf
the
drain
hose
was
cut,
use
a
11%”
to
2"
(3.8
to
5.1
cm)
screw-type
clamp
(not
provided).
3.
Use
a
rubber
hose
(not
provided)
with
screw-type
clamps
(not
provided)
to
connect
from
waste
tee
to
air
gap.
10
Prepare
Disnwasher
AWARNING
Tip
Over
Hazard
Do
not
use
dishwasher
until
completely
installed.
Do
not
push
down
on
open
door.
Doing
so
can
result
in
serious
injury
or
cuts.
AWARNING
Excessive
Weight
Hazard
Use
two
or
more
people
to
move
and
install
dishwasher.
Failure
to
do
so
can
result
in
back
or
other
injury.
1
|
Attach
insulation
)
er
\
ai
|
Tabs
La,
CO)
OQ
Completed
Install
2
Using
the
precut
slots
in
the
insulation,
fasten
the
insulation
over
the
molded
hooks
on
the
tub.
Be
sure
to
fasten
the
insulation
down
on
both
sides
of
the
tub.
2
Put
dishwasher
on
its
back
Helpful
Tip:
Place
cardboard
under
dishwasher
until
installed
in
cabinet
opening
to
avoid
damaging
floor
covering.
Do
not
use
door
panel
as
a
worktable
without
first
covering
with
a
towel
to
avoid
scratching
the
door
panel.
Using
2
or
more
people,
grasp
sides
of
dishwasher
door
frame
and
place
dishwasher
on
its
back.