
Installation guide
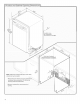
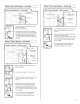

Slowlyroutewatersupplylinethroughholeincabinet.(Ifusing
coppertubing,itwillbendandkinkeasily,sobegentle.)Lt
shouldbefarenoughintothecabinetopeningtoconnectitto
thedishwasherinletonthefrontleft
sideofthedishwasher.
Slowlyturnwatershutoffvalveto"ON"position.Flushwater
intoashallowpanuntilcleartogetridofparticlesthatcould
clogtheinletvalve.Turnshutoffvalveto"OFF"position.
IMPORTANT:Alwaysuseanewdrainhose.Checklocalcodes
todetermineifanairgapisrequired.
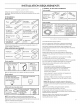
Ifneeded,drilla11/2"(3.8cm)diameterholeincabinetwallorside
oftheopeningclosesttothesink.
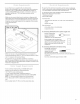
Routedrainhoseasshownthroughholeincabinettothefront
centerofopeningwheredrainconnectionwillbemade.Tape
drainhosetothefloorinareashown.Thiswillprohibititfrom
movingwhendishwasherismovedintocabinetopening.
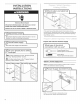
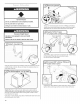
, Option A; Waste disposer _n0 air gap
i Option B, No Waste disP0ser-no air gap
, Option C, Waste disposer : with air gap
' opt 0n D, No waste disp0ser- with air gap
IMPORTANT: The drain hose connection of the disposer or a
waste tee must be made before the drain trap and at least 20"
(50.8 cm) above the floor where the dishwasher will be installed.
Helpful Tip: To reduce vibration of the hose, keep the hose away
from the floor.
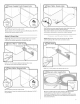
Option A, Waste disposer - no air gap
t ;t ; :i
1. Using a hammer and screwdriver, knock
plug into disposer.
2. Use needle-nose pliers to remove plug.
3. Attach drain hose to disposer inlet with
large silver drain hose clamp (provided).
Use pliers to squeeze clamp open and
move into position.