
Installation guide


INSTALLATIONREQUIREMENTS
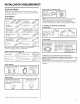
Tools and Parts
Gather the recommended tools and parts before starting
installation. Read and follow the instructions provided with
any tools listed here.
All Installations
Tools needed:
P ers
Phillips
screwdriver
5/16" and 1/4" _._
nut drivers or _Y"
hex sockets
10" adjustable wrench /_
that opens to S_
1 1/8 (2.9 cm)
m
Flat-blade
screwdriver
UL listed or CSA
approved twist-on R
wire connectors* v
5/8" open-end
wrench
*Must be the proper size to connect your household
wiring to 16-gauge wiring in dishwasher
Other useful items you may need:
F ash ight _ Bath towe
Parts supplied:
(I argeand lsma ) 2:#10xl
screws
_r
Make sure all these parts are included in the literature package.
Parts needed:
90° Elbow fitting With 3/8" Teflon C_taPe orpip
N:RT, external threads (the joint comPound
other end muSt fit your water
supply,he!
® Teflon is a registered tradernark of E.I. Du Pont de Nernours and Cornpany.
Other parts you may also need:
112" 2"
t381-510om)
screw_tYP e iI du_ 1
clamps (3 max)|
NOTE: Parts available for purchase in plumbing supply stores.
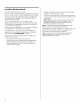
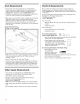
Check local codes. Check existing electrical supply. See
"Electrical Requirements" section. It is recommended that
electrical connections be made by a licensed electrical installer.
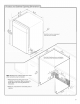
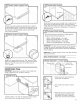
In addition, for first-time installations
Tools needed:
w_th !/_
Parts needed:
C0ppeitubing (3/8, See'Electrical Requirements" section
OID. suggested) or
flexible braided For Direct Wire: ForP0wersupp!y
watersuppiyiine use UL listed or Cord: useUL
OSA appr0ved listed PoWer
Strain irelief to sUpPly cord kit
fit 7/8 (212 Cm)Part Number4317824
h01e marked for Use
With dishwaSher
Additional parts supplied with certain models only:
IB0tt°mS°und pad (loCated IM°!siurebardertape
l in lower rack) 1 !
Make sure all these parts are included in the package containing
literature.