
Installation guide


1.
Remove
the
oven
racks.
4.
Securely
fasten
oven
to
cabinet
using
the
two
4
x
25
mm
self-
tapping
screws
provided.
Insert
the
screws
through
holes
in
FO
ey
|
NG
mounting
rails.
Do
not
overtighten
screws.
Excessive
Weight
Hazard
Use
two
or
more
people
to
move
and
install
oven.
Failure
to
do
so
can
result
in
back
or
other
injury.
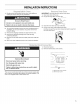
2.
Using
two
or
more
people,
lift
the
oven
by
the
side
handles
located
on
the
right
and
left
side
of
the
oven.
Gently
insert
into
the
cabinet
cutout.
A.
Two
4 x
25
mm
self-tapping
screws
5.
Install
the
oven
racks.
6.
Replace
oven
door
by
inserting
both
hanger
arms
into
the
door.
A.
Side
handle
3.
Push
against
seal
area
of
front
frame
to
push
oven
into
cabinet.
7.
Open
the
oven
door.
You
should
hear
a
“click”
as
the
door
is
set
into
place.
8.
Move
the
hinge
levers
back
to
the
locked
position.
9.
Check
that
the
door
is
free
to
open
and
close.
If
it
is
not,
repeat
the
oven
door
removal process
and
installation
procedures.
See
“Remove
Oven
Door”
section.
10.
Reconnect
power.
11.
On
some
models,
the
display
panel
will
light
briefly,
and
“--:--”
should
appear
in
the
display.
12.
If
display
panel
does
not
light,
please
reference
the
“Assistance
or
Service”
section
of
the
Use
and
Care
Guide
or
contact
the
dealer
from
whom
you
purchased
your
oven.