
User`s guide


Oven Racks
CAUTION: Do not attempt to change the rack posi-
tion when the oven is hot.
Your oven has two racks. They are
designed with a lock–stop edge.
Select models have one regular
rack and one RollerGlide
TM
rack.
The RollerGlide
TM
rack rolls out
on metal rollers and allows the
rack to fully extend making it easy to place food in and take
food out of the oven.
To remove flat rack: Pull rack straight out until it stops at
the lock–stop position; lift up on the front of the rack and pull
out.
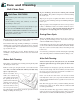
To remove RollerGlide
TM
rack: Pull both the rack glide and
the rack base out together. (See graphic above).
To replace: Place rack on the rack support in the oven; tilt
the front end up slightly; slide rack back until it clears the
lock–stop position; lower front and slide back into the oven.
Rack Positions
RACK 5 (The RollerGlide
TM
rack on select models is
not recommended on rack
position 5): Used for
toasting bread or broiling
thin non–fatty foods.
RACK 4:
Used for most broiling.
RACK 3:
Used for most baked goods on a cookie sheet or jelly roll
pan, layer cakes, fruit pies, or frozen convenience foods.
RACK 2:
Used for roasting small cuts of meat, casseroles, baking
loaves of bread, bundt cakes or custard pies.
Tabs
Support
Front
Notes:
• Do not use cookware that extends beyond edge of rack.
• For best results, allow two inches between the pan
placed on the rack and the oven side wall.
• When opening the oven door, allow steam and hot air
to escape before reaching into the oven to remove food.
• Use caution when removing items from the half rack to
avoid burns.
• Carefully remove items from the lower rack to avoid
disturbing the half rack.
• “HALFRACK” Accessory Kit is available from your
dealer when not included with range.
RACK 1:
Used for roasting large cuts of meat and poultry, frozen
pies, dessert souffles or angel food cake.
ROASTING POSITION:
Used for roasting taller cuts of
meat or turkey. Place both oven
racks, one above the other, on the
raised sides of the oven bottom.
MULTIPLE RACK COOKING:
Two rack: Use rack positions 2 and 4, or 1 and 4.
Half Rack (select models)
To install in oven:
1. Always install half rack
when oven is cool.
2. To install, grasp top center of
the half rack. Align the side
arm support between the top
fourth and fifth oven rack guides. Insert the two tabs on
the back frame of the half rack into the slots on the upper
left rear of the oven wall.
3. Push firmly on the top surface of the half rack until the
tabs slide into the slots and the half rack side arm support
rests on the fourth oven rack guide.
4. Check for proper installation by placing your hand on the
top surface of the half rack
and pressing down firmly.
To remove from the oven:
When the oven is cool, grasp
the top center of the half rack
and pull upward until the back
tabs on the rack slide out of the
oven back slots.
Oven Vent
When the oven is in use, never block the vent opening.
It is located at the base of the backguard. When the oven is in use,
this area may feel warm or hot to the touch. Do not place plastics
near the vent opening as heat from the vent could distort or melt
the plastic.
11
Oven Operation (continued)
Oven Light
Push the switch on the control panel
to turn it on and off.