Gas Range MAY[AG important Safety instructions ............................... 1=4 Care & Cleaning Self-Clean Oven ................... 19=22 Cleaning Procedures Surface Cooking ...................... 5=6 Surface Controls Sealed Gas Burners Oven Cooking ......................... Manual Clean Oven Controls Maintenance Baking Cook & Hold Delay Bake Form No. A/01/06 Part No.
clan. Do not attempt to adjust, repair, service, or replace any part of your appliance unless it is specifically recommended in this guide. All other servicing should be referred to a qualified servicer. Have the installer show you the location of the gas shut off valve and howto shut it off in an emergency. Always disconnect power to appliance before servicing.
Importent Sefetyinstructions To check if device is properly installed, look underneath range with a flashlight to make sure one of the rear leveling legs is properly engaged in the bracket slot. The anti-tip device secures the rear leveling leg to the floor when properly engaged. You should check the device each time the range has been moved. Do not use water on grease fires. Use baking soda, a dry chemical or foam-type extinguisher to smother fire or flame.
Importent Sefetyinstructions Other potentially hot surfaces include cooktop, areas facing the cooktop, oven vent, surfaces near the vent opening, oven door, areas around the oven door and oven window. Always place oven racks in the desired positions while oven is cool. Slide oven rack out to add or remove food, using dry, sturdy potholders. Always avoid reaching into the oven to add or remove food. If a rack must be moved while hot, use a dry, sturdy potholder.
Importent SefetyInstructions important This appliance has been tested for safe performance using conventional cookware. Do not use any devices or accessories that are not specifically recommended in this guide. Do not use eyelid covers for the surface units, stovetop grills, or add-on oven convection systems.
Cooktn HI: Use to bring liquid to a boil, or reach pressure in a pressure cooker. Always reduce setting to a lower heat when liquids begin to boil or foods begin to cook. LO: Use to simmer foods, keep foods warm and melt chocolate or butter. Some cooking may take place on the LO setting if the pan is covered. An intermediate flame size is used to continue cooking. Food will not cook any faster when a higher flame setting is used than needed to maintain a gentle boil.
Cooktn Do not operate the burners without a pan on the grate. Cooktop To prevent the cooktop staining: from discoloring The grate's porcelain finish may chip without a pan to absorb the heat from the burner flame. or • Clean cooktop after each use. Although the burner grates are durable, they will gradually lose their shine and/or discolor due to the high temperatures of the gas flame.
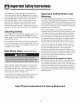
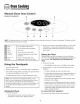
Manual Clean Oven Control (:select models:) A F .............. B C D \\ E NOTE: The display will show 12:00 when the appliance is first connected to power or if power is interrupted. The Bake and Broil indicators light when function is pressed. Bake Use for baking and roasting. Broil Use for broiling and top browning. Timer Sets Timer. Clock Use to set time-of-day clock. CANCEL Cancels all operations except Timer and Clock. More+ or Less- Enters or changes time, oven temperature.
Baking, Roasting and Broiling ° To change oven temperature during cooking, press the Bake pad, then press the More+ or Less- pad until the desired temperature is displayed. Setting the Controls For Baking or Roasting: • To change oven temperature during preheat, press the Bake pad twice, then press the More+ or Less- pad until the desired temperature is displayed. 1. Press Bake pad. , 000 will light and the Bake indicator light will flash in the display. 3. Place food in the oven.
4. Follow the suggested times in the broil chart below. Meat should be turned once about halfway through cooking time. 2. Place food in the center of oven. Check food for doneness at minimum time in recipe. Cook longer if necessary. 5. After broiling, press Cancel to turn the oven off and remove the broiler pan from the oven. The current time of day will reappear in the display. 3. Remove food from oven and turn Oven Temp knob to OFF.
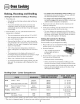
¢ookln______jg Oven Control (select models) A B C D I J ! G H The control panel is designed for ease in programming. The displaywindow on the control shows time of day, timer and oven functions. Control panel shown includes model specific features. (Styling may vary depending on model.} Broil Use for broiling and top browning. Bake Use for baking and roasting. _i_iiiiiiiii More+ or LessTimer Cook & Hold Clean Clock The clock car/be set to display time in a 12-hour or 24-hour format.
Locking the Controls To cancel the Clock display: If you do not want the time of day to display: The touchpad controls can be locked for safety, cleaning, or to prevent unwanted use. They will not function when locked. Press and hold the CANCEL and Clock pads for three seconds. The time of day will disappear from the display If the oven is currently in use, the controls cannot be locked. The current time of day will remain in the display when the controls are locked.
Baking Baking Differences Between Your Old To set Bake: and New Ovens 1. Press the Bake pad. It is normal to notice some bakhrg time differences between a new oven and an old one. See "Adjusting the OvenTemperature" on page 15. • "BAKE" will flash. ° 000 will light in the display. ....................................... Cook & Hold 2. Select the oven temperature. The oven tempera- More+ ture can be set from 170° to 550°. Press or press ............................................
cookln______jg Delay Bake When the Delay time has expired: • "DELAY" will turn off. • Baking time is displayed. ° "BAKE" and "HOLD" are displayed. To set a Delay when Cook & Hold has already been programmed: When using Delay, the oven begins to cook later in the day. Set the amount of time that you want to delay before the oven turns on and how long you want to cook. The oven begins to heat at the selected time and cooks for the specified length of time, then keeps food warm for up to one hour. 1.
cookln______j Keep Warm Keep Warm For safely keeping foods warm or for warming breads and plates. Notes: • For optimal food quality, oven cooked foods should be kept warm for no longer than 1 to 2 hours. To set Keep Warm: • To keep foods from drying, cover loosely with foil or a lid. 1. Press the Keep Warm pad. • To warm dinner rolls: • "WARM" flashes. - cover rolls loosely with foil and place in oven. • 000 appears in the display. 2. Select the Keep Warm temperature.
Automatic Shut-Off/Sabbath Mode Adjusting the Oven Temperature Oven temperatures are carefully tested for accuracy at the factory. It is normal to notice some baking or browning differences between a new oven and an old one. As ranges get older, the oven temperature can shift. The oven will automatically turn off after 12 hours if you accidentally leave it on. This safety feature can be turned off.
¢ookln______jg Broiling (select models) 5, Place food in the oven. Close oven door. To set Broil: 6. Turn meat once about halfway through cooking. 1. Press the Broil pad. 7. When food is cooked, press the CANCEL pad. Remove food and broiler pan from the • "BROIL" flashes. ove n. • SETis displayed. • The time of day will reappear in the display. 2. Press the More+ pad to set HI broil or press the Less- pad to set LO broil. ° HI or LO will be displayed.
cookln______j Oven Racks Pilotless ignition Your range is equipped with pilotless ignition. With this type of ignition system, the gas automatically shuts off and the oven will not operate during a power failure. A ffghted match will not light the oven burner. No attempt should be made to operate the oven during a power failure" Oven Vent Your oven has two racks. They are designed with a lock-stop edge. When the oven is in use, the area near the vent may become hot enough to cause burns.
MULTIPLE RACK COOKING: RACK 2: Used for roasting small cuts of meat, casseroles, baking loaves of bread, bundt cakes, custard pies or two-rack baking. Two rock: Use rack positions 2 and 4, or 1 and 4. Note: Never place pans directly on the oven bottom. RACK 1: Used for roasting large cuts of meat and poultry, frozen pies, dessert souffles, angel food cake, or two-rack baking. Half Rack Accessory ROASTING POSITION: A half rack isavailable as an accessory to increase oven capacity.
aeentn9 Self-Clean 6. Wipe up sugary and acidic spillovers such as sweet potatoes, tomato, or milk-based sauces. Porcelain enamel Oven (select models) Note: For manual clean oven, see page 22. i is acid-resistant, not acid-proof. The up porcelain finish discolor if acidic spills are not wiped before a self- may clean cycle. I a clean ote: Oven cycle.temperature must be below 400° F to program To set Self=Clean: 1. Close the oven door. 2. Move door lock lever right to the locked position. 3.
¢leam 3. Press the Clean pad. During • "CLEAN" will flash. 4. Press the More+ or Less- pad. the Self-Clean Cycle When LOCK shows in the display, the door cannot be opened. To prevent damage to the door, do not force the door open ................................... when LOCK is displayed. ° "CL-M" (Medium Soil, 3 hours] is displayed. Smoke and Smells CL-H" (Heavy Soil, 4 hours] CL-M" (Medium Soil, 3 hours] Smoke may also occur if the oven is heavily soiled or if a broiler pan was left in the oven.
¢leentn9 Cleaning Procedures Brand names are registered trademarks of the respective manufacturers. _*To order call 1-877-232-6771 USA or 1-800-688-8408 Canada. _ _ _ _ _ _ _ __ _ _ _ _ _; ...................._ ; _ _ .............................. _ _ _ _ _ _ Broiler Pan and insert Never cover insert with aluminum foil as this prevents the fat from draining to the pan below. • Place soapy cloth over insert and pan; let soak to loosen soil. • Wash in warm soapy water.
¢leenln9 Oven Window and Door = Glass • Avoid using excessive amounts of water which may seep under or behind glass causing staining. • Wash with soap and water. Rinse with clear water and dry. Glass cleaner can be used if sprayed on a cloth first. ° Do not use abrasive materials such as scouring pads, steel wool or powdered cleaners as theywill scratch glass. Oven interior Self=Clean: ° Follow instructions on page 19-20 to set a self-clean Manual Clean: cycle.
Nelntenence Oven Door Leveling Legs F_ Be sure the range should be leveled when installed. If the range is not level, turn the leveling legs (located at each corner of the range:) until range is level. II/] (_ ]] [L[ ,I )1_. _ _i_/ To remove: \ 1. When cool, open the oven door to the first stop position (opened about four inches:). LEVELING LEG Oven Light 2. Grasp door at each side. Do not use the door handle to lift door. 3. Lift up evenly until door clears hinge arms. To replace: 1.
Melntenence Electrical Connection Storage Drawer (select models:) Appliances which require electrical power are equipped with a three= prong grounding plug which must be plugged directly into a properly grounded three-hole 120 volt electrical outlet. Always disconnect power to appliance before servicing, The storage drawer can be removed to allow you to clean under the range. The three-prong grounding plug offers protection against shock hazards.
froubleshoofln:9 For most concerns, try these first. • Check o Check o Check o Check Surface burner fails to light. ° Check to be sure unit is properly connected to power supply. o Check for a blown circuit fuse or a tripped main circuit breaker. o Check to be sure ignitor is dry and clicking. Burner will not light if ignitor is damaged, soiled or wet. If ignitor doesn't click, turn control knob OFF. The flame is uneven. ° Burner ports may be clogged. Surface burner flame lifts off ports.
Troubleshootin Oven did not dean properly. (select models) • Longer cleaning time may be needed. • Excessive spillovers, especially sugary and/or acidic foods, were not removed prior to the self-clean cycle. Oven door will not unlock after self=clean cycle (select models). ° Oven interior is still hot.
Warranty What is Not Covered By These Warranties 1. Conditions and damages resulting from any of the following: a. Improper installation, delivery, or maintenance. b. Any repair, modification, alteration, or adjustment not authorized by the manufacturer or an authorized servicer. c. Misuse, abuse, accidents, or unreasonable use, or acts of God. d. Incorrect electric current, voltage, electrical and/or gas supply. e. Improper setting of any control.
Cuisini re gaz /sin instructions importantes ....................................... 29=33 Caisson sur la surface .................... 34-35 Commandes de la surface de cuisson BrQleursscell6s Caisson dans le four .......................
Life routes les instructions avant d'utiliser cet appareil; observer toutes les instructions pour eliminer les risques d'incendie, choc electrique, dommages materiels et corporels que pourrait susciter une utilisation incorrecte de rappareil. Utiliser rappareil uniquement pour los fonctions prevues, decrites darts ce guide. Pour une utilisation adequate et en s_curit_, il faut que rappareil soit convenablement installe par un technicien qualifie, et relic _ la terre.
Instructionsde " imponentes instructions g nerales composants de I'appareil susceptibles de devenir tiedes ou chauds. Ne pas hisser des articles en plastique sur la table de cuisson: un article en plastique trop proche de I'event du four ou d'un brOleur aflume pourrait s'amollir ou fondre. Pour eliminer le besoin d'atteindre quelque chose par-dessus les brOleurs de surface, il est preferable qu'il n'y ait aucune armoire de cuisine directement au-dessus de I'appareil.
instructions desecurlte imponentes des enfants. II est important d'enseigner aux enfants qu'un appareil menager n'est pas un jouet, et qu'ils ne do[vent toucher aucune commande ou autre composant de rappareil. brQleur correct et verifier que le brQleur s'allume effectivement. A la fin de la periode de cuisson, eteindre le brQleur avant de retirer rustensile, pour eviter une exposition aux flammes du brQleur.
instructions desecurlte impomntes deplacer une grille Iorsqu'elle est chaude, utiliser une manique seche. Veiller _ toujours arreter le four _ la fin d'une periode de cuisson. Seuls certains materiaux en verre, vitroceramique, ceramique, ou certains ustensiles vitrifies/emailles peuvent etre utilises sur la table de cuisson ou dans le four sans risque de bris sous reffet du choc thermique. Observer les instructions du fabricant Iors de rutilisation d'un ustensile en verre.
securke tmportentes Avertissement et avis Nous informons les utilisateurs de cet appareil que Iors d'une ope,ration d'autonettoyage, ils peuvent e,tre expose,s_ une faible concentration de certaines substances figurant dans la liste mentionne,e ci-dessus, dont le monoxyde de carbone. Pour minimiser Fexposition, veiller _ ce que la pie,ceou se trouve le four soit convenaNement ae,re,edurant une ope,ration d'autonettoyage par Fouverture d'une fene,tre ou d'une porte.
Culsson surle surfece Hi [Elev_e): S'utilise pour porter un liquide dbullition ou atteindre la bonne pressiondunsun autocuiseur.R6duireensuite la puissancede chauffageapr_s le ddbut de I'dbullition ou de la cuissondes aliments. LO [Basse): S'utilise pour le mijotage ou le maintien de la temp6ratured'un mets,ou pour la fusion de chocolatou beurre.Lorsquele plat ou I'ustensileest couvert,un de!butde cuisson peut se produire avec la puissancede chauffage LO.
Culsson surle surfece Surface de caisson Grilles de br leur Pour _viter la formation changement de couleur Avant une ocration de cuisson,v(_rifierque la grille est correctementplac@.Unegrille de brOleur incorrectementinstallc!epout @ailler I'c!mailde la table de cuisson. caisson de taches ou un de la surface de : • Nettoyer la surface de cuisson apr_s chaque utilisation. Ne pas faire fenctienner un br_leur sans qa'an astensile seit plac_ sur la grille.
Culsson denslefour Commandes du four nettoyage manuel (certains modeles) A F \ \ jJ B C J D RENIARQUE: L'afficheurindique 12:00Iorsque I'appareilest branch6la premierelois ou en cas de panne de courant. Lestc!moinslumineux de cuisson couranteet de cuissonau gril s'allumentIorsque I'onappuie sur la touche de fonction correspondante. iiiiiiiiiiiii iiiiiiiiiiiii Cuissoncourante S'utilise pour la cuissoncourante et le rOtissage.
Culsson denslefour Caisson courante, caisson au gril • Laisserle four pr6chaufferpendant10 _ 15 minutes. rStissage et • Pourrappelerla temp6raturepr6programm_ependantle pr_chauffage,appuyersur la touche Bake.La temp6raturesera affich6ependanttrois secondes. Program(nation des coma)andes pour une caisson courante ou un r6tissage : • Pourchanger la temperature du four pendant la cuisson, appuyersur Bake,puis sur la touche More+ ou Less-jusqu'a ce que la tempc!ratured6sirc!esoit affich6e. 1.
Culsson densle four 3. Appuyersur la touche More+ pour choisirun gril _ temp6ratureHI (Elevde)ou sur la touche Less- (Moins] pour choisir un gril temperatureLO (Basse). Reglage du four pour uue cuissou un r6tissage courante ou : 1. Enfoncer/fairetourner le bouton OvenTemp 0-empdraturefour), jusqu'a la position correspondanta la temp6ratured6sir6e. Laisserle four pr_chaufferpendant 10 a 15 minutes. • Choisirle rdglageHI pour un gril normal.
Culsson denslefour Tableau de commando A (certains modeles) B C D More+ I]mer E F G H Le tableaude commandoest concu pour faciliter la programmation.La fen6tre d'affichageindique I'heure,lesfonctions avecminuterie et fonctions du four. Le tableau de commandorepr6sent6comprend caract6ristiquesspc!cifiquesau module.(Le style pout varier solonle meddle.) Gril S'utilisepourla cuissonau gril etle rissolage surpartiesup6rieure.
Culsson denslefour Annulation de la minuterie : Lorsquele courant _lectrique arriveou apr_s une interruption de courant,la derniSreheure avant I'interruptionde courant va clignoter. 1. Appuyer sur la touche Timer et la maintenir ainsipendant trois secondes. Pour rappeler rheure du jour Iorsqu'uneautre fonction de dur_e s'affiche,appuyersur la touche Clock. OU 2. Appuyer sur la touche Timer et r6gler rheure a 00:00.
Culsson denslefour Cuisson COUrante Remarques sur la cuisson courante au four : • Pour changer la temperature du four pendant la cuisson, appuyersur Bake,puis sur la touche More+ ou Less-jusqu'_ ce que la temp6ratured6sirdesoit affich6e. Programmation de une cuisson courante : 1. Appuyer sur la touche Bake(Cuissoncourante]. • Le mot BAKE(CUISSONCOURANTE)clignote. • 000clignote a rafficheur.
Culsson denslefour Lorsque la dur_e de caisson s'est 6coul6e : 4. Appuyersur More+ pour programmerla tempc!raturede cuisson. • O,uatre bips retentissent. • 00:00et le mot HOLDclignotent. • Le mot BAKEs'6teint. • Le mot BAKEreste allure& • Losroots HOLDet WARM (CHAUD)s'allument. 5. Appuyersur More+ pour programmerla durc!ede cuisson. • 75° (170°) parait a I'afficheur. • La durc!ed'attente,les roots DELAY,BAKEet HOLDs'allument I'afficheur.
Culsson denslefour Nlaintien au chaud Remarques sur la fonction au chaud : Pour maintenirau chaud clansle four des alimentscuits et chauds ou pour r6chaufferpainset assiettes. maintien • Pour obtenir des qualit6s alimentaireset nutritives optimales, les alimentscults au four ne doivent pas6tre gard6sau chaud plus de I a 2 heures. Program(nation du maintien au chaud : 1. Appuyersur la touche KeepWarm (Maintien au chaud). ° Le mot WARM (CHAUD)clignote.
Culsson denslefour Arr t autornatique/Mode sabbat Ajusternent de la temperature Le four s'arr6teautoma%uement aprBs12 heuress'il a 6t6 accidentellementlaiss6en marche.Cettecaract6ristiquede s_curit6 pout 6tre arr6t6e. La pr6cisiondes temp6raturesdu four a 6t6 soigneusementv6rifi6e I'usine.II eat normalde remarquerquelquesdiff6rencesdans la cuissonentre un four neuf et un four ancien.Au fur eta mesureque los cuisini_ressont moins neuves,la temp6raturedu four pout varier.
Culsson denslefour Cuisson au grU (certains modeles) Pour un rissolagemaximum,pr_chaufferle four pendant2 ou 3 minutes avantd'ajouter la nourriture. Programmation de la cuisson au gril : 5, 1. Appuyer sur la touche Broil [Gril). Placerla nourriture dans le four. Formerla porte du four. 6. Retournerla viandeune lois _ la moitic!de la dur_e de cuisson. • Le mot BROIL(GRIL)clignote. 7. LorsqueI'alimentest cult, appuyersur la touche CANCEL[ANNULER).Retirer la nourriture et la I_chefrite du four.
C.issondenslefour Reinstailation AIlumage sans flamme de veille : 1. Placerla grille sur lossupportsdans le four. 2. SouleverIc!g_rementI'avant.Faireglisser la grille vers I'arri_re au-del_ de la position de calage. La cuisini_re est dot6e d'un syst_med'allumagesansflamme de veille. Cesyst_meferme automatiquementI'arrivc!ede gaz et emp_che tout fonctionnement du four/ors d'une interruption de I'alimentation _lectrique. 3. Abaisser la grille et la faire glisser darts le four.
Four autonettoyant 5, (certains modeles) Eliminerlea r6sidus de graisse ou de produits renvers6ssur la sole avant le nettoyage.Ceci emp6che la formation de flammes ou de fum6e durant le nettoyage. Essuyerles rc!sidussucr6set acides,comme leapatatesdouces, Rernarque : Pour la nettoyagemanualvoir le page 50. 6. la tomate ou lea sauces_ basede lait. La porcelainevitrific!e poss_deune certaine r6sistanceaux composc!sacides,mais qui n'est paslimit6e.
Pendant 2. Appuyer sur la touche More + ou Less- pour programmerla duree d'attenteavant que ne commencele cycle. La duree d'attentepeut 6tre reglee,de dix minutes(00:10)a onze heures, cinquante-neufminutes (11:59). Fumee et odeurs 3. Appuyer sur la touche Clean (Nettoyage). • Le mot CLEAN(NETTOYAGE) va clignoter. 4. Appuyer sur la touche More + (Plus+)ou Less(Moins-). • CL-M (Nettoyage- salet6 moyenne)est affich& le cycle d'autonettoyage Lorsquele mot LOCKparait a I'afficheur,la porte ne pout 6tre ....
M6thodes de nettoyage *Les nomsde marquesont des marques d_posdesdes diff6rents fabricants. ** Pour commanderdirectement, composerle 1-877-232-6771 E.-U.ou 1-866-688-8468 Canada. L_chefrite et sa grille Nejamais couvrir la grille de papier d'aluminium;cola emp_che la graisse de couler dunsla I_chefrite. • Recouvrirla I_chefriteet sa grille d'un linge savonneux;laisseragir pour ddtacher los r6sidus. • Laveravecde I'eausavonneusetilde. Utiliser un tampon _ r6curer pour c!liminerlossouillurestenaces.
Panneaux lat_raux, tiroir de remisage, porte du gril inferior et poign_es de porte = _mail peint • Unefois les pi_ces refroidies,les laver a I'eausavonneusetilde, rincer et s6cher.Ne jamais essuyerune surface tilde ou chaude avec un lingo humide,ceci pouvant endommagerla surfaceet entrainerune brQlurepar la vapeur. • Pour lestaches rebelles,utiliser des agentsde nettoyage16g_rementabrasifscomme la p_te au bicarbonatede soude ou Bon Ami*.
Porte du four 3. Ne pasformer la porte du four avantque les grilles ne soient en place darts le four. Touted%radation du hublot de verre- rayure,choc,tension, etc. pout affaiblir sa structure et augmenterle risque de bris _ une date ult6rieure. Pieds de r glage Depose de la porte: de I'aplomb V6rifier que la cuisiniSreest d'aplombune foisde install6e. Si elle ne I'est pas, tourner les pieds r_glage de I'aplomb_ chacun des anglesde la 1.
D6placement gaz d'un appareil Raccordement lectrique Los appareJls n_cessitantune aiimentation _Jectrique comportent une fiche _ trois broches raisea la terre qui dolt 6tre branch6e directementduns une prise de 120volts a trois cavit6set correctementraisea la torte. Lesraccordsdesappareilsa gazservant_ branchercot appareil I'alimentationde gaz ne sont pus pr6vuspour 6tre d@lac6s continuellement.Une lois I'appareilinstallS,NE PAS le d@lacer de fa_on r@6t@ pour le nettoyerou le changerde place.
Recherche despennes i ii i!i!ii i i i Pour la plupart des problbrnes observ6s, essayer d'abord les solutionspossibles,_ droite. Un brSleur de surface ne s'allume pas. !! ii i iiiiiiiiiiiiiiiiiiiiiiiiiiiiiiiiiiiiiiiiiiiii i! !! i! i! i! i i!!!!i! i! i! i! i! • • • • V6rifier que lescommandesdu four sont correctementr6gl6es. V@ifiersi la fiche est bien ins6r6eduns la prise. Inspecter/r6armerle disjoncteur.Inspecter/remplacerlosfusibles. Contr61erla source d'alimentation61ectrique.
Becherche des ImpossibJlit_d'autonettoyage du four Ccertains modules). • D6terminerque I'appareiln'a pas6t6 programm6pour un autonettoyagediff6r6.Voir pages47-48. , V6rifier que la porte est fermc!e. , V@ifiersi la commandeest en mode sabbat.Voir page 44. • Le four est peut 6tre ) une temp6raturesupc!rieurea 205 °C (400°F].La temp6raturedu four dolt 6treinf6rieurea 205 °C (400°F]pour pouvoirprogrammerun cycled'autonettoyage. Lefour ne se nettoie pas correcternent Ccertains modules).
epres-vente Ne sont pas couverts par ces garanties 1. Lesprobl_meset dommagesr_sultantdessituations suivantes: a. Mise en service,livraisonou entretien effectu_sincorrectement. b.Toute r6paration,modification,alt6ration et tout rc!glagenon autorisc!spar le fabricant ou par un prestatairede serviceapr_s-venteagr6& c. Mauvaisemploi,emploi abusif,accidents,usagenon raisonnable,ou catastrophe naturelle. d. Courant61ectrique,tension, alimentation_lectriqueou en gaz incorrects. e. R6glageincorrectd'une commande.
Estufa a Gas sobre Seguridad ............................ 57=61 Jnstruccion_ Cocinando en la Estufa ................ 62=63 Controles Superiores Quemadores de Gas Sellados Cocinando en el Homo ................ 64=74 ...................... 75=78 Homo Autolin_ piante Procedimientos de Lira pieza Mantenimiento .............................. 79=80 Ventana y Luz del Horno Retiro de la Estufa a Gas Controles del Homo de Limpieza Manual Reloj Hornear Temporizador Asar Localizaci6n y Soluci6n de Averias ...
Lea y siga todas las instrucciones antes de usar este electredern_stico para evitar el riesgo potencial de incendio, cheque el6ctfico, lesi6n personal o da_o al electrodom6stico come resultado de su use inapropiado. Utilice este electrodom6stico solamente para el prop6sito que ha side destinado segQn se describe en esta gufa. Para asegurar funcienamiente cerreete y segure: El electrodorn6stico debe set instaladodebidamente y puesto a tierra per un t6cnico caNficado.
Impomntes Instrucciones Generales Se urlded Muchos pl_sticos son vulnerables al calor. Mantenga los pl_sticos alejados de las piezas de la estufa que puedan estar tibias o calientes. No deje artfculos de pl_stico sobre la cubierta de la estufa pues se pueden derretir o ablandar si est_n demasiado cerca del respiradero o de un quemador superior encendido.
Imponentes Seguridad Se les debe ense_ar a los ni_os que el electrodom6stico y los utensilios que estan en 61o sobre 61pueden estar calientes. Deje enfriar los utensilios calientes en un lugar seguro, fuera del alcance de los ni_os peque_os. Se les debe ense_ar a los ni_os que un electrodom6stico no es un juguete. No se debe permitir que los ni_os jueguen con los controles u otras piezas de la estufa. Segurlded Para Cocinar Siempre coloque un utensilio en un quemador superior antes de encendeflo.
Importentes Segurlded Nunca deje que un utensilio hierva hasta quedar seco pues esto puede daliar el utensilio y la estufa. Siempre coloque las parrillas del horno en la posici6n deseada cuando el homo este fifo. Deslice la parrilla del homo hacia afuera para agregar o retirar alimento, usando tomaollas secos y resistentes. Siempre evite alcanzar dentro del homo para agregar o retirar alimentos. Si una parrilla debe set sacada cuando est,1todavfa caliente, use un tomaollas seco.
Inslrucclones Imponenles Es normal que la cubierta de la estufa se caliente durante el ciclo de autolimpieza. Por Io tanto, se debe evitar tocar la cubierta durante un ciclo de autolimpieza. reducir_n la combusti6n incompleta. La exposici6n a estas sustancias puede tambi6n ser reducida a un mfnimo ventilando los quemadores al exterior en forma adecuada.
¢ocinando enlu Estufa 'HI' (Alto): Se usa para hacer hervir un liquido o alcanzar la presi6nadecuadaen una olla a [ presi6n. Siemprereduzcael ajuste a un calor [ m4s bajo cuando los liquidos comiencena hervir o cuandolos alimentoscomiencena cocinarse. 'LO' (Bajo):Se usa para calentar alimentosa fuego lento, mantener los alimentoscalientesy derretir chocolateo mantequilla. Se puede cocinar en el ajuste '[.O' siempre que el utensilio est6 tapado.
¢oclnaMo enlu [stufa Cubierta Rejillas de los Quemadores Para evitar que la cubierta se descolore o se manche: Las rejillasdeben estar debidamentecolocadasantes de comenzara cocinar. La instalaciOnincorrectade las rejillas puede resultaren picaduras de la cubierta. , Limpiela cubierta de la estufa despu6sde cada use. ° Limpie losderrames_cidos o azucaradostan pronto come la cubierta se hayaenfriado puesestos derrames puedendescolorar la porcelana.
¢odnuMoenelnorno Controles del Homo de Limpieza (modelos selectos) A Manual F More+ \X ................ \ \ \ \\ \ B C D E F NOTA"El indicadorvisual despliega12:00cuandose conecta el electrodom6sticopor primeravez o sl se interrumpeel suministro el6ctrico. Lasluces indicadoras'Bake' y 'Broil' se despliegancuando se activala funci6n correspondiente. = 'Bake' (Hornear) Se usa para horneary asar. 'Broil' (Asar) Se usa para asara la parrilla y dorar los alimentos.
¢odnaMo enelnorn Horneado, Asado y Asado a la Parril|a • Paraverificarla temperaturaprogramadaduranteel precalentamientodel homo,oprima la tecla 'Bake'.La ternperaturase desplegar_idurantetres segundos. Setting the Controls For Baking or Roasting: ° Para cambiar la temperatura del horao durante el proceso de cocciBn,oprima la tecla 'Bake',luego oprima'More+' o 'Less-' hasta que sedesplieguela temperaturadeseada. 1. 0prima latecla 'Bake'.
¢oclnaMoen el Homo 3. Optima la tecla 'More+' para programarel asadoen el ajuste 'HI' (alto)o 'Less-'para el ajuste 'LO' (bajo). Ajuste del Homo para Horneado 1. Oprimay gire la perilla 'OvenTemp'a la temperaturadeseada. Espere10 a 15 minutos para el precalentamiento. , Seleccioneel ajuste'HI' (alto)para asadoa la parrillanormal.
¢odnuMoenelnorno PaBel de Control (modelos selectos} A B C D /. ...................... ( Timer t E F G H I J El panel de control ha sido disefiadopara su f@il programaci6n.El indicador visualen el panel de control muestrala hora del d[a,el temporizadory lasfunciones del homo. El panel de control mostradoarriba incluye las caracteffsticasespedficas del model& (Elestilo del panel de control var[a seg[in el modelo.} 'Broil'(Asara la Parrilla) Se usaparaasara la parrillay dorarlos alimentos.
¢o¢inandoenelHorno Para cancelar el temporizador: Cuandose conectaenergfael6ctricaal homo o despuc!sde una interrupciOnde la energ[ael6ctrica,la t31timahora del reloj previaa la interrupciOndestellar_ien el indicador. 1. Oprimay mantengaoprimida la tecla 'Timer' durantetres segundos. Paradesplegarla hora del d[a cuando el indicadorest6 mostrando otra funciOnde tiempo, oprima la tecla 'Clock'. U 2. Optima la tecla 'Timer'y coloque la hora a 00:00.
¢o¢inandoenelnorno 'Bake' (Horneado) Notas sobre Homeado: Para programar 'Bake' (Homeado): • Para cambiar la temperatura del homo darante el proceso de cocci6n, oprima la tecla 'Bake',luego oprima'More+' o 'Less-' hasta que se desplieguela temperaturadeseada. 1. Optima la tecla 'Bake'. • 'BAKE'destellard. • '000'destellarden el indicadorvisual. 2. Seleccionela temperaturadel homo. La temperatura del homo puede ser programadade 75° a 285° C [170° a 550° F).
¢ocinandoenelnorno Cuando haya expirado el tiempo de cocci6n: 5. Optima 'More+' para programarel tiempo de horneado. • Se escuchar_ncuatro sefialessonoras. ° Enel indicadorvisual se iluminan 'DELAY','BAKE',y 'HOLD'. • 'BAKE'se apagar_i. • 'HOLD'y 'WARM' se iluminar_n. • Enel indicadorse desplegar_75° 070°). Cuando el tiempo diferido ha expirado: ° 'DELAY'se apagar_. , Se despliegael tiempo y la temperaturade horneado.
¢ocinandoenelnorno 'Keep Warm' (Mantener Caliente) Notas sobre 'Keep Warm': Paramantener calientesen forma seguraalimentoscalienteso para calentar panesy platos. ° Paracalidad6ptima de los alimentos,losalimentoscocinados en el homo deben set mantenidoscalientespor no m_isde I a 2 horas. Para programar 'Keep Warm': 1. Oprimala tecla 'Keep Warm'. • 'WARM'destella. ° Paraevitar que losalimentosse sequen,ct_braloslevemente con papel de aluminioo una tapa. • '000'se despliegaen el indicadorvisual.
¢oclnandoenelnorno Cierre Autom tico/Nlodo Sab tico Ajuste de la temperatura homo El horno se apagar_ autom_ticamentedespu6sde 12 horassi usted Io deja accidentalmenteencendido. Estacaracter[sticade seguridad puede ser desactivada. La exactitudde las temperaturasdel horno es cuidadosamente probada en la f_brica. Esnormal notar alguna diferencia entre la temperaturade horneado, entre un homo nuevoy un homo antiguo. Conel correrdel tiempo, la temperaturadel homo puede cambiar.
¢odnuMoenelnorno 5. Coloqueel alimento en el homo. Cierrela puerta del homo. 'Broiling' (Asar a la Parrilla:) (modelos selectos:) 6. Ddvuelta a la came una vezaproximadamentea mitad de la cocci0n. Para programar 'Broil': Cuandoel alimento est6 cocinado,optima la tecla 'CANCEL'.Retire el alimentoy la asadera del homo. 1. Optima la tecla 'Broil'. • 'BROIL'destella. • La hora del d[avolver_ a desplegarseen el indicadorvisual. • 'SET'se despliegaen el indicador. 2.
¢oclnandoenelHomo Encendido sin Piloto Para reinstaiar la parriiia: Su estufa est_ equipadacon un sistemade encendidosin piloto. Con estetipo de encendido,el gas seapaga autom_iticamentey el homo no operar# durante una interrupci6n de la corriente el6ctrica. 1. Coloquela parrilla en el soporte de la parrilla en el horno. 2. Incline levementehaciaarriba el extremodelantero;deslice la parrilla hacia atr_s hastaque pasesobre los topes de enganche. 3.
Culdudo[Imptem Limpieel excesode grasao derramesde la parte inferior del homo. Estoevita humo excesivoo Ilamaradasdurante el ciclo de limpieza. Homo Autolimpiante (modelos selectos) Limpielos derramesazucaradoso _cidos tales como papa dulce Nora: Parala limpieza manual,ver p_gina 78. i 6. [camote),tomates o salsasa basede leche.La porcelana esmaltadaes resistenteal _cido pero no a prueba de _cidos.
Culdedoy Umplez,, g 2. Optima la tecla 'More+' o 'Less-'para programarla cantidadde tiempo que usted deseadiferir el ciclo. Eltiempo diferido puede ser programadode 10 minutos [00:10)a ] ] horas,59 minutos [11:59). Durante More, el ci¢lo de autolimpieza Cuandoaparece'LOCK'en el indicador,la puerta no se puede abrir. Paraevitar dafio a la puerta, no fuerce la puertapara abrirla cuando la palabra 'LOCK'est,1desplegadaen el indicadorvisual. 3. Optima la tecla 'Clean'. Humo y Olores .
Umplez,, Culdedo ¥a Procedirnientos de Lirnpieza * Losnombresde los productosson marcasregistradas de sus respectivosfabricantes. ** Para hacerpedidos, Ilameal 1-877-232-6771EE.UU.o al 1-800-688-8408Canad& Asadera e Inserto Nunca cubra el inserto con papel de aluminio plies esto evita que la grasa se escurra a la bandeja inferior. Quemadores de Gas Sellados • Limpiefrecuentemente. Espereque el quemadorse enfrfe. Limpiecon una esponjade fregar de pl_sticocon jab6n.
llmpiez Culdedo ¥ Paneles Laterales Gaveta de AImacenamiento, Puerta de la Parrilla inferior y Manijas de las Puertas = Esmalte Pintado • Cuandoest6frfa, lave con agua tibia jabonosa,enjuaguey seque.Nunca limpie una superficietibia o caliente con un pato hOmedopues esto puede datar la superficiey causaruna quemaduraa causadel vapor. • Paramanchasrebeldes,use agentesde limpieza levementeabrasivostal como pasta de bicarbonatoo 'BonAmi'*.
Puerta del Homo Tornillos Niveladores Verifiquesi la estufa est_ niveladacuandose instal& Si la estufa no est_ nivelada,gire lostornillos ]_1 I] I I ._ niveladoresubicados hasta que quede nivelada. en cadaesquinade la estufa ___//_c'/L_=: ,: __POSITIVO Para sacar: 1.Cuandoeat6fr[a,abra la puerta del homo hasta la posiciOntope de asara la parrilla [abierta aproximadamente10cm (cuatro pulgadas)]. _\ ANTIVUELCO TORNILLO NIVELADOR Luz del Homo 2. Sujetela puerta de cada lado.
Mententmlento Retire de la Estufa a Gas Cone×i6n Losconectores de la estufa a gas usadospara conectareste artefacto al suministrode gas no est_n dise_adospara movimiento continuo. Unavez instalados,NO mueva repetidamenteeste artefacto a gaspara su limpiezao para ubicarlo en otro lugar. Si este artefactotiene que ser movidoy/o retiradopara reparaci0n, siga el procedimientodescrito en las instruccionesde instalaciOn.
Para la mayoda de los problemas, verifique primero Io siguiente. Revisesi los controlesdel homo est_n debidamenteajustados. • Verifique si el enchufe est_ firmemente insertadoen el tomacorriente. • Verifique o vuelvaa reponer el disyuntor. Verifique o reemp[aceel fusible. • Verifique el suministrode energ[ael_ctrica. Eiquemador superior no se eneiende. o o e La llama es dispareja. La llama del quemador superior se levanta del orificio.
Eihomo no se autolimpia Onodelosselectos}. • Verifique para asegurarsede que el ciclo no estc!ajustado para un comienzodiferido. Ver p_iginas76-77. • Verifiquesi la puerta est4 cerrada. • Verifiquesi el control est,1en Modo Sab_itico.Ver p%. 72. • El homo puede estar a m_sde 205° C (400° F). La temperaturadel homo debe ser inferiora 205° C [400° F) para programarun ciclo de limpieza. Elhomo no se lirnpi6 en forma debida (modelos selectos}. • Puedeque sea necesarioun tiempo de limpiezam_islargo.
Gamntia Lo que no cubren estas garantias 1. Situacionesy dafios resultantesde cualquierade lassiguientessituaciones: a. InstalaciOn,entrega o mantenimientoinapropiados. b.CualquierreparaciOn,modificaciOn,alteraciOno ajuste no autorizadospot el fabricante o taller de servicioautorizado. c. Mal uso, abuso,accidentes,uso no razonableo hechosfortuitos. d. Corriente,voltaje,suministro elOctricoo suministro de gas incorrectos. e. Ajuste inadecuadode cualquiercontrol. 2.