
Quick Reference Sheet

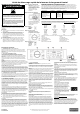
Table Of Contents

W11355237A
W11407239A-SP
Front Load Washer Quick Start Guide
OPERATING INSTRUCTIONS
WARNING
Fire Hazard
Never place items in the washer that are dampened
with gasoline or other flammable fluids.
No washer can completely remove oil.
Do not dry anything that has ever had any type of
oil on it (including cooking oils).
Doing so can result in death, explosion, or fire.
WARNING: To reduce the risk of fire, electric shock, or injury to persons,
read the IMPORTANT SAFETY INSTRUCTIONS, located in your
appliance's Owner's Manual, before operating this appliance.
NOTES:
� Not all features and cycles are on all models, and control panel
appearance may vary.
� If your model has a touch interface, the control panel features a
sensitive surface that responds to a light touch of your finger. To
ensure your selections are registered, touch the control panel with
your fingertip, not your fingernail. When selecting a setting or option,
simply touch its name.
� If your model has physical buttons, make sure to press the button
firmly.
� At cycle completion, your setting and option choices will be
remembered for the next cycle. However, if power to the washer is
lost, the settings and options will go back to the factory defaults.
Step 1. Add HE Detergent
NOTE: See the “Adding Laundry
Products” section in your Owner's
Manual for more information on
adding HE detergent, fabric
softener, and/or bleach.
Step 2. Load Clothes
Add load loosely. Items need to
move freely for best cleaning.
Step 3. Turn Power
On
Step 4. Close Door; then Select
Cycle and Settings
Step 5. Press Start/
Pause
Cycle Guide – Normal Cycle
Settings and options shown in bold are default settings for that wash cycle. For best fabric care, choose the cycle,
options, and settings that best fit the load being washed. Always read and follow fabric care labels and laundry
product instructions. Avoid tightly packing the washer. The washer will not rinse well or spin correctly if tightly
packed. Not all settings are available with each cycle, and some options cannot be used together. Not all options are
available on all models.
Items to Wash: Cycle: Temperature: Description:
Normally soiled cottons,
linens, sheets, and
mixed-garment loads
Normal Hot
Very Warm
Warm
Cool
Cold
This cycle combines medium-speed tumbling
and an extra-high-speed spin. This cycle is
designed to provide the most energy
efficiency.
Online Ordering Information
For detailed installation instruction and maintenance information, winter storage, and transportation tips, please see
the Owner’s Manual included with your machine.
For information on any of the following items, the full cycle guide, detailed product dimensions, or for complete
instructions for use and installation, please visit https://www.maytag.com/owners, or in Canada
https://www.maytag.ca/owners. This may save you the cost of a service call.
However, if you need to contact us, use the information listed below for the appropriate region.
United States:
1–800–344–1274
Maytag Brand Appliances
Customer eXperience Center
553 Benson Road
Benton Harbor, MI 49022–2692
Canada:
1–800–688–2002
Maytag Brand Appliances
Customer eXperience Centre
200–6750 Century Ave.
Mississauga, Ontario L5N 0B7
Button Descriptions
1. POWER/CANCEL
Select to turn the washer on and off. Select to stop/cancel a cycle at any time.
NOTE: Turning the Wash Cycle knob will also turn the washer on.
2. WASH CYCLE KNOB
Turn the knob to select a cycle for your laundry load. Press the Wash Cycle
knob to enable the Extra Power option.
NOTE: The Clean Washer with affresh
®
LED will flash when the washer has
run 30 wash cycles as a reminder to run the Clean Washer with affresh
®
cycle.
See online “Cycle Guide” for detailed descriptions of cycles.
Designed to use only HE High
Efficiency detergents.
NOTE: For best results when using the Overnight Wash & Dry cycle, use for
loads weighing 2 lbs or less, such as a soccer uniform or a running tank and
shorts. Allow the cycle to run the full duration of 12 hours.
Extra Power
Extra Power option can be used for increased cleaning power. Press the Wash
Cycle Knob to activate the Extra Power option, which runs a cold prewash cycle
before the main cycle. When Extra Power is activated, the Wash Cycle Knob will
illuminate and the estimated time remaining on the display will increase. On
single load dispenser models, add an extra dose of detergent to the Bleach/
Detergent for Extra Power compartment when using Extra Power, for best
results.
3. START/PAUSE
Touch and hold for 3 seconds until the light above Start comes on to start a cycle
or touch once while a cycle is in process to pause it. If you want to add a
garment, you can touch Start when the “Add Garment” LED is on.
4. LED DISPLAY AND SETTINGS
When you select a cycle, its default settings will light up and the Estimated Time
Remaining will be displayed. Factors such as load size, wash temperature, and
water pressure may affect the time shown in the display. Tightly packing,
unbalanced loads, or excessive suds may cause the washer to lengthen the
cycle time as well. Touch the desired setting on the display to adjust. See online
“Cycle Guide” for available settings on each cycle. Not all settings are available
with all cycles.
Temp
The recommended wash temperature is preset for each cycle. Some preset
temperatures can be changed. You may select a different wash temperature
based on the level of soil and type of fabric being washed. For best results, use
the warmest wash water safe for your fabric, following the garment label
instructions. All wash temperatures feature a cold rinse.
Spin
This washer automatically selects the spin speed based on the cycle selected.
Some preset speeds can be changed.
� Faster spin speeds mean shorter dry times, but may increase wrinkling in
your load.
� Slower spin speeds reduce wrinkling, but will leave your load more damp.
Soil
Soil Level (wash time) is preset for each wash cycle. When you change the soil
setting, the cycle time will increase or decrease in the Estimated Cycle Time
display. For most loads, use the soil level that is preset with the cycle you have
chosen. For heavily soiled and sturdy fabrics, use the Soil Level setting to select
a higher soil level. For lightly soiled and delicate fabrics, use the Soil Level
setting to select a lower soil level. Lower soil level settings will help reduce
tangling and wrinkling.
5. CYCLE STATUS
NOTE: Not all Cycle Status Lights are available on all models.
The Cycle Status Lights show the progress of a cycle. At each stage of the
process, you may notice sounds or pauses that are different from traditional
washers.
Sensing
When Start is touched and held, the washer will first perform a self-test on the
door lock mechanism and the sensing light will come on. You will hear a click,
the drum will make a partial turn, and the door will click again as it unlocks
briefly. The door will click one more time when it locks again.
Once the door has locked the second time, the washer will begin spinning to
sense the load size. This sensing process will continue throughout the cycle.
You may also hear water flowing through the dispenser, adding detergent to the
load.
After the load size is sensed, the estimated time based on load size will be
displayed. The actual cycle time may be lengthened; however, the display will
continue to show the estimated time. The sensing light will blink once a second
at various times during the cycle, such as when the washer is reducing extra
suds.
Washing
During the wash cycle, this will display to let you know the cycle is in progress.
Add Garment
When “Add Garment” is lit, you may pause the washer, open the door, and add
items. Touch and hold Start/Pause to start the washer again.
Detergent Low
When detergent in the bulk dispenser is running low, the display will show the
detergent level (Low).
6. OPTIONS
Touch to activate additional wash options or additional features on the washer.
Not all options are available on all models.
Delay Start
Touch this option to delay the start of the wash cycle by up to 12 hours.
Fresh Hold
®
/Fresh Spin™ Cycles
The Fresh Hold
®
/Fresh Spin™ option will periodically tumble the load after the
end of the cycle for up to 24 hours while the integrated fan circulates air through
the washer to reduce humidity. Fresh Spin
™ also periodically tumbles the load
after the end of the cycle but does not use an integrated fan. To turn on the
Fresh Hold
®
/ Fresh Spin™ option, touch Fresh Hold. If, however, the Fresh
Hold
®
/Fresh Spin™ option is turned on, it will stay on for all future cycles until
turned back off—the washer remembers the last on/off status set. To turn off the
Fresh Hold
®
/Fresh Spin™ option, touch Fresh Hold.
To turn off the Fresh Hold
®
/Fresh Spin™ option when it is running, touch Power.
NOTE: The door will lock while the Fresh Hold
®
/Fresh Spin™ option is active.
To cancel the option and unlock the door, touch Power.
Steam
The Steam option adds additional soak and wash time to many cycles to help
remove tough stains as well as a steam boost for added cleaning power. An
integrated heater helps to maintain optimal wash temperatures.
Extra Rinse
Activate this option to add an extra rinse to most cycles. You can also touch and
hold Extra Rinse for 3 seconds to disable/enable the Control Lock.
Cycle Signal
Touch and hold Cycle Signal for about 3 seconds. The display will count down.
You will see “3,” then “2,” then “1.” The display will start displaying the sound
levels. You will see “1,” then “2,” then “3,” then “Off.” When the Cycle Signal is
released, the last value shown will be the current selection.
Control Lock
Touch and hold for 3 seconds to lock the controls to
avoid unwanted changes or operation. Touch and hold
3 seconds again to unlock. For each second Control
Lock is held down, the display will count down 1
second; you will see “3,” then “2,” then “1.” You may still
touch Start to pause the cycle or touch Power to turn off
the washer.
WiFi Connect
Download the Maytag
™ app and follow the instructions to connect your washer/
dryer to your home WiFi network. You may also visit www.maytag.com/connect.
In Canada, visit www.maytag.ca.
Extra Power
The Extra Power option boosts stain-fighting performance on any wash cycle
with a dual temperature wash, combining cold and hot temperature during
different phases of the wash time. To use this function, press the knob to
activate the Extra Power option. For single-load dispensers, add an additional 1/
2 of the manufacturer’s recommended amount into the dispenser marked for
Extra Power. For the Optimal dispenser, it will automatically dispense the
detergent at the optimal time.