
Specifications


7
CARE AND CLEANING
REPLACING THE DRUM LIGHT
Control Panel – clean with a soft, damp
cloth. Do not use abrasive substances.
Tumbler – remove any stains such as cray-
on, ink pen or fabric dye (from new items
such as towels or jeans) with an all-purpose
cleaner. Then tumble old towels or rags to
remove any excess stain or cleaning sub-
Dryer Exhaust System – should be
inspected and cleaned once a year to main-
tain optimum performance. The outside
exhaust hood should be cleaned more fre-
quently to ensure proper operation. (Refer
to the Installation Instructions for more infor-
mation.)
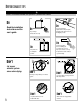
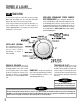
Instructions for replacing the bulb:
1) Unplug or disconnect the dryer from the
power supply.
2) Lift top of dryer by inserting a putty knife
under top, 4˝ in from each side.
3) Rotate bulb holder to vertical position
before removing bulb.
4) Push bulb down and rotate counter-
clockwise to remove.
5) Replace with a 25 watt, 115/125 volt
twist lock utility light Part No. 53-0570 or
equivalent. Place bulb in socket, push
down and rotate clockwise.
6) Rotate bulb holder to horizontal position.
7) Place top of dryer back in original posi-
tion. Make sure metal tabs hold top in
place.
8) Reconnect dryer to power supply.
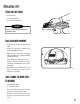
DRYER RACK
For boots, sneakers, fragile sweaters,
afghans, nylon stockings – any items that
might be damaged by tumbling – use the
removable drying rack.
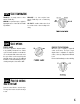
To use the rack:
1) Position L-shaped legs against round
inset at back of dryer.
2) Rest the two front legs on either side of
the lint screen.
3) Check to see that the rack is securely in
position.
4) Place items to be dried on top of the
rack. Allow space for air to circulate.
Items should not hang over the edge,
between the supports, or touch any
other part of dryer. NOTE: The rack does
not move, but the drum rotates around
the rack.
5) Close dryer door.
6) Use TIMED DRY CYCLE. Select tem-
perature regular, medium, delicate or air
fluff, depending on the item.
7) Some items may need to be rotated from
front to back or refolded to dry inner lay-
ers – check periodically.
8) To remove rack, simply grasp sides with
hands and lift out.
stance. Once these steps are done, stains
may still be visible, but should not transfer to
subsequent loads.
Cabinet – wipe off any marks with soap and
water.
Do not place hands in dryer while
drum is rotating.
NOTE