
Instruction Sheet

INSTRUCTION SHEET FOR BUILT-IN REFRIGERATOR
HANDLE ACCESSORY
BEFORE YOU BEGIN: The handle and handle mounting hardware must be installed before installing the custom panel. A qualified
cabinetmaker must perform the installation.
IMPORTANT:
■ This kit is designed to be used only with wood panels.
■ To avoid damage, lift the door and drawer panel(s) by the
edges.
TOOLS NEEDED:
Gather the required tools and parts before starting installation.
Read and follow the instructions provided with any tools listed
here.
PARTS SUPPLIED:
*Numbers may vary depending on refrigerator model and handle
type.
Install the Refrigerator Handle(s)
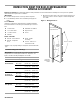
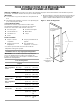
IMPORTANT: For model specific hole location and the spacing
requirements for mounting the handles onto the panels, see
Figure 1 and the following Refrigerator Door table.
1. Measure from the bottom of the custom panel and mark your
first hole location as shown in Figure 1 and the Refrigerator
Door table.
Figure 1 - Refrigerator Door
W10248266A
■ Cordless drill
■ ⁵⁄₁₆" Socket driver
■ ³⁄₃₂" Allen wrench
■ Drill bits
■ Flat-blade screwdriver
■ Tape measure
■ Pencil
■ Handle - freezer drawer
■ Handle - refrigerator
door*
■ Studs - handle
mounting*
■ Screws - #10-24 x 1"
hex washer head*
Refrigerator Door
Handle Type A B
Bottom Mount
Classic
Euro-Style
11 ³⁄₁₆"
(28.42 cm)
30"
(76.20 cm)
Euro-Style 10 ³⁄₄"
(27.31 cm)
30 ³⁄₄"
(78.11 cm)
Pro 10 ³⁄₄"
(27.31 cm)
30 ³⁄₄"
(78.11 cm)
French Door
Bottom Mount
Classic
Euro-Style
11 ³⁄₁₆"
(28.42 cm)
30"
(76.20 cm)
Euro-Style 10 ³⁄₄"
(27.31 cm)
30 ³⁄₄"
(78.11 cm)
Pro 10 ³⁄₄"
(27.31 cm)
30 ³⁄₄"
(78.11 cm)
Side by Side
Classic
Euro-Style
See Figure 2
Side by Side Euro
Euro-Style 19 ³¹⁄₃₂"
(50.72 cm)
43 ¹⁄₈"
(109.54 cm)
Pro 19 ³¹⁄₃₂"
(50.72 cm)
43 ¹⁄₈"
(109.54 cm)
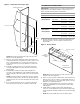
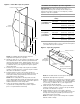
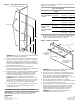
Handle
Mounting
Studs
Refrigerator
Compartment
Handle
Custom Refrigerator
Compartment Panel
Setscrews
#10-24 x 1" Screws
A
B