
Specifications


K36
AUTOMATIC TRANSAXLE
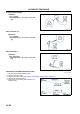
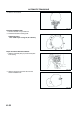
2. Install the control valve body component.
Tightening torque
7.810.8 N·m
{80110 kgf·cm, 7095 in·lbf}
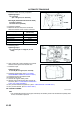
Bolt length (measured from below the head)
B: 40 mm {1.575 in}
No mark: 70 mm {2.756 in}
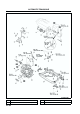
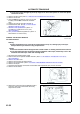
3. Install the oil strainer.
4. Match the harness colors, then connect the
solenoid connector and TFT sensor connector.
5. Install the ground.
Tightening torque
7.810.8 N·m {80110 kgf·cm, 7095
in·lbf}
6. Apply a light coat of silicon sealant to the contact
surfaces of the oil pan and transaxle case.
7. Install the oil pan.
Tightening torque
68 N·m {6281 kgf·cm, 5370 in·lbf}
8. Install the crossmember. (See R23 FRONT
CROSSMEMBER REMOVAL/INSTALLATION.)
9. Install the front tires and splash shield.
10. Install the under cover.
11. Connect the negative battery cable.
12. Add ATF and with the engine idling, inspect the
ATF level. (See K13 AUTOMATIC TRANSAXLE
FLUID (ATF) REPLACEMENT.)
13. Carry out the mechanical system test. (See K6 MECHANICAL SYSTEM TEST.)
14. Carry out the road test. (See K9 ROAD TEST.)
End Of Sie
OIL COOLER FLUSHING
A6E561419900W01
Note
• The contaminated cooler line (oil pipes and hoses) and auxiliary cooler must be flushed completely when
ATX is overhauled or replaced.
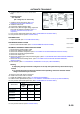
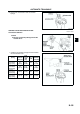
Spring
Color of connector
(harness side)
Pressure control solenoid Black
Shift solenoid A White
Shift solenoid B Blue
Shift solenoid C Green
Shift solenoid D white
Shift solenoid E Black
A6E5614W062
A6E5614W063
A6E5614W064