2015 M{zd{ cx-5 SMART START GUIDE 1610469_15b_Mazda_CX-5_SSG_021714.
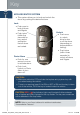
Key KEYLESS ENTRY SYSTEM • T his system allows you to lock and unlock the doors by pushing the desired buttons. Lock • Push once to lock all doors and liftgate. • Push twice (within five seconds) for horn sound verification that all doors are locked. Panic Alarm • Push for one second or more to activate alarm. Unlock • Push once to unlock driver’s door or all the doors (depending on personalization setting). • Push twice (within three seconds) to unlock all doors and liftgate.
www.MazdaUSA.com Door Request Switch ADVANCED KEYLESS ENTRY SYSTEM • T his system allows you to lock and unlock the doors without taking the key out. While Carrying the Advanced Key… Advanced Key Lock Unlock Panic Alarm Electric Liftgate Opener Liftgate Request Switch • U nlock the driver’s door by pushing the driver’s door request switch once.
Key ACCELERATED WARM-UP SYSTEM (AWS) Vehicle Starting: Your vehicle is equipped with SKYACTIV combustion technology. This technology includes AWS (Accelerated Warm-up System) for optimal emission performance during cold starting conditions. Cold Start (e.g., First start of the day on cold mornings): Depress the brake (Automatic Trans.) or clutch (Manual Trans.), when the push the START/STOP button.
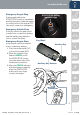
www.MazdaUSA.com Emergency Engine Stop Pushing and holding the START/STOP button or repeatedly pushing the button while the engine is running will turn the engine OFF. Use only in case of an emergency. START/STOP Button Indicator Light Emergency Vehicle Entry If the key cannot be used due to a malfunction or dead key battery, use the auxiliary key (below) to lock or unlock the doors.
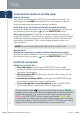
Seats ELECTRONICALLY OPERATED DRIVER SEAT CONTROLS (if equipped) Lumbar Support Adjustment Recline Switch To increase firmness, push and hold the front part of the switch. Release at desired firmness. to adjust seatback angle. Push forward or backward To decrease firmness, push and hold the rear part of the switch. Slide/Tilt Switch Seat can be moved back and forth, raised, lowered, or tilted with this control. NOTE: 8-way power seat shown above. 6-way power seat also available.
www.MazdaUSA.com FRONT SEAT WARMER The driver and front passenger seats can be warmed by pushing the applicable seat warmer button while the ignition is ON. Seat temperature increases with the number of illuminated indicator lights (0-OFF, 1-Low, 2-Mid, 3-High). Low High FOLDING SECOND-ROW SEATS 1 Support the seatback with your hand. 2 Push the rear seatback knob down (red indicator is visible when seat is in the unlocked position). 3 Bring the seatback forward.
Seats Folding Rear Seatbacks Down NOTE: 4:2:4 type rear seats shown. Using remote handle: 1 Check that rear seats are clear of objects. 2 Open the liftgate and pull the left and right side remote handle levers. OR Folding Only Center Seat Down Using remote handle: 1 Store center seat head restraint. 2 Check that rear seats are clear. 3 Open the liftgate and pull only the smaller of the left side remote handle levers.
Feature Highlights PERSONALIZATION FEATURES Customize the following vehicle functions using the audio SETUP button: • Door Locks • Lighting Control • Wiper Control OUTSIDE TEMPERATURE DISPLAY UNIT CHANGE The outside temperature unit can be switched between Celsius and Fahrenheit using the following procedure: 1 With the ignition switched OFF, push and hold the INFO button on the steering wheel. Continue holding the INFO button for 5 seconds or longer while switching the ignition ON.
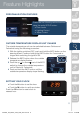
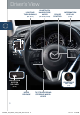
Driver’s View LIGHTING/ TURN SIGNALS (PP. 13-14) AFS (P. 19) BLUETOOTH HANDS-FREE/ AUDIO (PP. 29-30, 35-36) CRUISE CONTROL INFORMATION DISPLAY (P. 24) TPMS SET (P. 20) TCS OFF BSM (P. 22) NAVIGATION SYSTEM SD CARD START/STOP BUTTON (P. 4) (P. 33) HOOD RELEASE TILT/TELESCOPING STEERING WHEEL LEVER 9 1610469_15b_Mazda_CX-5_SSG_021714.
www.MazdaUSA.com WIPER/ WASHER (P. 14) HAZARD WARNING CLOCK (P. 8) NAVIGATION/AUDIO (WITH 5.8” LCD) (PP. 29-34) AUDIO (WITHOUT 5.8” LCD) (PP. 27-28) CLIMATE CONTROL SEAT WARMERS (PP. 25-26) (P. 6) ACCESSORY SOCKET PASSENGER AIRBAG OFF INDICATOR1 1 This indicator light illuminates to remind you that the front passenger’s front/side airbags and seat belt pretensioner will not deploy during a collision. The reason for this is that the weight in the seat is less than approximately 66 lbs.
Instrument Cluster There are two different types of instrument clusters (Type A & Type B). Type B is shown here. Type A is similar, but with different warning & indicator light locations. Refer to Owners Manual for instrument cluster Type A. TACHOMETER SHIFT POSITION INDICATOR LIGHT SPEEDOMETER GLOSSARY OF WARNING AND INDICATOR LIGHTS NOTE: See Owner’s Manual for more details and explanations.
www.MazdaUSA.com See page 8 or the Owner’s Manual for further information. ODOMETER/ FUEL INFORMATION AMBIENT TRIP METER GAUGE DISPLAY TEMPERATURE Brake Warning Light Parking brake on/low brake fluid/malfunction AFS Adaptive Front Lighting OFF System (AFS) OFF (p. 19) Charging System Malfunction ENGINE COOLANT TEMP LIGHTS Since this vehicle does not use an engine coolant temperature gauge, red and blue engine coolant temperature lights are used to indicate high and low coolant temperature.
Lights LIGHTING CONTROL/TURN SIGNAL LEVER :T urns tail, parking, and dashboard lights on. AUTO: The light sensor automatically determines when to turn the headlights on or off. : Turns fog lights on only when headlights are on. Push for High Beams Pull to Flash High Beams : Turns tail, parking, dashboard, and headlights on. Smart Turn: To signal a lane change, push the turn signal lever up or down halfway and release. The turn signal indicator will flash three times.
Wipers WINDSHIELD/REAR WINDOW WIPER/WASHER CONTROL LEVER AUTO: The rain sensor senses the amount of rainfall and turns the wipers on or off. Rotate inner ring away from you (clockwise) for more sensitivity (requires less rain to turn wipers on) and toward you (counterclockwise) for less sensitivity (requires more rain to turn wipers on).
Transmission MANUAL SHIFT MODE The Manual Shift Mode gives you the feel of driving a manual transmission by allowing you to manually shift to control engine rpm and torque when more control is desired. To Use Manual Shift Mode: • Shift the lever from D to M. To Shift Up To A Higher Gear: • Tap the shift lever back (+) once. To Shift Down To A Lower Gear: • Tap the shift lever forward (-) once. NOTE: Changing to manual mode can be done while driving the vehicle.
www.MazdaUSA.com ACTIVE ADAPTIVE SHIFT (AAS) CONTROL AAS will automatically adjust how and when the transmission shifts gears based on road conditions and your driving style. The transmission may stay in a lower gear longer than usual when going up or down hills or driving around corners. This feature gives you better control and a more connected driving experience. 6-SPEED MANUAL TRANSMISSION • Push the clutch pedal completely down to start the engine and to shift gears.
Fuel FUEL DOOR RELEASE (located on floor in front of driver’s seat) To open, pull the fuel door release. Fuel Regular Unleaded Fuel – 87 Octane Fuel Tank Capacity • 2WD – 14.8 gallons • AWD – 15.3 gallons FUEL DOOR To avoid scratching the paint during refueling, secure the fuel filler cap as shown. 17 1610469_15b_Mazda_CX-5_SSG_021714.
www.MazdaUSA.com FUEL ECONOMY To achieve the best fuel economy: • D rive sensibly. Speeding, rapid acceleration and excessive braking will lower fuel economy. • Observe the speed limit. Fuel economy can decrease rapidly at speeds above 60 mph. • Keep tires properly inflated. Under-inflated tires will lower fuel economy. • Use the recommended grade of oil specified in the owner’s manual and keep the engine properly maintained.
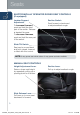
Headlights (cont’d from pg.13) ADAPTIVE FRONT-LIGHTING SYSTEM (AFS) (if equipped) The adaptive front-lighting system (AFS) automatically turns the headlight beam to the right or left in conjunction with the direction of the steering wheel. The AFS improves the direction of headlight illumination while cornering, and only works when the vehicle is moving.
Tires TIRE PRESSURE MONITORING SYSTEM (TPMS) Your vehicle is equipped with a Tire Pressure Monitoring System (TPMS) that detects low tire pressure in one or more tires. In the following cases, the TPMS must be “initialized” so the system can operate normally. • The tire pressure is adjusted (up or down) in one or more tires. • A tire rotation is performed. • A ny tire or wheel is replaced. • T he vehicle’s battery is disconnected, replaced or completely dead.
Mirrors AUTO-DIMMING MIRROR AND HOMELINK® HomeLink Auto-Dimming Indicator Light On Rear Auto-Dimming Light On Sensor Auto-Dimming Off Off Auto-Dimming Mirror • Auto-dimming will automatically darken your rearview mirror to reduce headlight glare from vehicles behind you. • Auto-dimming is activated every time the engine is started. NOTE: In addition to the auto-dimming mirror’s rear light sensor, there is also a front light sensor (not shown).
Blind Spot Monitoring BLIND SPOT MONITORING (BSM) SYSTEM The Blind Spot Monitoring (BSM) system is designed to assist the driver by monitoring the blind spots to the rear of the vehicle on both sides. • If your vehicle speed is 20 mph (32 km/h) or more, the BSM will warn you of vehicles in the detection area by illuminating the BSM warning lights located on the left and right door mirrors.
Smart City Brake Support SMART CITY BRAKE SUPPORT (SCBS) SYSTEM (if equipped) The Smart City Brake Support (SCBS) system is designed to reduce damage in the event of a collision by operating the brake control (SCBS) when the system’s laser sensor detects a vehicle ahead: • When your vehicle speed is 2 to 18 mph (4 to 30 km/h). • T he system determines that a collision with a vehicle ahead is unavoidable.
Information Display INFO (Type B Instrument Cluster) Refer to Owners Manual for Type A instrument cluster. Push INFO button on steering wheel to display the following (actual displayed information will vary on your vehicle): Average MPH INFO Button Current MPG Average MPG Remaining Miles NOTE: To clear Average MPH or Average MPG, push and hold INFO button when selected screen is displayed. 1610469_15b_Mazda_CX-5_SSG_021714.
Manual Climate Control Temperature Control Dial Rotate the dial for temperature control. NOTE: When set to MAX A/C with dashboard vents or dashboard and floor vents, the A/C will turn on, and recirculated air will be selected for maximum cooling. Fan Control Dial Mode Selector Dial Rotate the dial to set desired fan speed (1-4). Rotate the dial to select airflow mode. Push to recirculate cabin air to reduce outside odors and improve cooling. Dashboard vents Push for fresh air circulation.
Automatic Climate Control Driver Temperature Control Dial AUTO ON: Push dial to turn Automatic Air Conditioning system on (indicator light on). Rotate dial to select your desired set temperature (shown above). The airflow mode and the amount of airflow will be automatically controlled in accordance with the set temperature. NOTE: Automatic climate control will allow you to maintain individual preset cabin temperatures for the driver and passenger when DUAL mode is selected.
Audio Controls (without 5.8” LCD screen) AUDIO CONTROLS CD Slot POWER ON Push the Volume/Power dial to turn the audio system on. MEDIA SELECTION FM/AM: Push FM/AM button to select the FM1, FM2, or AM band. The selected band will be indicated in the display. CD: Push CD button to select the CD player when inserting a CD. USB/iPod: Push USB/AUX button to select the USB or iPod player when connecting USB or iPod. AUX: Push USB/AUX button to switch to AUX jack input.
www.MazdaUSA.com Eject CD FOLDER SEARCH (during MP3/WMA/AAC CD or USB playback) • To change to the previous folder, push the folder down button , or push the folder up button to advance to the next folder. TEXT: For files with a file name and other information that have been input. The display switches between display of the file name and other information each time the text button (TEXT) is pushed during playback. LOADING A CD • Insert the CD into the slot, label-side up.
Audio Controls (with 5.8” LCD screen) Eject CD PLAYING BLUETOOTH ® (BT) AUDIO 1 Make sure BT audio device is paired to your vehicle. 2 Turn on BT audio device. 3 Touch the Bluetooth® on-screen tab. 4 Select the BT-Audio option. GRACENOTE The Gracenote media database is used to improve voice recognition of artist and album names with the Mazda Hands Free system. To make best use of the voice recognition, install the most recent database. 1 Load the Gracenote update on a memory stick from www.MazdaUSA.
www.MazdaUSA.com INSERTING THE CD Insert CD, label-side up. BLUETOOTH ® AUDIO Bluetooth® enabled phones and audio players provide an opportunity to play music through the audio system with no wires attached. Some phone models do not support all features. Go to www.MazdaUSA.com/bluetooth or contact (800) 430-0153 for further assistance or to report a phone/MP3 device concern.
Audio PORTABLE AUDIO PLAYER INTEGRATION USING THE AUX JACK Your vehicle is equipped with an AUX or auxiliary jack that will allow you to play your portable audio player through the vehicle’s audio system. Learn the system when parked and do not let it distract you while driving. AUX Jack NOTE: You will need an audio cable with an 1/8 inch (3.5 mm) mini stereo plug (available as a Genuine Mazda accessory) to connect your portable audio player into the AUX jack.
www.MazdaUSA.com PORTABLE AUDIO PLAYER INTEGRATION USING THE USB PORT Your vehicle is equipped with a USB port that will allow you to play your USB device or portable audio player through the vehicle’s audio system. Learn the system when parked and do not let it distract you while driving. USB Port Refer to the Owner’s Manual for additional information. 1 Locate the USB port inside the center console. 2 Connect the device plug into the portable audio player and into the USB port.
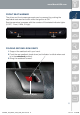
Navigation System TO REMOVE OR INSERT THE MAP SD CARD: SD Card 1 Turn the vehicle ignition OFF. 2 Locate the sliding door on the lower left side of the dash and slide it open (right). • Remove card: Push the card once, then pull it out. • Insert card: Push the card in (label-side up), then slide door closed (left). NOTE: • Visit www.mazdausa.com/navigation within 60 days of vehicle delivery and download the most recent map available for your device for free.
www.MazdaUSA.com NOTE: You can change the country or state setting by touching the flag before you select a city. 5 Enter the town or city name. 6 Enter the street name. 7 Enter the house number, then touch Done. 8 T he location is shown on the map. Touch Select to continue or Back to enter another address. 9 When the new route is shown, touch Done. For more information about the route, touch Details.
Bluetooth ® PAIRING YOUR BLUETOOTH® PHONE OR AUDIO DEVICE NOTE: • For safety reasons, you cannot pair a phone while driving. • Before pairing your cell phone or audio device, you must manually turn on the Bluetooth® function on the device. Refer to your device's Bluetooth® for steps to turn on Bluetooth®. • For customer service and device compatibility: Toll-free call: 800-430-0153 Website: www.MazdaUSA.
www.MazdaUSA.com NOTE: For connection issues, please confirm the Bluetooth connection status by pushing the PHONE button and looking in the top left corner for the Bluetooth icon and your phone’s name. Some phones will turn off the Bluetooth signal after connecting the USB cable to the vehicle or after downloading an update • If not displayed, check your phone and make sure Bluetooth is turned on (or discoverable) in the Settings menu. Detailed instructions for some phones are available online.
Accessories PERSONALIZE YOUR MAZDA CX-5 WITH GENUINE MAZDA ACCESSORIES Go to www.MyMazda.com, then select "Accessories" below the MyMazda Home header for a complete listing of available accessories for your Mazda CX-5. Genuine Mazda Accessory Wheel Locks are available at your Authorized Mazda Dealer CUP HOLDER When using the cup holder to hold a small sized cup (height about 100 mm (4 in)), the cup can be taken out of the cup holder easily by using the supplied spacer.
www.MazdaUSA.com www.MyMazda.com—The Official Site for M{zd{ Owners Register today on www.MyMazda.com—the ultimate destination for Mazda Owners.
Customer Delivery Checklist VEHICLE PRESENTATION: Refer to the Smart Start Guide during presentation Rear View Monitor*....................... 21 Keyless Entry............................... 1-2 • Advanced Keyless Entry* • Door/Liftgate Request Switch* • Liftgate Opener Switch Starting the Engine.................... 3-4 • Start/Stop Button • Accelerated Warm-Up System (AWS) • Emergency Vehicle Entry/ Engine Start/Stop Seats.............................................
Customer Delivery Checklist DEALERSHIP DATE SALES CONSULTANT CUSTOMER’S NAME VIN E-MAIL PRESENTATION OF OWNER’S MATERIALS: Review the following items with the customer Smart Start Guide • Remove this checklist from Smart Start Guide • Personalization Features (refer to your Owner’s Manual) Maintenance Passport Floor Mats • Ensure floor mats are properly hooked after cleaning •D o not install two floor mats, one on top of the other, on the driver side Warranty Information
GENUINE MAZDA SERVICE Because you and your Mazda deserve the best Your new Mazda deserves nothing less than the very best. To keep it running like new for years to come, trust the experts at your local Authorized Mazda Dealer. Simply bring your vehicle in for your scheduled maintenance and any needed repairs.