-9 X CE ID { GU D T Z AR { T S m RT 9 A M 0 S 20 Optional equipment shown. 162131_09a_CX-9_SSG_081208.
Key ADVANCED KEYLESS ENTRY system Advanced Key Lock Unlock Panic Alarm • Advanced Keyless Entry allows you to lock/unlock the doors and liftgate of the vehicle, and even start the engine without ever taking the key out of your pocket. While carrying the Advanced Key you can… • U nlock the vehicle by pressing the driver’s door request switch.
Starting the engine with the Advanced Key While carrying the Advanced Key you can... • S tart the engine by pushing the Start knob all the way in. When the key indicator light illuminates green, turn the Start knob from the ACC position to the START position and hold until the engine starts. • S hut the engine OFF by turning the Start knob to the ACC position and then pressing in and turning to the Lock position. • T he key indicator light will show green when the advanced key is detected.
Seats Fuel Door Release (Located on floor inside driver’s side door) Pull up to open fuel door. ELECTRONICALLY OPERATED DRIVER SEAT Recline Switch Push forward or backward to adjust seatback angle. Slide/Tilt Switch Push forward or backward to slide the seat bottom. The seat can also be raised, lowered or tilted with this control. Memory Seat Switch Lumbar Switch To increase the seat firmness, press and hold the front part of the switch to the desired position, then release it.
Split Folding Third-row seat To create a flat luggage compartment space, fold the seatbacks forward. 1 Open the liftgate. 2 Lower the headrests. 3 Pull the strap on the rear of the seat while pushing the seat forward to lay flat. To Return to the Original Position Pull the strap to return the seatback to the original position. Third-Row Seat Access Pull the third-row seat access lever on the side of the second-row seatback to fold and slide the seat forward to access third-row seating.
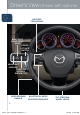
Driver’s View (shown with optional lighting/ Turn signal blind spot monitoring (BSM) Power Liftgate switch headlight leveling traction control system (TSC) hood release handle Bluetooth ® Voice recognition/audio Tilt Steering wheel lever 5 162131_09a_CX-9_SSG_081208.
Navigation System) Wiper/ washer hazard warning NAVIgation/ AUDIO Information display audio system without navigation Cruise control/ Navigation Voice Recognition auxiliary power point climate control 6 162131_09a_CX-9_SSG_081208.
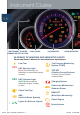
Instrument Cluster Instrument cluster dimmer select button Fuel Gauge tachometer Gear indicator GLOSSARY OF WARNING AND INDICATOR LIGHTS Please see Owner’s Manual for more details and explanations. Tire Pressure Monitoring System (TPMS) Low Fuel key key KEY Warning Light (Red) Advanced key not detected or transmitter battery is dead. TCS OFF KEY Indicator Light TCS OFF (Traction Control System) Traction Control System is deactivated.
Odometer/ Trip meter speedometer Engine coolant temperature gauge Turn Signals/ Hazard Warning Headlight High Beam Automatic Transmission TCS/DSC (Traction Control System/ Dynamic Stability Control) 4WD Odometer/ trip meter selector 4WD Flashing lamp indicates high temperature differential oil, illuminated lamp indicates an abnormality with AWD system; dealer inspection required.
Feature Highlights WINDSHIELD WIPER/WASHER • MIST-Push lever up for a single swipe to clear mist. • A UTO-With the windshield wiper lever in the AUTO position, the rain sensor senses the amount of rainfall and turns the wiper on or off automatically. Rotate the ring away from you (clockwise) for less sensitivity and toward you (counterclockwise) for more sensitivity. • LO-Push down to second position. • HI-Push down to third position.
TURN SIGNAL/LIGHTING CONTROL LEVER • Rotate the outer knob up to the first position for AUTO. • R otate the outer knob up to the second position for tail, parking, and dashboard lights. • Rotate the outer knob up to the third position for tail, parking, dashboard and headlights. • Rotate the inner ring for fog lamps. • Push the lever away from you to turn the high beams on. • Pull the lever back one position to turn the high beams off.
Feature Highlights Indicator Light Light Sensor Auto-Dimming On and Off Auto-Dimming Mirror • Auto-Dimming will automatically darken your rear view mirror to reduce headlight glare from vehicles behind you. • T he Auto-Dimming feature is active when the vehicle is started and cancels when the transmission in placed in Reverse.
Blind Spot Monitoring System (BSM) The Blind Spot Monitoring or BSM system is designed to assist the driver by monitoring the blind spots to the rear of the vehicle on both sides. • If your vehicle speed is 20 mph (32 km/h) or more, the BSM will warn you of vehicles in the detection area by illuminating the BSM warning lights located on the left and right door mirrors.
Automatic Climate Control Information Display Automatic Dual-Zone Climate Control Operation 1 Press AUTO to turn the front air conditioning on. 2 Rotate A/C / MODE dial to the desired cabin air temperature setting (shown in the Information Display above).
Press to manually turn air conditioning ON or OFF while climate control system is on. MODE Press to select the desired airflow mode. OUTSIDE Press to turn climate control system off. OFF Press to display outside temperature. FRONT Press to defrost the windshield. REAR Press to defrost the rear window. Press to turn heated seats ON and OFF. REAR CONTROL Press to allow control from the rear controls. Rotate dial to turn the system ON and to select the desired fan speed.
Audio Controls Without Navigation Audio System ON • Push POWER/VOLUME to turn the radio on. Media selection Press the appropriate button: • FM/AM • SAT (SIRIUSTM Satellite radio) • CD • AUX (to switch to AUX jack input or RSES—Rear Seat Entertainment System) Note: If the FM broadcast signal becomes weak, reception automatically changes from STEREO to MONO for reduced noise, and the “ST” indicator will go out.
setting your clock 1. Turn the ignition switch to the ACC or ON position 2. P ress and hold the CLOCK button until displayed time flashes. 3. P ress and hold the H (hours) button to the correct hour. 4. Press and hold the M (minutes) button to the correct minute. Scan tuning • Press the SCAN button to automatically sample strong stations. • To hold a station, press the scan button again during this interval.
Audio Controls With Navigation Audio System ON • Press the POWER/VOLUME button to turn the radio on.
setting your clock 1. Press the MENU button. 2. Select the Set Clock tab. 3. Choose a 24-hour display or a 12-hour display. 4. Use the + hour and - hour tabs to enter the correct hour. 5. Use the +30 min (minutes) and -30 min to move minutes ahead or back by 30 minutes. 6. Press the OK tab to exit. 7. gps automatically sets the clock, however, it may be necessary to adjust hours in different time zones or daylight saving time. • To set a channel, first press the source button.
Navigation System (inserting disc/selecting destination) Inserting the Map Disc: HAWAII Disc A DISC A ALASKA Disc B DISC B PUERTO RICO Insert map disc into lower DVD slot Your navigation system operates using the map discs supplied. • Disc A covers most of the Midwest and Western states including Hawaii and Alaska. • Disc B covers some of the Midwest and all of the Eastern states including Puerto Rico. • Both discs cover all of Canada.
Selecting a destination using a street address You can choose setting a destination using a street address, a point of interest, the nearest restaurants, ATMs, gas stations, hospitals and more. 1 Press “Menu” button on Navigation Face. 2 Select “Destination Entry”. 3 Select “Address”. 4 Select the “State” or “Province”. • Scroll down past the States to find Canadian Provinces. 5 Press “OK”. 6 Select “City”. 7 Select “Input City Name”.
Bluetooth ® without Navigation System (Refer to your Owner’s Manual for Bluetooth with Navigation operations) Pairing Your Bluetooth® Phone Note: Before pairing your cell phone, it is recommended that you refer to your phone’s manual for steps to turn on Bluetooth® and perform phone pairing. These steps will be required to perform steps 7-8 below. located on the steering wheel. 1 Press 2 From the options and after the beep say, “Set-up”.
MyMazda.com—The Official Site for Mazda Owners Register today on MyMazda.com—the ultimate destination for Mazda Owners.
Customer Delivery Checklist Vehicle presentation: Refer to the Smart Start Guide during presentation Keyless Entry................................ 1-2 • Keyless Transmitter • Advanced Key* • Door Request Switches* • Liftgate Request Switch* • Power Door Locks Starting The Engine....................... 2 • Start Knob Ignition (Advanced Key*) Liftgate.............................................2 • Manual Operation • Power Liftgate (PLG) Operation* Fuel Door.................
Customer Delivery Checklist DEALERSHIP DATE SALES CONSULTANT CUSTOMER’S NAME VIN E-MAIL Presentation of Owner’s Materials: Review the following items with the customer Smart Start Guide • Remove this checklist from Smart Start Guide MyMazda.com W arranty Information • Basic Vehicle – 36 months/36,000 miles • Roadside assistance program Service Department I ntroduce Service Manager; • O ffer to register customer on MyMazda.
Genuine mazda service Because you and your Mazda deserve the best Your new Mazda deserves nothing less than the very best. To keep it running like new for years to come, trust the experts at your local authorized Mazda Dealer. Simply bring your vehicle in for your scheduled maintenance and any needed repairs.* At Mazda Full Circle Service Centers,** our technicians will automatically perform a complimentary Full Circle inspection on your vehicle and issue a detailed report card at every visit.