SMART START GUIDE 1406031_14a_Mazda_CX-9_SSG_071013.
Key Door Request Switch ADVANCED KEYLESS ENTRY SYSTEM • T his system allows you to lock and unlock the doors, open the liftgate and even start the engine without taking the key out of your pocket or purse. While Carrying the Advanced Key • U nlock the driver’s door by pushing the driver’s door request switch once. • U nlock all doors and the liftgate by pushing the driver’s door request switch twice or by pushing the passenger’s door request switch or the liftgate request switch.
www.MazdaUSA.com Starting the engine While Carrying the Advanced Key… • S tart the engine by pushing the start knob in and turning it (like a normal key) while depressing the brake pedal. • S hut the engine OFF by turning the start knob to the ACC position and then pushing in and turning to the OFF position. • T he indicator light will show green when the advanced key is indicator light flashes green, the advanced key detected. If the transmitter battery power is low.
Seats ELECTRONICALLY OPERATED SEAT WITH MEMORY Recline Switch Push forward or backward to adjust seatback angle. Slide/Tilt Switch Seat can be moved back and forth, raised, lowered, or tilted with this control. Lumbar Switch Memory Seat Switch Push forward or backward to increase or decrease lumbar support. To Program the Driver’s Seat Position and Outside Mirror Angle 1 Park the vehicle. 2 Adjust the seat to the desired position using the slide/tilt and recline switches.
www.MazdaUSA.com Second Row SeatBack Recline To recline the seatback, lean forward slightly while folding lever. Then lean back to the desired position and release the lever. Folding the Second-Row Seats 1 2 3 4 Unfasten the lap portion of the center-rear seat belt. Slide seat all the way back toward rear of vehicle. Lower head restraints. Pull the seatback folding lever and fold the seatback forward. Split Folding Third-row seat To create a flat luggage compartment space, fold the seatbacks forward.
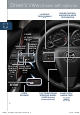
Driver’s View (shown with optional LIGHTING/ TURN SIGNALS (P. 9) Cruise control/ Navigation Voice Recognition Power Liftgate switch (P. 16) Headlight leveling Parking sensor system (P. 9) Traction control system (TCS) (P. 15) Blind spot monitoring (BSM) (P. 13) Navigation System SD Card (P. 23) Hood release Tilt/Telescoping Steering wheel lever (behind steering wheel) Bluetooth ® Hands-Free (PP. 25-26) audio (PP. 19-20) 5 1406031_14a_Mazda_CX-9_SSG_071013.
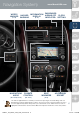
Navigation System) Wiper/ washer (P. 10) Hazard warning Information Passenger airbag off CLOCK display (P. 29) indicator1 SETTING Navigation/ Climate AUDIO control (PP. 19-20, 23-24) 1 www.MazdaUSA.com (PP. 17-18) Seat warmers (P. 18) ACCESSORY SOCKET This indicator light illuminates to remind you that the front passenger’s front/side airbags and seat belt pretensioner will not deploy during a collision. The reason for this is that the weight in the seat is less than approximately 66 lbs.
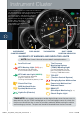
Instrument Cluster The instrument cluster has a dimmer function that can be cancelled to make the illumination brighter during the day when the headlights are on. If the illumination is too dim during the day, press the knob, or if the illumination does not dim when turning on the headlights at night, press the knob. When dimmed, rotate the knob to adjust the brightness of the illumination.
www.MazdaUSA.com Odometer/ Trip meter Speedometer Engine coolant temperature gauge B rake Warning Light Parking brake on/low brake fluid/malfunction urn Signals/Hazard T Warning Indicator Lights utomatic Transmission A Malfunction S hift Position Indicator Light Trip meter selector2 Low Engine Oil Pressure S ecurity Indicator Light Door/Liftgate Ajar 4WD 4WD On: System is not normal; dealer inspection required. Flashing: Differential oil temperature is high; dealer inspection required.
Lights LIGHTING CONTROL/TURN SIGNAL LEVER :T urns tail, parking, and dashboard lights on. AUTO: The light sensor automatically determines when to turn the headlights on or off. : Turns fog lights on only when headlights are on. Push for High Beams Pull to Flash High Beams : Turns tail, parking, dashboard, and headlights on.
Wipers www.MazdaUSA.com WINDSHIELD/REAR WINDOW WIPER/WASHER CONTROL LEVER AUTO: The rain sensor senses the amount of rainfall and turns the wipers on or off. Rotate inner ring away from you (clockwise) for less sensitivity (requires more rain to turn wipers on) and toward you (counterclockwise) for more sensitivity (requires less rain to turn wipers on).
Mirrors POWER MIRRORS WITH REVERSE TILT DOWN FUNCTION* When the ignition is switched ON and the selector lever is shifted to the R position, the outside mirrors tilt downward to facilitate the view of the lower area on each side of the vehicle. Power Door Mirror Selector Switch 1 S witch the left/right power door mirror selector switch to the left or right side. 2 S hift the selector lever to the R position while pressing the brake pedal. The outside mirrors tilt downward automatically.
www.MazdaUSA.com Auto-Dimming Mirror and HomeLink® HomeLink Auto-Dimming Indicator Light Rear Light Sensor On Auto-Dimming Auto-Dimming Off On Off Auto-Dimming Mirror • A uto-dimming will automatically darken your rearview mirror to reduce headlight glare from vehicles behind you. • Auto-dimming is activated every time the vehicle is started. NOTE: In addition to the auto-dimming mirror’s rear light sensor, there is also a front light sensor (not shown).
Blind Spot Monitoring BLIND SPOT MONITORING (BSM) SYSTEM (if equipped) The Blind Spot Monitoring (BSM) system is designed to assist the driver by monitoring the blind spots to the rear of the vehicle on both sides. • I f your vehicle speed is 20 mph (32 km/h) or more, the BSM will warn you of vehicles in the detection area by illuminating the BSM warning lights located on the left and right door mirrors.
Rear Cross Traffic Alert REAR cROSS TRAFFIC ALERT (RCTA) (if equipped) The RCTA is designed to alert the driver of oncoming traffic when backing out of a parking spot. RCTA is active when your vehicle is in reverse and your vehicle speed is 0 to 8 mph (13 km/h). When BSM sensors detect an object moving 3 to 18 mph (5 to 30 km/h) (vehicle/motorcycle), RCTA will notify the driver with indicators and sound: • Rear View Monitor and outside mirror flashing indications. • Beep sound (same as BSM).
Rear View Monitor Rear View Monitor Rear View Monitor (if equipped) Placing the gearshift lever into Reverse automatically operates the Rear View Parking Camera and is viewable via the 5.8” LCD screen. NOTE: When using the Rear View Parking Camera, please check your surroundings as objects may be closer than they appear.
Liftgate MANUAL LIFTGATE • T o open, unlock the liftgate, pull up on the handle and raise the liftgate. • T o close, push liftgate down until it securely locks, but do not slam. Power LIFTGATE • T o open or close using the advanced keyless transmitter, unlock the liftgate and push and hold the liftgate button for one second or more. • To open or close from the driver’s seat, unlock the liftgate and push and hold the power liftgate switch on the dashboard (see Driver’s View) for one second or more.
Automatic Climate Control Information Display Driver Temperature Control Dial Auto ON: Push dial to turn Automatic Air Conditioning system on. Rotate dial to select your desired set temperature (shown in information Display above). The airflow mode and amount of airflow will be automatically controlled in accordance with the set temperature. Push to select airflow mode. 17 1406031_14a_Mazda_CX-9_SSG_071013.indd 17 Fan Control Dial • Push OFF to turn climate control system off.
www.MazdaUSA.com Front Seat Warmers The driver and front passenger seats can be warmed by pushing the applicable seat warmer button while the ignition is ON. • Seat temperature increases as the number of indicator lights increases. Two lights equal high, one light equals low. • When the seat warmers are not needed, push button until indicator lights are off. rear climate control Operation from Front Seats 1 Turn the front air conditioning on. on the front control panel (indicator on).
Audio Eject CD PLAYING BLUETOOTH ® (BT) AUDIO 1 M ake sure BT audio device is paired to your vehicle. 2 Turn on BT audio device. 3 Touch the Bluetooth® on-screen tab. 4 Select the BT-Audio option. GRACENOTE The Gracenote media database is used to improve voice recognition of artist and album names with the Mazda Hands Free system. To make best use of the voice recognition, install the most recent database. 1 Load the Gracenote update on a memory stick from www.MazdaUSA.com/USB.
www.MazdaUSA.com LOADING A CD BLUETOOTH ® AUDIO Bluetooth® enabled devices provide an opportunity to play music through the audio system with no wires attached, however, there are some limitations: Some phone models do not support all features. Go to www.MazdaUSA.com/bluetooth or contact (800) 430-0153 for further assistance or to report a phone /MP3 device concern.
Audio PORTABLE AUDIO PLAYER INTEGRATION USING THE USB PORT OR AUX JACK Your vehicle is equipped with a USB port (some models) and auxiliary AUX jack located in the center console. This will allow you to play your iPod, USB device, or portable audio player through the vehicle’s audio system. Learn the system when parked and do not let it distract you while driving.
www.MazdaUSA.com 2 • A udio Controls (without navigation): Push the AUX button on the audio unit to switch to the AUX mode. • Audio Controls (with navigation): Push AUDIO button on audio system, then touch AUX on-screen button. 3 Use the portable audio player controls to play music. USB Port Refer to the Owner’s Manual for additional information. 1 Connect the cable into the portable audio player and the USB port.
Navigation TO REMOVE OR INSERT THE MAP SD CARD: SD Card 1 Turn the vehicle ignition OFF. 2 Locate the sliding door on the lower left side of the dash (see page 5) and slide it open (right). • Remove card: Push the card once, then pull it out. • Insert card: Push the card in (label-side up), then slide door closed (left). NOTE: • Visit www.mazdausa.com/navigation within 60 days of vehicle delivery and download the most recent map available for your device for free.
www.MazdaUSA.com 6 Enter the street name. 7 Enter the house number, then touch Done. 8 T he location is shown on the map. Touch Select to continue or Back to enter another address. 9 When the new route is shown, touch Done. For more information about the route, touch Details. Planning a ROUTE using your voice You can navigate to any of the following places using your voice: • POIs for named brands of, • An address, including home. for example, restaurants, gas • Favorites. stations, car rental and gyms.
Bluetooth ® PAIRING YOUR BLUETOOTH ® PHONE OR AUDIO DEVICE NOTE: • For safety reasons, you cannot pair a phone while driving. • Before pairing your cell phone or audio device, you must manually turn on the Bluetooth® function on the device. Refer to your device's Bluetooth® for steps to turn on Bluetooth®. • For customer service and device compatibility: Toll-free call: 800-430-0153 Website: www.MazdaUSA.
www.MazdaUSA.com NOTE: For connection issues, please confirm the Bluetooth connection status by pushing the PHONE button and looking in the top left corner for the Bluetooth icon and your phone’s name. Some phones will turn off the Bluetooth signal after connecting the USB cable to the vehicle or after downloading an update • If not displayed, check your phone and make sure Bluetooth is turned on (or discoverable) in the Settings menu. Detailed instructions for some phones are available online.
Transmission SPORT A/T MANUAL SHIFT MODE The Sport A/T Manual Shift Mode gives you the feel of driving a manual transmission by allowing you to manually shift to control engine rpm and torque when more control is desired. To Use Manual Shift Mode: • Shift the lever from D to M. To Shift Up To A Higher Gear: • Tap the shift lever back (+) once. To Shift Down To A Lower Gear: • Tap the shift lever forward (-) once. NOTE: Changing to manual mode can be done while driving the vehicle.
Fuel Fuel Door Release Fuel Door Release (located on floor in front of driver’s seat) To open, pull the fuel door release. Fuel Regular Unleaded Fuel – 87 Octane Fuel Door To avoid scratching the paint during refueling, secure the fuel filler cap tether over the hook as shown. Hook BREAK-IN PERIOD No special break-in is necessary, but a few precautions in the first 600 miles should be observed. • Do not race the engine.
Feature Highlights INFORMATION DISPLAY Driver Side Interior Set Temperature Clock Outside Temperature/ Passenger Side Set Temperature Climate Control ALUMINUM WHEEL CARE Your aluminum wheels have a protective coating on them. Only use a mild soap or neutral detergent with a sponge or soft cloth to clean them. CAUTION: Using a wire brush, polishing compound, solvent, or any type of abrasive cleaner may damage the protective coating. PERSONALIZE YOUR MAZDA CX-9 WITH GENUINE MAZDA ACCESSORIES Go to www.
www.MazdaUSA.com www.MyMazda.com—The Official Site for M{zd{ Owners Register today on www.MyMazda.com—the ultimate destination for Mazda Owners.
Customer Delivery Checklist Vehicle presentation: Refer to the Smart Start Guide during presentation Keyless Entry................................1-2 • Keyless Transmitter • Advanced Key* • Door Request Switches* • Liftgate Request Switch* • Power Door Locks Starting The Engine........................ 2 • Start Knob Ignition (Advanced Key*) Seats............................................. 3-4 • Adjustment • Memory Seat Function* Rear Seat Access...........................
Customer Delivery Checklist DEALERSHIP DATE SALES CONSULTANT CUSTOMER’S NAME VIN E-MAIL Presentation of Owner’s Materials: Review the following items with the customer Smart Start Guide www.MyMazda.com • Remove this checklist from Smart Start Guide • Personalization Features (including all Auto Lock/Unlock function settings, refer to your Owner’s Manual) • O ffer to register customer on www.MyMazda.
Genuine mazda service Because you and your Mazda deserve the best Your new Mazda deserves nothing less than the very best. To keep it running like new for years to come, trust the experts at your local Authorized Mazda Dealer. Simply bring your vehicle in for your scheduled maintenance and any needed repairs.