
Quick Tips
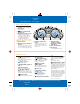


CONVERTIBLE
Always check the Owner’s Manual for more operating information and safety features
Convertible
Convertible
Tip: Hardtop should be stored
in a dry area and covered
with a soft blanket for added
protection.
Tip: Always stop vehicle in a
safe place and park on a level
surface; set parking brake;
lower side windows; remove
items from rear storage area
before operating the top.
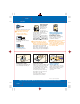
Manual convertible top
To lower: Push unlock button (1)
while pulling top latch (2) rearward,
continue to pull top latch back
completely; pull front of top rearward
to release from windshield header.
If lowering top from inside vehicle,
use either handle (3) to lower.
If lowering top from outside vehicle,
grasp side of top, near windshield
header (4) to lower.
Fold back top and press firmly
on front of top to securely lock
in lowered position.
Raise wind blocker (6) if desired.
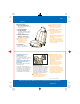
Detachable hardtop*
To remove: Push unlock button (1)
while pulling top latch (2) rearward,
continue to pull top latch back
completely; pull front of top rearward
to release from windshield header.
Remove seat belts from belt
guides; slide seats/fold seatbacks
forward; release side latches (8)
and disconnect rear window
defroster coupler (7); slide top
rearward while pressing down
on rear deck latches (9); lift
hardtop straight off body.
To install: Align rear deck latches
(9) with rear deck studs (10); slide
hard top forward while pressing
down on rear deck latches (9);
securely lock top latch (2) and
side latches (8); reconnect rear
window defroster coupler (7).
For complete details, see
Owner’s Manual.
Tip: Detachable hardtop
removal/installation is easier
with two people.
Tip: If manual soft top is hard
to lower; raise top slightly;
then slowly lower it while
pressing upper part of rear
glass with your hand.
To raise: Lower wind blocker (6);
pull unlock lever (5) to release top
from lowered position.
If raising top from inside vehicle,
grasp either handle (3) to raise.
If raising top from outside vehicle,
grasp side of top near windshield
header (4) to raise.
Push lever on top latch up until
lock button (1) clicks and top
latch is securely locked.
WARNING: If red indicator is
visible on unlock button (1),
top is not securely latched.
*Denotes optional equipment
9
7
8
8
10
10
9
3
3
1
2
4
6
5