
Owner's Manual
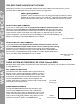


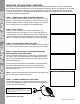
Table Of Contents

3
PRE-INSTALLATION
INSTALLATION TIME
About 1.5 hours are required to complete this installation, not including other system components.
TOOLS AND SUPPLIES NEEDED
● Wire Strippers and Crimpers ● Blue Painter’s Tape and Marker Pen
● Flush Cut Wire Cutters (for trimming zip-ties) ● Small (Jeweler’s) Screwdriver
● Hand-Held Drill and 5/16” Drill Bit ● Bojo Tools (Pry Tools)
● Ratchet ● Socket (preferably deep)
● 10mm Socket ● 1/2” Open Box Wrench
● T25 Torx Driver ● T40 Torx Driver
Depending on which vehicle-specic RZR-Tuned audio system you are installing and what other
components (not included in this kit) that are also being installed, you may or may not need all of the tools
listed below. You may also own more specialized tools to complete the installation. Please share the
pictures of your installation on MB Quart social media channels to help others.
In addition to the tools listed, have music ready for the INITIAL TESTING step. MB Quart recommends:
● USB thumb drive with music pre-loaded
● Bluetooth device such as a smartphone with music or a music app
SAFETY PRECAUTIONS
Safely prepare your machine for the installation before proceeding.
● Turn the ignition off and remove the key
● Use a packing blanket other soft material to protect your machine
● Safety Glasses - always wear eye protection
PREPARATION FOR INSTALLATION
Before dismantling your vehicle, we suggest you prepare all your components, enclosures, hardware and
wiring It increases efciency to have everything ready when each component is installed.
STEP 1 – REMOVE SEATS
Remove driver and passenger seats by pulling on the
lock clip shown in Figure 1-1 This lock clip is located
between the bottom and upright portion of the seat.
Removing both seats will give you the room to work in
the kick panel areas, in addition to getting access to the
battery for Step 2.
STEP 2 – REMOVE NEGATIVE BATTERY CABLE
Using a 10mm socket and ratchet, remove the negative
battery terminal and set aside as shown in Figure 1-2.
This safety measure ensures you do not have any
accessories powered during the installation, as well as
keeps the battery from unnecessarily draining.
Figure 1-1
Figure 1-2