
Owner's Manual

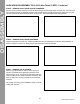
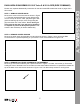

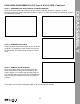
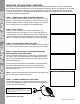
Table Of Contents

5
DISASSEMBLY
DASH AREA DISASSEMBLY 2013-2018 (Non-Turbo S) RZR
Please note, separate disassembly instructions for the 2018.5 Turbo S and 2019+ RZR models are found on
pages 7-9 in this manual.
STEP 1 – REMOVE CENTER HOOD
Start with removing the hood as shown in Figure 5-1.
Twist the tabs at the upper left and right corners. Pull up
to remove. This is where you will access the bus bar
if you will also be installing an amplier to power the
kick panel speakers. Conrm that your machine has
the bus bar harness installed. If your bus bar harness
has not been installed, you can purchase from your
dealer or Polaris online. The part numbers are 2881551
or 2881646 depending on which specic RZR model you
own.
STEP 2 - REMOVE TOP OF DASH
Remove (2) T40 screws as shown in Figure 5-2. Slide dash forward to access back of dash and unplug
gauges and switches one at a time. Set dash aside in a safe location. This will provide wiring access.
STEP 3 – REMOVE THE GRAB BAR
Remove the grab bar as shown in Figure 5-3 by removing the retaining clip and pin and rmly pulling the
grip toward the rear of the vehicle.
STEP 4 - REMOVING DASH POCKET & REAR MOUNT
To remove the DIN dash pocket from the dash, locate the rear support bracket at the rear of the pocket and
remove the T40 Torx head screw as in Figure 5-4. Next, remove the clip shown on the right from the back
and pull out the plastic pocket. Set aside the retaining clip shown in Figure 5-5 for re-use when mounting an
MBQR-RAD-2 source unit or simply reinstalling the pocket.
Figure 5-1
Figure 5-2
Figure 5-3
Figure 5-4
T40 Torx Screw
Set aside OEM dash clip for source unit mounting
later in the installation if you are installing an MB
Quart MBQR-RAD-2 or simply reinstalling the pocket.
Figure 5-5