
Owner's Manual
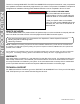
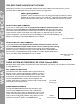

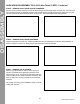
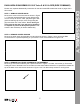

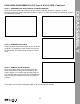
Table Of Contents

8
©2020 Maxxsonics USA, Inc.
DASH AREA DISASSEMBLY 2018.5 Turbo S & 2019+ RZR - Continued
STEP 4 – REMOVE DYNAMIX
®
ECU BRACKET OR POCKET SCREW
If no Ride Command, Dynamix ECU or OEM installed amplier are present, proceed to removing lower
pocket. If you have the Dynamix ECU or OEM installed amplier, remove (4) 10mm bolts holding the bracket
as shown in Figure 7-4a. Move the ECU and/or OEM amplier to the side leaving wire connections intact.
Lower pocket removal is (1) T40 screw on the pocket support bracket as shown in Figure 7-4b.
STEP 5 – REMOVE LOWER POCKET AND PASSENGER SIDE CUBBY
Remove the lower pocket by pulling forward as shown in Figure 7-5a. If you have Ride Command you
will also have to disconnect the USB cable. If you don’t have Ride Command, the pocket area is where
the MBQR-RAD-2 source unit installs if you'll be installing one. Next, remove (2) plastic push clips in the
passenger side cubby as shown in Figure 7-5b. Then remove cubby and set aside.
STEP 6 – REMOVE CENTER SWITCH HARDWARE
Remove (4) T40 screws located above the center
switches as in Figure 7.6a. If you have a Ride
Command, (2) will be on each side of the screen and (2)
behind the screen as in Figure 7.6b.
Figure 7-4a Figure 7-4b
Figure 7-5a Figure 7-5b
Figure 7-6a
Figure 7-6b
DISASSEMBLY
T40 Torx Screw