
Installation Guide

11
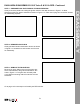
AMPLIFIER SETTINGS
AMPLIFIER WIRING
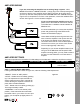
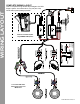
If you are connecting the amplier into an existing Stage 2 system - either
MBQR-STG2-RAD-2 or MBQR-STG2-RC-1, simply plug in the unused power/ground
connector of the the mono amplier into the Stage 2 harness. At the same time, if
you have (or will later install) optional illuminated MB Quart SR1-120RGB LED light
rings for the 8” compression horn front or rear speakers, connect the red/black wires
as well. See Figure 9-1 for the connection diagram.
If you are connecting the amplier on its own -
please refer to the electrical connections outlined
in the NA2-400.1 installation manual available at
MBQuart.com.
It’s recommended that you connect the amplier’s
power and ground wiring at the RZR bus bar
location as described on page 3.
Use at least 10 AWG power and ground wire. Be
sure to fuse the amplier’s main power wire with
a 30 ampere fuse placed close to the point of
connection at the bus bar. Connect the amplier’s
remote turn-on wire to your source unit’s remote
turn-on output (typically a blue wire).
Depending on your chosen amplier location if not
using one of the MB Quart vehicle-specic RZR
amplier mounting plates, you may need to extend
the wire from the subwoofer to connect with the
amplier.
AMPLIFIER SETTINGS
This manual provides the information for initial settings on the NA2-400.1 subwoofer amplier accordingly.
TUNED PACKAGE TWO-CHANNEL AMPLIFIER MONO AMPLIFIER
MBQR-SUB-2 N/A Bass Boost to 0dB
LPF to 100Hz
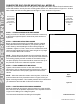
STEP 1 - ADJUST MONO AMPLIFIER
Looking at the NA2-400.1 shown in Figure 9.2, make the following initial adjustments:
● BOOST - Switch to “0dB” position.
● LEVEL - Rotate control to halfway (pointing
up). This represents an input level that will
closely match the source unit’s output at full
volume allowing the amplier to achieve full
power without notable distortion.
● LPF - Rotate control to halfway (pointing up).
This is approximately 100HZ.
● SUBSONIC - Leave in the lowest (15Hz
position). If the subwoofer has trouble with
the lowest notes in your choice of music upon
testing, you can adjust up slightly about 1/4
turn.
Figure 9-2
0dB
Figure 9-1