
Installation Guide


12
©2020 Maxxsonics USA, Inc.
INITIAL TESTING
This step is to conrm that everything is working before you put the vehicle back together.
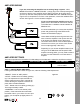
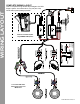
STEP 1 – RECONNECT THE BATTERY
With the power/ground wiring connected to the bus bar,
reconnect the negative terminal of the negative battery
cable as indicated in Figure 10-1.
STEP 2 – TURN ON IGNITION
Turn the ignition key to the ACC position and push the
PWR button on your source unit.
STEP 3 – INITIAL CHECKS
Conrm connectivity of the system you just installed.
● AMPLIFIER
Ensure the amplier’s power connection has the fuse in place.
Ensure the amplier is properly grounded.We recommned the bus bar location.
Ensure the remote turn-on wire is connected to the source unit.
Ensure the amplier’s inputs are connected to the source unit’s output(s) properly.
Ensure the amplier initial settings are completed. Refer to page 11.
● SUBWOOFER
Ensure the subwoofer’s wiring is connected to the amplier.
If you extended the subwoofer’s wiring because of amplier placement, ensure the correct polarity is
observed - positive amplier output to positive subwoofer wire and negative amplier output to negative
subwoofer wire.
If the subwoofer is working and producing sound, proceed to the next section - Fine Tuning.
Figure 10-1
INITIAL TESTING