MX SERIES OEM INTEGRATION ACCESSORIES MX-1 / MX-2 MX-3 / MX-4
MX SERIES OEM INTEGRATION ACCESSORIES INDEX PAGE MX OEM Accessory Overview and Setup............................................................................................................1 Installation............................................................................................................................................................2 MX-1 Feature Descriptions.........................................................................................................................
MX OEM ACCESSORY OVERVIEW Maxxsonics OEM Accessories are the answer for getting more power and better sound from an existing car audio system when it is improbable, impractical and sometimes just impossible to change an aftermarket head unit. The following is a brief description of each MX OEM Accessory. More detailed information is included in each models’ individual section. *MX-1 & MX-2 models feature Maxxsonics’ innovative Audio Signal Sense.
INSTALLATION ASSEMBLE TOOLS AND ACCESSORIES: Wire Cutters/Crimpers/Strippers Drill With Phillips Bit Digital Multi-Meter 1/8” Diameter Heat Shrink Tubing Supplied Screws 18 Gauge Power Wire(Application Appropriate Length) Supplied Allen Wrench 18 Gauge Ground Wire(Application Appropriate Length) Small Flathead Screwdriver 18 Gauge Remote Wire(Application Appropriate Length) Wrench For Battery Post PLAN YOUR SYSTEM LAYOUT: Prior to installing your MX-1, be sure that you have identified a good moun
MX-1 FEATURE DESCRIPTIONS SUBWOOFER INPUT LEVEL: Variable from 40Volts to 4Volts. This control is used to match the output signal level from your headunit. PARAMETRIC BASS EQ: An incredible feature that allows for you to select a specific frequency, select a level of boost, and determine how wide the span of the boost will be. - BOOST: Variable from 0dB to +10dB. At 0, the PARAMETRIC BASS EQ is OFF. - BANDWIDTH: Variable from Narrow(all the way to the Left) to Wide(all the way to the Right).
MX-1 FEATURE DESCRIPTIONS HIGH LEVEL FRONT(F) & REAR(R) INPUT CONTROL: Variable from 40Volts to 4Volts. This control is used to match the output signal level from your headunit to your Front and Rear speakers. SUBWOOFER INPUT MODE SELECTOR: This switch allows for your to select 4 CH MONO to sum the input signal from the Front and Rear channels when a factory subwoofer is not present for signal or HIGH LEVEL when a factory subwoofer output is available for signal.
MAX VOLUME MIN GREEN: PRE-CLIP YELLOW: SOFT CLIP RED: HARD CLIP MXR-1 BASS REMOTE Factory Radio 4V 40V 4V HIGH LEVEL F & R INPUT CONTROL R/F 40V SUBWOOFER INPUT LEVEL BANDWIDTH 30Hz 100Hz FREQUENCY 35Hz 200Hz 200Hz REAR HIGH PASS FILTER 12 dB/OCT 15Hz 15Hz 35Hz 1V 9V SUBWOOFER OUTPUT LEVEL 9V FRONT & REAR STEREO OUTPUT LEVEL 4V GREEN: PRE-CLIP YELLOW: SOFT CLIP RED: HARD CLIP CLIPPING CONTROL SUBSONIC FILTER 24 dB/OCT High Level Speaker Wires FRONT HIGH PASS FILTER 12 dB/OC
REAR FRONT SUBWOOFER Right / Left Subwoofer Speakers BALANCED LINE OUTPUT Power Connections 1.Connect the remote (REM OUT) output of the MX-1 to the remote input on the aftermarket amplifier. 2. Connect the battery (BAT+) terminal to a constant +12 volt source with a 5 amp in-line fuse (not supplied). Note: Do not install the fuse until the entire installation is complete and you are ready to test. 3.
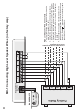
Factory Radio MAX GREEN: PRE-CLIP YELLOW: SOFT CLIP RED: HARD CLIP + + + - MXR-1 REMOTE CONTROL R/F cut + cut - - + R/R - + L/R - cut cut cut cut cut SPEAKER WIRE INPUT L/F cut + SUB cut + RADIO cut - High Level Speaker Wire Connections 1. Cut ( )the factory amplifier speaker wires coming from the amp to the speakers in half. 2. Connect the speaker wires from the amp to the MX-1 as show in the diagram on this page. 3.
GREEN: PRE-CLIP YELLOW: SOFT CLIP RED: HARD CLIP MXR-1 MAX VOLUME Factory Radio R/F L/F MIN - R/R + + - + L/R - Ground BASS REMOTE High Level Speaker Wire Outpus MXR-1 REMOTE CONTROL R/F cut + cut - - + R/R - + L/R - cut cut cut cut SPEAKER WIRE INPUT L/F cut + SUB - RADIO Not Used + + High Level Speaker Wire Connections 1. Cut ( ) the factory radio speaker wires from the radio to the speakers in half. 2.
MX-2 FEATURE DESCRIPTIONS HIGH LEVEL FRONT(F) & REAR(R) INPUT CONTROL: Variable from 40Volts to 4Volts. This control is used to match the output signal level from your headunit to your Front and Rear speakers. FRONT HIGH PASS FILTER: Variable from 15Hz to 200Hz. This filter features a 12dB per Octave roll off. This means that the FRONT HIGH PASS FILTER has a gradual roll-off and allows for smooth cutoff.
Low Level RCA Outputs REMOTE OUTPUT BATTERY + w/5 amp fuse REMOTE INPUT CHASSIS (-) Black Red Orange Blue 4V REAR FRONT Right / Left Right / Left 4V 9V FRONT & REAR STEREO OUTPUT LEVEL 15Hz 200Hz FRONT HIGH PASS FILTER 12 dB/OCT Factory Radio 40V HIGH LEVEL F & R INPUT CONTROL 15Hz 200Hz CONVERTER MX-2 REAR HIGH PASS FILTER 12 dB/OCT + cut + Speakers cut + Green/Black cut + cut + cut + cut + cut Purple/Black Purple Gray + cut High Level Speaker Wires White REMOTE INPUT
REAR Right / Left _ + Speakers + _ + Blue Aftermarket Amplifier FRONT Right / Left FRONT / REAR L OUT IN Red - CHASSIS (-) Power Connections 1.Connect the remote (REM OUT) output of the MX-2 to the remote input on the aftermarket amplifier. 2. Connect the battery (BAT+) terminal to a constant +12 volt source with a 5 amp in-line fuse (not supplied). Note: Do not install the fuse until the entire installation is complete and you are ready to test. 3.
High Level Speaker Wire Outpus White/Black + cut + cut Green/Black + cut + cut - Gray Green White + + cut + cut + Purple R/R + - Gray/Black L/F + cut L/R - Purple/Black R/F + - + cut RADIO SPEAKER WIRE INPUT Connect this end of the speaker wires to the amplifier Black + High Level Speaker Wire Connections 1. Cut ( ) the factory radio speaker wires from the radio to the speakers in half. 2.
MX-3 FEATURE DESCRIPTIONS PARAMETRIC BASS EQ: An incredible feature that allows for you to select a specific frequency, select a level of boost, and determine how wide the span of the boost will be. - BOOST: Variable from 0dB to +10dB. At 0, the PARAMETRIC BASS EQ is OFF. - BANDWIDTH: Variable from Narrow(all the way to the Left) to Wide(all the way to the Right). Narrow will focus on your selected FREQUENCY of BOOST and bleed into less frequencies.
Radio / CD Player MAX +10 dB .2V BOOST 0dB POWER BAT REM BAT IN + SUBWOOFER INPUT LEVEL 9V GREEN: PRE-CLIP YELLOW: SOFT CLIP RED: HARD CLIP BANDWIDTH 30Hz 100Hz FREQUENCY 35Hz 250Hz LOW PASS FILTER 24 dB/OCT 9V INPUT OUTPUT R L R L PRE-AMP INPUT / OUTPUT SUBWOOFER OUTPUT LEVEL 4V 15Hz 35Hz SUBSONIC FILTER 24 dB/OCT MXR-3 REMOTE CONTROL GREEN: PRE-CLIP YELLOW: SOFT CLIP RED: HARD CLIP CLIPPING CONTROL BASS CONTROLLER MX-3 PARAMETRIC BASS EQ Subwoofer Power Connections 1.
MX-4 FEATURE DESCRIPTIONS SUBWOOFER OUTPUT LEVEL: Variable from 4Volts to 9Volts. This control is used to adjust signal output voltage to your amplifier. Use caution when adjusting the signal output to be provided to your amplifier as you can damage your amplifier if you provide more signal than your amplifier is rated to handle. SUBWOOFER INPUT LEVEL: Variable from 40Volts to 4Volts. This control is used to match the output signal level from your headunit.
40V 4V HIGH LEVEL LR & RR INPUT CONTROL MX-4 ADD-A-SUB 9V SUBWOOFER OUTPUT LEVEL 4V Black CHASSIS (-) Orange REMOTE INPUT Yellow BATTERY (+) w/ 5 amp fuse Blue REMOTE OUTPUT High Level Speaker Wires REMOTE INPUT Aftermarket Amplifier Factory Radio R/F L/F R/R L/R Sunwoofer MX-4 Main Diagram + + + High Level Speaker Wire Outpus _ + 16 + Purple/Black + Ground + _ _ Green/Black Green Purple Sub Input Low Level RCA Outputs BAT + REM IN GND R/R + - SPEAKER WIRE INPUT L/R + - L
TROUBLESHOOTING A SYSTEM The key to finding the problem in a troubled sound system is to isolate parts of that system in a logical fashion to track down the fault. Description of the Diagnostic system built into the MX-1 & MX-3: 1. Clipping Indicator: Red Illumination when signal is clipped. 2. Normal Operation: Green Illumination, when signal is unclipped up to 9volts.
Maxxsonics Limited Warranty As the manufacturer of Maxxsonics, MB Quart, Hifonics, Crunch and Autotek car audio products, Maxxsonics USA Inc. Warrants to the original consumer purchaser the amplifier to be free from defects in material and workmanship for one (1) Year from date of purchase. All other parts and accessories of the system are warrantied to be free from defects in material and workmanship for one (1) year from date of purchase.
PART#: S0109