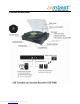
mbeat® USB Turntable and Cassette to Digital Recorder Model: USB-TR08 Read instructions carefully before use and store in a safe place for future reference. Product color and specification are subject to change without prior notice. The manufacturer or distributor reserves the right to amend the instruction manual at anytime to reflect the latest product design changes or limitations Version: 082010 Downloaded from www.Manualslib.
Product introduction Downloaded from www.Manualslib.
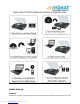
Initial start up Power on Ensure that the mains voltage of your home corresponds to the operating voltage of the unit. Your Downloaded from www.Manualslib.
unit is ready to be connected to a mains voltage of 240V/50Hz. Amplifier connection If you want to connect the device to your own powered speaker set or your mixer or amplifier, there is a set of Aux output (RCA sockets R/L) at rear of the product which allows user to connect the device to external audio speakers or some mixers. z Red plug into R/H channel input. z White plug into L/H channel input. How to use turntable function Play the record using Turntable Function 1. 2. 3. 4. 5. 6. 7. 8. 9.
Play the record through cassette Follow the above instruction figures 1. Plug the power cable to the AC power supply. (240V/50Hz) 2. Insert a pre recorded cassette tape into cassette slot, with the exposed side against the control button (refer above figure 2). By pushing, the cassette will slide into the cassette mechanism and the control knob is up. Turn on the power/volume button; the cassette is starting to play automatically. Please note: one end of the cassette will remain visible and it is normal. 3.
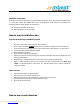
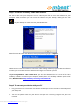
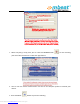
Step 1. Install the “Audacity” audio edit software Put the CD disk into your computer and run “Aduacity.exe” file to install the software on your computer. After installation you can launch the software on your desktop, looking for this icon on your desktop or starter menu on your Windows OS. When first time to launch the software, select your prefer language as “English” Follow the on screen instructions to install this audio editing software program.
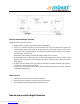
Step 3. How to use Audacity to record your music mbeat® USB turntable and cassette to digital recorder is able to transfer music from turntable or cassette to PC with USB connection by using the powerful audio edit software named “Audacity”. For the detailed software guide please refer to the “Audacity Software Quick Guide” and Audacity official website as well.
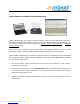
4. Check the Stereo Mix column in the drop down menu and just to keep the default settings, the software shall be able to auto default the device setting as “Stereo Mix” or “Line”, or remain gray inactive color according your computer hardware configuration. Those factors are not such key important and you can set up in “Preference” , under “Edit” menu as well 5.
After enter “Preference” section, choose Audio I/O section: Under Playback drop down menu: Select “Realtek HD Audio output “ , which means it is your sound card audio output to listen the music playback through tape recorder while doing the recording internally. Under recording drop down menu: Select “USB PnP Audio”, which indicated the audio source from the device when it is plugged into the computer. Your system may show the name like “Generic USB Audio device”, or “USB PnP Device”, it does not matter.
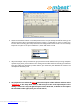
7. When everything is ready, then you can select the RECORD button to start recording your music from turntable or cassette into digital format. 8. You can turn the device’s volume down and turn on the computer speaker to monitor your records. 9.. Select the PAUSE button to pause the recording. Downloaded from www.Manualslib.
10. Select the STOP button to stop the recording. 11. Select the to skip to start. 12. Select the button to go to end. 13. You can see the recorded file on your computer and convert the recorded file to other formats including .WAV/ MP3/Ogg Vorbis.
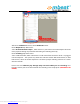
How do I download and install the LAME MP3 encoder? Because of software patents, we cannot distribute MP3 encoding software ourselves. Follow these instructions to use the free LAME encoder to export MP3 files with Audacity. Windows OS Users, follow these steps z Check your CD disk , there should have z can copy into your computer somewhere that you can find to reload it on Audacity If you can not find out this file, you can download and follow below steps to install it. Go to the LAME download page.
14. Play the saved file. Put the saved file in the Audacity program and press the PLAY button to play the file. 15. Download music into the digital MP3 or iPod device Please save those converted music into a folder that you can easily to find, then you can copy or paste those converted MP3/WMA/OGG files into your MP3 /MP4 player, or you can load them into your iTunes then transfer into your iPod.
Installing a new stylus cartridge -Refer to the figures 5 & 6 *NOTE 1. We strongly advise you to clean your records with an anti-static cloth to gain maximum enjoyment from them and to make them last. 2. We would also point out that for the same reason your stylus should be replaced periodically (approximately every 250 hours) 3.
z z z Check your main power board function Check whether you plug the power plug into the power board and power board main switch is on or not Check whether the power button is on or not 2.
7. Can not convert music into MP3 file and Save it z You need to install “LAME MP3 encoder” into your computer first time to make the audacity save the music into MP3 format please refer “How do I download and install the LAME MP3 encoder? 8.
may depend on your computer model and operating system. Please select the proper device name If you are still having difficulty finding the USB recorder, try to check your system settings or control panel to adjust audio input settings from the sound control panel. After you have completed the above settings, you are ready for recording. To record 1. Start the device with the vinyl record or cassette. Click the red record button on the toolbar to begin recording to PC. 2.
Toolbars Selection tool - for selecting the range of audio you want to edit or Listen to. Envelope tool - To change the volume over time. Draw tool - for modifying individual samples. Zoom tool - for zooming in and out. Time shift tool - for sliding tracks left or right. Multi tool-lets you access all of these tools at once depending on the location of the mouse and the keys you are holding down. Audio Control Buttons Skip to Start - moves the cursor to time 0.
Edit Toolbar All of the buttons on this toolbar perform actions – and with a couple of exceptions, they’re all just shortcuts of existing menu items to save you time. Holding the mouse over a tool will show a “tooltip” in case you forget which one is which. Cut Copy Paste Trim away the audio outside the selection Silence the selected audio Undo Redo (repeat last command) Zoom In Zoom Out Fit selection in window – zooms until the selection just fits inside the window.
Name - lets you change the name of the track. Move Track Up – exchange places with the representing the left speaker, and the bottom track representing the right speaker. When tracks are joined into a stereo pair, all edits automatically apply to both the left and right channel. track above this one. Split Stereo Track – if the selected track is a Move Track Down – exchange places with the track below this one.
To add audio files to an existing project window, use one of the Import commands in the Project menu. more than one track, or varying sample rates. See also File Formats. Export Selection As WAV - same as above, Close – closes the current window, asking you if you want to save changes. On Windows and Unix, closing the last window will quit Audacity, unless you modify this behavior in the Interface Preferences.
in the Project Menu. clipboard without removing it from the project. Export Multiple – lets you split your project into multiple files all in one step. You can either split them vertically (one new file per track), or horizontally (using labels in a Label Track) to indicate the breaks between exported files. Paste – Inserts whatever is on the clipboard at the position of the selection or cursor in the project, replacing whatever audio data is currently selected, if any.
Select…>Cursor to End – Selects from the cursor position to the end of the selected tracks. nearest second. So if you click and drag from 4.2 seconds to 9.8 seconds, it will result in a selection from 4 seconds to 10 seconds, exactly. You can change the units that are snapped to using the “Set Selection Format” option in the View Menu. Find Zero Crossings – Modifies the selection slightly so that both the left and right edge of the selection appear on a positive-slope zero crossing.
that the selection fills the window. want. The menu item changes to Dock Edit Toolbar, which you can use to put toolbar back into the main window. Set Selection Format – lets you choose the formatting that is displayed at the bottom of the window indicating the current selection time. Options include film, video, and audio CD frames, seconds + samples, or pure time. If you turn on Snap-To mode in the Edit Menu, the selection will snap to the frames or other quantization you have selected in this menu.
uncompressed format. When you select the file, Audacity will analyze it and try to guess its format. It will guess correctly about 90% of the time, so you can try just pressing “OK” and listening to the result. If it is not correct, however, you can use the options in the dialog to try some other possible encodings. At the beginning of your imported track(s), you may notice a little bit of noise. This is probably the file’s header, which Audacity was not able to parse.
functions above, except that the cursor or selection is moved along with the tracks. That allows you to shift the tracks without losing your relative place. Add Label at Selection – This menu item lets you create a new label at the current selection. You can title the label by typing with the keyboard and then hitting “Enter” when you’re done. Add Label at Playback Position – This menu item lets you create a new label at the current location where you are playing or recording.
in the audio. Change Pitch – changes the pitch/frequency of the selected audio without changing the tempo. When you open the dialog, the starting frequency is set to Audacity’s best guess as to the frequency of the selection. This works well for recordings of singing or musical instruments without background noise. You can specify the pitch change in one of four different ways: musical note, semitones, frequency, or percent change. frequencies.
Nyquist Prompt – for advanced users only. Allow you to express arbitrary transformations using a powerful functional programming language. See the Nyquist section of the Audacity website for more information. Phaser – the name “Phaser” comes from “Phase Shifter”, because it works by combining phase-shifted signals with the original signal. The movement of the phase-shifted signals is controlled using a low Frequency Oscillator (LFO). Repeat – repeats the selection a certain number of times.
Follow us on twitter at http://twitter.com/mbeataustralia Warranty Policy Thank you for purchasing our products. Mbeat Australia warrants all its products against defect in material or workmanship for 12 months, or under specified warranty terms depending on the product from the date of purchase. In the unlikely event that this product proves to be defective, please contact Mbeat Australia's support department for trouble shooting, repair or replacement of your unit.
Downloaded from www.Manualslib.