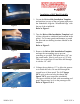
Installation of OCF Roof Light Kit Figure 1 1. Cut out the Driver-Side Installation Template and position it on top of the roof gutter adjacent to the windshield. Align the ‘Windshield Edge’ with the top of the windshield. Refer to Figure 1. 2. Tape the Driver-Side Installation Template back in place (aligned to windshield and centered in the gutter). Use a center punch and hammer to punch the front and rear drilling locations labeled on the template. Refer to Figure 2. Figure 2 Figure 3 3.
5. The headliner has to be temporarily lowered or removed to proceed with the next steps, refer to manufacture instructions for removal. Refer to Figures 11-18. 6. With the headliner out of the way use the Inside Figure 5 Figure 6 Pillar Templates to mark the access holes inside the vehicle on both the sides of the vehicle. Make sure the airbag is not in the way. Temporarily reposition it while marking and drilling. With the templates secured with tape mark the hole locations, two per side.
10.Install the light bar using the hardware provided by the light bar manufacturer. Tighten the Passenger Side Bracket. 11. Wire as per light bar instructions. Cable Ties are provided to secure the wire to the Driver-Side Bracket. 12.Reinstall the headliner. Figure 9 Figure10 Figure 11 Figure 12 Figure 13 Figure 14 Figure 15 Figure 16 Figure 17 Figure 18 Congratulations! You’re finished! We are sure that you will enjoy this Off Camber Fabrications product by MBRP Inc.