
User's Manual


- 9 -
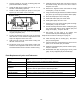
4. Properly support I.D. and O.D. of bearing (#12) and
press exciter shaft into bearing.
5. Check felt filter (#13) to make sure it is ok. If it is
blocked or deteriorating replace it.
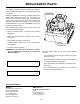
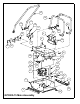
6. Check to make sure spirol pin (#18) is 11/16” (see
Figure 2) up from inside of rear cover (#5).
7. Press bearing (#11) into rear cover and install snap
ring (#8) and gasket (#17).
8. To aid in the assembly of the rear cover you will need
three 5/16-18 x 2-1/2” minimum length bolts that will
help in the alignment of the rear cover.
9. Apply some oil to the I.D. of the exciter housing and
the O.D. of the rear cover.
10. Set the rear cover on top of the exciter housing and
install the three alignment bolts thru the rear cover
and thread them three turns into the exciter housing.
11. Carefully press or tap the rear cover down to seat on
the exciter housing. Be sure to use care in order to
keep the cover even.
12. Remove the alignment bolts and install six flange
screws (#21). Torque to 13 ft-lbs.
13. Using medium strength thread lock install the retainer
(#7), three cap screws (#19) and brass washer (#22).
14. Press oil seal (#10) into front cover (#4).
15. Install seal washer (#6) onto exciter shaft.
16. Install gasket (#16) onto front cover.
17. Intall front cover onto exciter housing with six flange
screws (#20). Torque to 13 ft-lbs.
18. Grease oil seal lip and exciter shaft. Install pulley (#3)
onto exciter shaft with key (#15), washer (#14) and
flange screw (#21). Torque to 13 ft-lbs.
19. Add exciter oil (see page 6 for quantity and
recommended oil) and install pipe plug (#23).
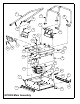
Steps 20 thru 23 reference the figure on page 12.
20. Clean mounting bars on housing (#1). Set exciter
(#3) on mounting bars.
21. Check to make sure exciter sits flat on all four mount
points, if not use shims (#11) as needed.
22. Install four exciter bolts (#18) and lock washers (#31).
Torque to 150 ft-lbs.
23. Reassemble deck (#2), engine (page 18, #4), v-belt
(page 18, #3), beltguard (#5) and handle (#6).
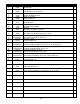
Parts Replacement Cycles and Tolerances
11/16"
SPIROL PIN
REAR COVER
Figure 2
Bearings
Replace anytime a bearing is rough, binding, discolored or removed from housing or
shaft.
Clutch Replace clutch if it does not disengage below 1800 rpm.
Engine Components Refer to your engine manufacturer’s Owner’s Manual.
Hardware
Replace any worn or damaged hardware as needed. Replacement hardware should
be grade 5 and zinc plated unless otherwise specified.
Safety Decals Replace if they become damaged or illegible.
Seals & Gaskets Replace if a leak is detected and at every overhaul or teardown.
V-Belts Replace if cracked, torn, or stretched to the point the belt won’t tension properly.