
user manual


- 7 -
WARNING
Always stop engine or motor and disconnect
spark plug wire or power cord before placing
hands or objects inside drum.
Always reconnect safety grid opener to grid after
cleaning drum.
Lubrication
1. Grease both trunnions and pillow blocks daily. There
are two grease fittings on each end of the drum.
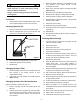
Checking Hydraulic Oil
1. Remove cap from fill neck located above the filter.
2. Insert a metal dip stick (18” long) into fill neck and
push into far corner of tank (see Figure 1).
3. Oil level should be approximately 2” when cold.
4. Add ISO32 Hydraulic Oil if necessary.
5. Reinstall cap.
Changing Hydraulic Filter
1. Remove hydraulic filter which is accessible from the
front opening of the engine shroud, or from
underneath the frame.
2. Apply clean oil to filter gasket, and install new filter
(MBW #08164).
Changing Hydraulic Oil & Suction Strainer
Refer to Hydraulic Components, page 18.
1. Remove cap (#6) from fill neck located above the
filter (#1).
2. Drain hydraulic tank (15 gallons) by removing drain
plug along back edge of frame. Draining can be sped
up by removing suction strainer, but this may be
much messier.
3. Remove hydraulic filter which is accessible from the
front opening of the engine shroud, or from
underneath the frame.
4. Apply clean oil to filter gasket, and install new filter
(MBW #08164).
5. Disconnect 3/4” hose (#26) from fitting (#18).
6. Remove strainer (#10) and fitting (#18) from tank.
7. Clean strainer thoroughly, replace if damaged.
8. Reinstall strainer and fitting into tank. Use hydraulic
loctite to prevent leaks.
9. Reconnect hose to fitting.
10. Install drain plug using pipe sealant.
11. Fill hydraulic tank with 15 gallons of Chevron ISO32
Hydraulic Oil.
12. Reinstall cap.
13. Start engine and allow hydraulic system to charge for
at least 5 minutes.
Greasing Wheel Bearings
1. Jack the rear end of the mixer and support by side
rails so that mixer is stable.
2. Remove the wheel.
3. Remove the dust cover.
4. Remove the cotter pin from the spindle nut.
5. Unscrew the spindle nut.
6. Remove the hub from the spindle, being careful not
to allow the outer bearing cone to fall out. The inner
bearing cone will be retained by the seal.
7. Remove the grease seal.
8. Wash all grease and oil from the bearing cones and
inspect each roller. If any pitting, spalling, or
corrosion is present, then the bearing cup and cone
must be replaced.
9. Pack the entire bearing with grease, apply a light coat
of grease to the bearing cup, and install.
10. Tap a new grease seal into place with a clean block.
11. Slide the hub onto the spindle.
12. While rotating the hub slowly, tighten the spindle nut
to approximately 50 lb-ft.
13. Loosen the spindle nut, but DO NOT rotate the hub.
14. Finger tighten the spindle nut until snug.
15. Back the spindle nut out slightly until the first
castellation lines up with the cotter pin hole and insert
the cotter pin.
16. Bend over the cotter pin legs to secure the nut.
17. Tap the dust cover into the hub.
18. Install wheel and torque lug nuts to 90 lb-ft.
Figure 1